Pages

Tuesday, September 30, 2014

Local Deals: Colonial Thrift Bread Store

I've decided to start highlighting some awesome local deals that I find. I realize that many of you are not local--don't worry--this site will still mainly contain recipes. But sometimes I just find deals in the nooks and crannies of Evansville that are just too good not to tell about.

And speaking of nooks and crannies, let's talk about today's highlight:
Colonial Thrift Bread Store 
5922 Vogel Rd.
Evansville, IN 47715
(This is on Vogel between Green River and Burkhardt.)

Why do I love this store?
1. They have good quality bread for very cheap. (my favorite is the Brownberry--known in other parts of the country as Orowheat; Colonial also carries Sara Lee.) A loaf of Brownberry that will run $2.78 at Walmart is only $1.59 at Colonial. I should note that they also have plain old white bread (if that's your thing) for very very cheap.
2. They run promotional deals or promotional games as well. Right now, they have a roulette wheel. When you spend $10, you get a roll on the roulette wheel. It lands on a number and you get that many more products for FREE. Even if you already bought all the bread you can use or store, you can get a ticket to use the next time. For example, today I let Emma roll and she rolled a 6 (good girl; I've never rolled higher than a 2, but Emma's a high roller). That meant that in addition to the fabulous deals on bread we got today, we can get 6 products (bread, donuts, whatever they have that you want) for free. I had bought all I needed today, so I got a little ticket. Now, next time I go in, I won't have to pay at all to get 6 loaves of bread (or any other products I want).
3. Often if they have too much, they give things away for free. Last time I went there I got two packages of Hawaiian rolls. About a month ago, I got 2 packages of  Hawaiian rolls and 2 packages of donuts (yeah, my kids were loving that--I never buy donuts, but for free--yup I'll take them).
4. They often run other promotions. Today when I went they had pumpkin English muffins for $.75/package and bagels for $.99.

Today, this is what I got. I paid $10.53 for it. Plus, I got my ticket for 6 more free items. That means that each item averaged (or will have averaged) $.65. If you had bought these things at Walmart, you would have spent approximately $25.00 for only 10 things ($2.50/item). Even at Walmart, the 4 loaves of bread alone would have exceeded the cost of the price I paid today for 16 items.

(One bagel rolled out of the shot. I got four loaves of bread, four packages of bagels, and two packages of English muffins for $10.53. All were name brands. Most were whole wheat and healthy.)

Monday, September 29, 2014

What a Cheapskate Gets Paid

Occasionally an article pops up about how much housewives/at-home-mothers are "worth." As in financially, as in--if they weren't around doing stuff in their families for free, how much would you have to fork out to pay someone to do the jobs they do. These articles can be a weird combination of insulting and empowering to a housewife/at-home-mother. Speaking as one, I can say that it's nice to feel that the things I do actually contribute financially to the family. And, yet, to put a price tag on the things we so lovingly do (listening to our children slowly sound out words, following a tween as she runs to her room and hurls herself upon the bed, catching your toddler's throw up in your hands--preferably before it hits the couch)--well, you just can't price that stuff, and to try to is insulting.

Yet I do feel that we cheapskates (whether we work full-time, part-time, or stay at home) are making significant financial contributions. I remember the day when my husband and I were trying to work out the details for a life insurance policy. We were discussing the moneys each of us would need if the other died (yeah, fun stuff). I realized that he (the "breadwinner") would need nearly as much money as I (the bread couponer/baker/saver) would. I realized that my contributions were financially significant--that I was not his dependent at all (as certain hair-raising feminists might have you believe), but a significant co-contributor to our financial life together. It felt good; my tiny inner feminist who has chosen to stay home for reasons bigger than herself kinda cheered.

So fellow cheapskates, this is what you get "paid."

1. Childcare:

Not all cheapskates need childcare, but it's often the first thing people talk about when trying to financially validate motherhood (because again, choosing to stay at home with your kids is all about finances, right?) But anyway, if I died, we would need childcare. Supposing Kip changed to day shift (which would cost him several thousand dollars a year in the first place since right now he earns night-time differential pay), that would be about $400/month. For our three school-aged children to go to after school day care, we'd add another $300/month. So that's $700/month that I "earn" for the family.


2. Food:

Each month we spend about $400 on food for our family of six (that's food only--no toiletries, etc.). I looked up the average amount a family of four spend. The Department of Agriculture estimates it between $600 (thrifty food plan) and $1160 (liberal food plan--meaning food that's a lot nicer) per month. They also give numbers for low-cost and moderate-cost averages if you're interested. SNAP gives (as a maximum allotment) a family of four $632 (and a family of six like us would get a whopping $900/month). Using those numbers as a guide, I save us at least another $200 plus on food a month and we eat pretty healthy and tastily.

How we do it (and please remember that these aren't must-do's; they're what I do):

-I make food at home.
-I do a super cheap (think rice and beans or eggs for dinner) meal once a week, sometimes more.
-We try really really hard not to waste food. About once every month or two I go through my freezers and make a list of the random things in there and try to cook from that.
-I take free food when it's offered, even if I have to freeze or can it.
-My kids are picky. This makes our budget cheaper because often they just want sandwiches or really plain food (not helpful, but just trying to be honest).
-I shop uber cheap stores like Aldi and Ruler Foods. When I don't, I take a quick jaunt through coupons.com and get a few coupons--it doesn't save me tons, but that $5 I save at Walmart always makes me happy.

3. Gas

This is a tough one for our family and we are not super thrifty with our gas. Kip has a 30 minute commute, which adds up. And my kids are getting to the ages where they have some activities sometimes (we're not crazy busy, but driving to soccer and friends' houses adds cost). We spend a good $500/month on gas. Sometimes more. I know--ouch. I don't help with this much, though I always try to combine errands (and I know how much a random trip to Walmart costs--$1.50, so I avoid them). We also use our Discover card, which is right now offering 5% cashback bonus on gas, which is about $25 extra bucks a month while the promotion goes on, so I'm giving myself $25/month for this one. (Kip would never manage more than one credit card in order to maximize rewards, but I have the type of brain that enjoys that so I do).

How we do it:

-Since we're unwilling to move or avoid our friends who are farther than 10 minutes away, my best advice is to consciously combine errands and to use a credit card with good rewards for gas--something that pays between 2% and 5% for gas. It'll give you a little extra Christmas money. (In fact, if you use Discover, you can earn your 5% for gas in months July-September, which you can use on Amazon. And then for October-December, you can get 5% back for all internet purchases for said Christmas presents. Yay!)
-Another thing you might consider is sending your kids to school on the bus. If you take them to school and your school is, say, three miles away (and it's not on your way to somewhere), you're spending about $1 for your round trip. Do that twice a day and you've spent an extra $40 on gas. No pressure all you loving loving moms; it's just something to think about because you could buy yourself a dress with that.

4. Clothes

The mighty internet says that women typically spend between $150 and $400/month on clothes. I'm not sure if these numbers are for working women or at-home women or a combination. Don't worry--I did a very scientific facebook poll of my friends and most of them spend less than this. So, it seems a bit high to me, especially since until about 3 years ago I only bought clothes if mine were deteriorating off my body. Recently, however, I've begun to spend more. I'd say I average about $25 or less for me/Kip and less for all my kids (clothes/shoes/socks/undies--the works). So $50/month as a rather high estimate. (I don't even consider this amount a badge of cheapskate honor in any way--you could probably do much better if you didn't care much about clothese.) According to the mighty internet, that means that I save over $100/month on clothes. That doesn't really seem fair since cute clothes are hardly a necessity (especially for a non-working woman), but I am going to give myself $50/month because I clothe my kids on a shoestring (and if you see them and they look like urchins, it's because they choose the pink basketball shorts and old pink shirt, not because they don't have other clothes).

How to do it:

-I shop consignment shops--they are AWESOME for jeans (for grown-ups especially) and for younger children's clothes. I also consign clothes there, which earns us (on average) about $10/month.
-I try not to buy more than we actually need, especially for my kids who currently could not care less about clothes (yes, it is tempting to buy all those cute things for you or your children and, yes, I sometimes succumb, but usually I try to keep it simple).
-I accept and love hand-me-downs. My kids are too young to care.
-I shop clearance racks pretty much every single time I buy new and use coupons on top of that if I can. Kohl's is very good for this. To be honest, the only time I can ever remember paying full price for an article of clothing was once a couple years ago when I bought a red dress ($50) that I loved with my soul, but even that was from Marshall's.
-Generally, when buying clothes for myself, I use a $1 rule. Will I wear it enough that it will be $1 or less per wear? So if I pay $10 for a shirt, I feel I should wear it at least 10 times. If I don't like it enough to do that, I don't buy it. Of course there's wiggle room--generally jeans are used much much more, though a dress might be worn a bit less than that. Still, if I'm thinking of buying a dress for $40 and I know I'll only wear say, two, times, I wouldn't buy it. Again--no pressure here; it's just a sort of guide that helps me decide if a piece of clothing is worth it to me.

5. Maids/gyms/stuff

-I don't pay anybody to clean my house. Maybe if you come to my house you could guess that. But believe it or not, I do a pretty thorough cleaning every Monday (laundry, toilets, bathtub, cupboards, floors, sometimes dusting--ugh, windows). It takes me about 2 hours. Again, I did a check on the mighty internet and people seem to expect to pay their cleaning ladies between $10 and $15, which seems painfully low, but it is what it is. So I'm giving myself $80/month for that.
-Kip does our lawn (if he didn't I would), which saves us at the very very least $200/month (truthfully, it's probably more like $500 since we have a big lawn that is tricky to mow, but I'm estimating for an average house here).
-We don't have a gym membership. I workout at home 5-6 days a week and Kip runs several times a week. For this we need shoes and some appropriate clothes. Also occasionally I miss the comradery of gyms (I love gyms) and go with friends. Still instead of spending $50/month, I spend about $10. I'm not giving myself any "money saved" for this since obviously going to the gym is not a life necessity, nor is it bad in any way (did I mention I love gyms). But I'm mentioning it because it does help us save money.

CONCLUSION:

So what have I earned for us: 

$1080/month. Tax free! (Kip's earned us another $200-500/month on that yard--thanks, love). Which is a very respectable part-time job. It's more than I could earn if I up and decided to work 20 hours/week at a department store for $12/hour. And did I mention it's tax-free!

Please note that this isn't to say that you can't work and also save this money--sure you can--then you'll be that much more ahead (although you probably can't work all the time and save money--there just isn't enough time to make it all happen). This is simply to point out some of the significant financial value of cheapskating your way through life. 

Saturday, September 20, 2014

5-Minute Rice and Bean Casserole with Avocado-Lime Guacomole


And now it's time for another uber-cheap, yet perfectly amazing meal.

When you think beans and rice, you think cheap, but you don't think fabulous, do you? Well, now you can. You probably also don't think 5-minute. And to be honest, the cooking time for this is much longer (90 minutes so I totally drew you in with a gimmick, but wait--don't go...), but the hands on time is straight-up five minutes or less. You throw everything in a dish, then put that in the oven. Then go do yoga or watch your favorite show depending on your moral fiber and all. But whatever you do, well, you can do it. And then dinner will be ready, and you'll forget you're not at a Mexican restaurant (until you have to clean up the little sticky rices your kids threw on the floor; then you'll remember you're at your house).

This is good without the avocado, but it's really amazing with the avocado. If you can find one for under $1, go for it. This meal will still cost you less than $3.00 for 6 people (and it fills you up).

5-Minute Rice and Bean Casserole with Avocado-Lime Guacamole
adapted from Eat, Live, Run
Prep time: 5 minutes
Cook time: 90 minutes
Cost: $1.95 without Guac; $2.60 with
rice: .30, chicken broth (made from cubes): .30, tomato sauce: .25, beans: .55, chilies: .50, spices: .05, avocado: .60 (yup, got a sale), lime juice (not fresh): .05

For casserole:

1 C brown rice, dry
3 C veggie or chicken broth
8 oz. tomato sauce (not puree)
1 14.5 oz. can kidney beans, drained and rinsed (I expect other types of beans would work as well)
1 4 oz can diced green chilies
1 1/2 tsp cumin
1 tsp chili powder
1 tsp salt
1/4 tsp garlic powder

For Avocado-Lime Guacamole:

1-2 avocados
1 jalapeno, minced (I skipped this since I didn't have one and just used a pinch of cayenne)
pinch cumin
pinch garlic powder
juice 1-2 limes (or 1-3 Tbsp juice)

Preheat to 350 degrees.

In a 9x13 inch dish combine rice, broth, tomato sauce, beans, chilies, cumin, chili powder, salt, and garlic powder. Mix it up. Cover the dish tightly with aluminum foil. Bake 90 minutes. Do not peek. If you do, the steam and heat will keep leaving and this will take longer and maybe be too dry.

During the last five minutes of cooking time, mash your avocados. Add lime juice and seasonings. I also gave it a shake of salt.

Serve casserole with a plot of guac on top. You can also garnish with sour cream or cheddar cheese to good effect, though you really don't need tons of adornment.

PRINTABLE RECIPE

Tuesday, September 16, 2014

Oven-Baked Plantains (Tostones)


And while we're posting ugly recipes, you really should try this one. I'd only had plantains one other time--maybe 10 years ago--and even though I'd enjoyed them, I had no idea how to make them. Then this past month, I found a recipe and made them. Delicious. But not gorgeous.

Plantains are meant to be cooked before they're eaten because they're starchier than a normal eating banana. These are baked. In the original recipe, Ellie from The Hobo Kitchen made a savory garlic sauce to pour over them. I thought this sounded amazing, but I knew that my kids would not find savory garlic banana-looking things amazing. So I opted to introduce them as a sweet side dish. I did not regret it.

Obviously, these are fussier than just peeling a banana and eating it, but I love switching things up sometimes and I find that occasionally my kids will respond to a new foreign-ish fruit. It helps us get out of our little eating ruts sometimes. Also, even though these require 30 minutes of foresight, they don't require more than 5 minutes of your hands-on attention.

Oven-Baked Plantains
adapted from The Hobo Kitchen
Serves 2-3
Prep time: 3 minutes
Cook time: 26 minutes
Cost: $.65
plantain: .55, other stuff: .10

1 large plantain
oil (I used canola; coconut might be amazing as well)
sugar and cinnamon

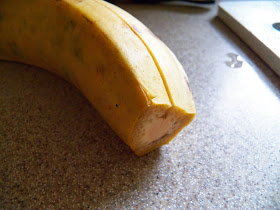
1. Cut off each end of the plantain.

2. Slice it along on opposite sides of the plantain.


3. Microwave for 6 minutes.

4. Remove (it's hot) from microwave and let it cool for a minute. Then remove skin and cut into 3/4 inch rounds.


5. Flatten the rounds (I did this with the bottom of a glass.)


6. Toss with a little oil (I used canola). Or generously grease your baking dish (I used a cookie sheet). You don't want to skimp on the oil too much--these things get sticky. I used foil hoping that would make it easier, but I'm not sure it helped.

7. Bake at 425 for 10-12 minutes on one side until they're golden on the bottom side. Then flip and bake about 8 minutes on the other side.

8. Remove from oven and sprinkle generously with sugar and cinnamon.

9. Serve.

Thursday, September 11, 2014

Eggplant Dip


Eggplant is a beautiful onyx of a vegetable--hanging off its plant looking all rich and sexy. Until you cook it. And then it is uggally (definition: the state of being so ugly the word must be drawn out and exaggerated, even in written form). I always want to grow eggplant. And buy eggplant. But then after I make it, no one wants to eat eggplant. This must be very sad for eggplant. After all it's still nutritious. It's still valuable. It's still totally delicious. But it doesn't look it. Such is the lot of today's dip. It is not the sexiest dip that will ever grace your table.

True story: I roasted up my eggplant for this dip, scooped out its ugly flesh and put it in my little Magic Bullet cup where it sat in my fridge for three more days. It was just so homely. I nearly threw it away twice--me--fierce opponent to throwing away of food no matter how unsightly it may be. The ugly (ha) truth is that I just couldn't imagine it tasting that good. It's true. And I'm ashamed. Because eggplant, much like women who have birthed four children, should not be discarded merely because the luster of youth has faded away. Eggplant, in fact, (much like women who have birthed four children), only gets better with a little life experience under its belt. Eggplant, in fact, is gross in its raw, uncooked (and still beautiful) state, but perfectly amazing in this not-very-attractive-but-butt-kickingly-tasty dip.

Besides the fact that this dip isn't going to be the next Disney Princess, the only thing I should warn you about is that it takes a while to make because you're going to char and then roast the eggplant. It really really gives it a nice flavor, and it's not hard to do, but it doesn't mean that this won't be on your table in less than 30 minutes. I charred and roasted mine when it was convenient and then just left it in the fridge for several days until I was ready for a quick lunch.


Eggplant Dip
adapted from Smitten Kitchen
makes a couple cups or about 4 small servings
Prep time: 10 minutes
Cook time: 30 minutes to roast and however long it takes you to char (on the grill that will be shorter; under my broiler, it took a while)
Cost: $3.15
eggplant: 2.00 (farmer's market prices), tahini: .75, other stuff: .40

2 medium eggplants (a pound or less each)
1-2 Tbsp olive oil
1 tsp coarse salt
6 Tbsp tahini
2 garlic cloves (smallish, unless you love garlic)
juice of a lemon (or 2-3 Tbsp)
pinch of cayenne pepper
couple pinches ground cumin
parsley for garnish

Char your eggplant. This can be done on the grill, over the flame of a gas stove, or under your broiler. I used the broiler, turning the eggplant a quarter turn every 8 minutes or so. It took a while (which surprised me); I think the other methods would be faster, but the nice thing about the broiler is you don't have to pay it too much attention (as you would holding it over a flame).

Heat oven to 375. Brush a baking sheet with olive oil and sprinkle with salt.

After the eggplants are charred, let them cool enough to handle and then cut them in half. Place them flesh-side down on the baking sheet and roast for about 30 minutes or until they're very tender when pressed or pierced.

Scrape out the eggplant flesh and put it into a blender or food processor (I used a Magic Bullet.) Discard the skins. I cooled my flesh before making the rest of the dip, but you don't have to. Add tahini, lemon, cayeen, cumin, and parsley if you'd like (I skipped the parsley and used it merely as a garnish).

Pulse in blender until it's the consistency you desire (I like mine a bit of the mushy side so that it's more hummus-like, but it can be left chunky if that's your thing.) Taste and adjust seasonings.

Serve with tortilla chips, sour dough bread, or vegetables.

PRINTABLE RECIPE


Sunday, September 7, 2014

Crock Pot Carne Asada--SRC


This month for Secret Recipe Club, I had The Hobo Kitchen. It's written by Ellie. I actually had her blog (with a different name) a while ago. I loved it. The funny thing is that at first I didn't realize I had the same person, but I was like "Oh my gosh; I want to make all these recipes." In fact, I ended up making two of her recipes for dinner one night. And then I went to read Ellie's profile and there she was--the same blogger I'd enjoyed so much when I secret-recipe'd her last blog. Apparently, she's still got it. Thank you, Ellie, for the fabulous recipes.

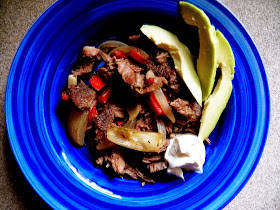
I made the Carne Asada. It was delicious and super easy and a crock pot recipe and just win win all around. The leftovers were even better. (Note: As a side dish, I also made a cinnamon sugar version of her Tostones (plantains) that were beyond delicious. I'd never made plantains before and I'm a total convert. But the pictures I took for that were ug-ly.)

Crock Pot Carne Asada
adapted from The Hobo Kitchen
Serves 6
Prep time: 10 minutes
Cook time: 6-8 hours (in crock)
Cost:$10.00-ish (this is a really rough estimate; sorry)
meat: mine was $5, but it was clearanced and was less than 2 lb, seasonings: .10, peppers (mine were free from a fabulous friend), but I'm guessing 1.50-2.00, toppings: 2.00

Note: I'm slightly red meat impaired. If it's not ground beef or some kind of chuck roast, I'm a little lost. This recipe called for flank steak, which I couldn't find at my store. So I just bought the clearance cheap steak and all was well, but if you can get flank steak, use it.

Another note: I followed this recipe as Ellie had it. However, I bet that if you had taco seasoning and wanted to use that instead of individual spices, that would work and save you a couple minutes. No guarantees because I haven't tried it, but especially if it didn't have thickening agents (such as cornstarch), I bet it'd be just fine.

2 lb flank steak
2 tsp chili powder
1 tsp cumin
1/4 tsp onion powder
1/4 tsp garlic powder
1/4 tsp cayenne pepper
1/2 tsp salt
1/2 tsp black pepper
1 yellow onion, diced
1 green pepper, diced
1 red pepper, diced
1 jalepeno, minced
For toppings:
cheese
sour cream
avocado

Combine dry spices. Sprinkle or rub these on the flank steak. Put that in the crock.

Add diced onion, peppers, and jalepeno.

Cook on low in the crock pot for 6-8 hours. Note: I recommend this low setting. I forgot to get mine into the crock and tried to cheat and do this for 3-4 hours on high. It tasted delicious, but wasn't fall-apart-fork-shreddable. I left the stuff we didn't eat in the crock for several more hours and it was perfect, so try not to short-change the cooking times.

Before eating, shred steak with two forks.

Serve over rice, tortillas, or corn chips.

Top with cheese, sour cream, and avocado.

PRINTABLE RECIPE

Friday, September 5, 2014

I Am Groot

So apparently Marvel has fashioned one of the "Guardians of the Galaxy" characters after the parsnips in my garden. I keep waiting for my royalty check, but it hasn't come yet.


Personally I think this should be the next Elf on a Shelf. It meets all the requirements--a creepy creature that I've been hiding at various points in our house for my son to see. Also, Groot's original  mission was to capture humans for experimentation. And, I don't know about you, but when I see the smile on the Elf on the Shelf's face, I think, "He's probably planning to capture humans for experimentation." Twinners.

Wednesday, September 3, 2014

Fluffer Nutter Dip


A few days ago I made some chocolate tortillas to be served with fruit as fruit tacos. These were met with only moderate success (even with plenty of whipped cream thereby). But me, being me--I didn't really want to throw away the leftover chocolate tortillas. But I didn't really want to slather them in salsa either.

I remembered a dip I'd had once at a church gathering. It was fluffy and peanut-buttery. That seemed like a good place to start. So I looked up fluffer nutter. It is a delightful combination of equal parts peanut butter and marshmallow fluff. Well, I'm pretty sure you can't lose with that combo (unless you're a contestant on The Biggest Loser, in which case you could lose rather easily with that combo).

The problem was that I, being a horrible parent and all, do not keep marshmallow fluff on hand. So I decided to experiment with my own slightly healthier version of fluffer nutter. And by slightly healthier, let me clarify that I do mean slightly. As in "to a small degree; not considerably" healthier. Because that, my friends, is the kind of hard core health fanatic I am. Although--in my defense--I have to say that my attitude is not quite as Epicurean as one blogger, who said that one of the advantages of the original dip (a dip which consists of equal parts peanut butter and marshmallow fluff) was that it would cut the carbs. By which she means, I assume, that she would normally just flop the jar of marshmallow fluff on the table and have at it. Thank goodness we added some peanut butter. Now it's a health food. And I, I--promoter of healthy dips for picky kids--will now take it one step further. I think we should call it a super food.

Instead of marshmallow fluff, I added cream cheese and a little powdered sugar. I might have been proud of that adaptation's healthiness except that it wasn't fluffy enough (or quite sweet enough). So I added whipped cream. (What? it was totally homemade--that qualifies as righteous, right?)

This can be served with real bonifide chocolate tortilla chips by making these tortillas, then cutting them and frying them up (health food fanatic--right here). However, I would have to tell you that this would not be worth the work. It'd be a better bet to serve them with apple slices or chunks of banana. Or--if you are not a health nut (ha--puns and sarcasm) like myself--perhaps some graham crackers or pretzels.


Fluffer Nutter Dip
makes about 3-4 Cups (which is enough for a party and probably too much for your family)
Prep time: 10 minutes
Cost: $4.00
peanut butter: .85, cream cheese: 1.00, powdered sugar: .15, whipped cream: 2.00

1 C peanut butter
8 oz cream cheese
1/2 C powdered sugar
2 C whipped cream (I used the real thing, but I expect nasty Cool Whip would work too--yes, I'm a cream snob)

Cream the peanut butter and cream cheese together. Beat in the powdered sugar.

Add in the whipped cream. If using the real stuff be sure not to overbeat it--just beat until it's blended.

Serve with fruit slices or sweet crackers.

PRINTABLE RECIPE