Tuesday, March 31, 2015

Chocolate Potato Chip Bird's Nests


So on Monday at too-late-at-night o'clock, I was like, "What am I going to blog about this week?" I chose our family's favorite chicken enchiladas, which were an excellent choice. Except that this Sunday is EASTER and I specifically made and photographed these rocking Sweet and Salty Bird's Nests with the full intention of posting them on Monday.


Which is why you should not do things at too-late-at-night o'clock after a day that is chock full of manual labor with your husband. Indeed, at too-late-at-night o'clock, you should not write things on the internet at all--that's just a good rule to live by. If you insist on doing random things at too-late-at-night o'clock, what you should do is head out and buy yourself some potato sticks (I'd never bought them before either) and then sit at your kitchen table and make these little lovelies. Don't eat them at too-late-at-night o'clock (you're sure to regret that on several levels). But make them, and then love them. They are super super delicious. And delightfully dumb easy.


Chocolate Potato Chip Bird's Nests 
makes about 20 nests
Prep time: 10 minutes
Set time: at least an hour
Cost: $3.75
butterscotch chips: .50, chocolate chips: 1.25, potato chips: 1.00, Cadbury eggs: 1.00

1/2 C butterscotch chips
1 1/2 C semi-sweet chocolate chips
2 1/2-3 C shoestring potato chips
Cadbury milk chocolate eggs for the eggs in the nest

Melt butterscotch and chocolate chips together. I do this in a glass bowl in the microwave, stirring every 30 seconds or so until they're melted. (Note: If you do it in a large glass bowl, you can just pour the shoestring potato chips in and stir.)

Add your shoestring potato chips and stir until they're all covered.

Plop spoonfuls of this onto wax paper in a nest-like fashion, which is--fortunately--chaotic enough for most of us to manage.

Now arrange your Cadbury milk chocolate eggs on these (or Robin's eggs or Hershey's eggs or whatever).

Allow to set. This will take at least an hour, and you should really give yourself two hours, especially if it's warm in your house.

PRINTABLE RECIPE

Monday, March 30, 2015

Chicken Enchiladas


These are our favorite enchiladas. And I've never gotten them onto this blog because when I'm hungry I'm a lazy picture taker. And after we've eaten these, they look like a heard of monsters came through and scooped out enchiladas with their hands (which is mildly--though not entirely--accurate). At any rate, I decided it was time to share even if I never have that perfect picture of that perfect bite (which inevitably went into my mouth as soon as it hit the spoon).

These can utilize leftover chicken should you happen to have any.

Chicken Enchiladas
makes 6 large enchiladas
Prep time: 40 minutes
Cook time: 25-30 minutes
Cost: $7.00
enchilada sauce: 2.00, tortillas: .75, cream cheese: 1.00, green chilies: .50, chicken: 2.00, cheese: .75

2 cans (10 oz) mild green enchilada sauce
6 medium or large flour tortilla shells
8 oz cream cheese, softened
4 oz can green chilies (these can be left out if you hate any heat or worry that your minions will rebel about little green chunks of anything, but I like them)
1 lb chicken, boiled and shredded
1 1/2 C cheddar cheese, shredded

First boil your chicken. One thing I love about boiling chicken is that you can do this even if you forgot to de-thaw your meat (which I always always do) and it's not big deal. After it's done cooking, shred it.

In a pot set to medium heat, combine the shredded chicken with the cream cheese, green chilies, and about 1 C of the cheddar. Mix it up until your cheeses are melty.

Once the filling is ready, pour a bit of the enchilada sauce into a 9x13 inch pan--just enough to coat the bottom of the pan.

Then put some enchilada sauce on a plate. Put your tortilla on the plate and coat it in the sauce on both sides (this is an extra step, but I love how it makes the enchiladas taste--no dry nasties). After your tortilla is coated, add a spoonful of filling and roll it up. Then place it in the pan.

Repeat this until all your tortillas are stuffed. Pour any remaining enchilada sauce over your enchiladas and top with the remaining cheese. Bake at 375 for 25-30 minutes or until the sauce is bubbling and the cheese has just started to brown a bit.

PRINTABLE RECIPE


Monday, March 23, 2015

Coconut Chocolate Bites


It's spring break. Need a healthy snack? Or maybe something to eat in the closet while your kids run wild through your house (just kidding; well, usually). Try these. They're a dark chocolate coconut concoction--like a Mounds Bar that decided to make some healthy choices (you know you've hit middle age when that sounds sexy...)

My one recommendation is that you don't go eat a whole bunch of these. Cut them into bite-size bits and eat as such. That's because they're what I'd like to call "high energy" bars, which is just a polite way of calling them fat. If you eat a big ol' hunk of these, well, you'll just feel kind of full and I have to warn you that these have a fair amount of coconut oil in them. Yeah, yeah, it's a healthy fat and stuff, but still it's fat and I just don't think humans are meant to consume large amounts of plain old fat by the spoonful. So be warned. 


Coconut Chocolate Bites
adapted from Art and the Kitchen
Makes 36 tiny bite-sized bars
Prep time: 5 minutes
Chill time: 1-2 hours
Cost: $8.40 (supposing you cut this into 16 bars--that makes it $.50/bar, which--in my defense--is still cheaper than a candy bar)
oil: $4.00, coconut: 2.00, chocolate: 2.00, honey: .40

Note: I told you there was a lot of fat in this. And it makes it not really so cheap. I'm sorry about that. Just eat your bite-sized bits and you can still play your cheapskate card. 

1 C organic and unrefined coconut oil (in its liquid state)
2 C unsweetened coconut
1/4 C honey
10-12 oz dark chocolate

Put a piece of parchment paper in an 8x8 inch pan (um, I'm pretty sure that was the size I used--almost positive; if, however, it looks like your bars are four inches thick, then please use a larger pan). 

In a bowl, combine melted coconut oil, unsweetened coconut, and honey. Stir well. Press into parchment-lined pan. 

Put this in the freezer or fridge to set. 

When it's set, melt chocolate. I do this in the microwave by microwaving in 30 second intervals and stirring in between. When it's melted, pour the chocolate over the coconut layer. 

Put this in the fridge to set. 

When it's set, take it out, let it get to room temperature so it's easier to cut (I know; I know). Then cut into tiny bites and eat. 


Monday, March 16, 2015

Green Smoothie Muffins


I might be running a little late for your St. Patrick's breakfast, but these are still definitely worth making. I have to confess I was put off by their potential color (mine did not come out as green as the muffins I saw on Pinterest, so beware that yours might be greener than this), but these are so delicious that every single one of my kids wanted more more more until there were no more. Which is nice since they contain three fruit/vegetables and are 100% whole wheat. Also, a few handfuls of chocolate chips never hurt anything.

Green Smoothie Muffins
adapted from I Can Teach My Child
makes 12 large muffins
Prep time: 10-15 minutes
Bake time: 20 minutes
Cost: $2.85
bananas: .45, strawberries: .60, spinach: .30, whole wheat flour: .30, sugar: .15, egg: .10, canola oil: .10, chocolate chips: .75, other stuff: .10

3 very ripe bananas
8 strawberries
2 C baby spinach
1 1/2 C whole wheat flour (preferably white)
3/4 sugar
1 egg
1/4 C canola oil
1 tsp baking soda
1 tsp cinnamon
1/4 tsp salt
1/2-1 C chocolate chips, optional

Combine bananas, strawberries, and spinach in food processor or blender. Blend until smooth.

In a separate blow combine whole wheat flour, sugar, baking soda, cinnamon, and salt. Then beat in the egg and canola oil. This will leave you with a somewhat crumbly batter. Now add your "green smoothie" and mix.

Mix in chocolate chips if using.

Pour into 12 muffin tins. Bake at 350 for 15-20 minutes or until a toothpick inserted comes out clean.

Let cool and enjoy.

PRINTABLE RECIPE


Monday, March 9, 2015

Spinach Mushroom Coucous Toss


March might not have any major holidays (except occasionally when Easter falls into this month), but it makes up for it through an abundance of quirky, insignificant holidays--there's Dr. Seuss's birthday, National Pancake Day, Pi Day, St. Patrick's Day. Only one of these holidays was around when I was a kid and, while it could be argued that we--as a culture--have gone a little nuts, I do love me a quirky yet insignificant holiday. You forget about it? No big deal. You remember it? It's kind of fun. I've already got big Pi plans. This week we'll focus on some ideas for St. Patrick's Day. Today's recipe, I must admit, is a fairly grown-up idea. Your kids might not cheer it, but don't worry, there are some green muffins coming later.

Besides its lovely green, it's super healthy and dumb easy, yet surprisingly sophisticated. Also perfectly adaptable. It can be on your plate in less than ten minutes.

Spinach Mushroom Couscous Toss
adapted from Julia's Album
serves 4
Prep time: 3 minutes
Cook time: 10 minutes for all
Cost: $2.20 (that's $.55/serving for a perfectly respectable and well-rounded lunch)
mushrooms: 1.00 (Aldi price), spinach: 1.00, couscous: .75, other stuff: .20

Note: In place of couscous, you could use any grain you've got--quinoa or even rice or barley.

1 lb button mushrooms
2-3 cloves garlic
1 Tbsp butter
1 Tbsp olive oil
5 green onions, or a dash of onion powder if those you love are chunky onion averse
5 oz fresh spinach
2 C cooked couscous (or another grain of your choice)
salt and pepper to taste

First, get your couscous cooking. Follow the instructions on your box.

While it's cooking, slice your mushrooms. Then heat oil and butter in a frying pan. Add the mushrooms and cook until they start to give off their juices. I salt them at this point also. At that point add the garlic and green onions (if using). Cook for another couple minutes. Then add the spinach and cook, stirring, until it's wilted (another couple minutes). Now throw in your cooked couscous. Add salt and maybe a bit of pepper to taste. And you've got yourself a restaurant-worthy meal in about ten minutes. Go on you fabulous person, you.

PRINTABLE RECIPE

Wednesday, March 4, 2015

Classic Apple Pie


Making a pie is an act of love. Making a pie on Pi Day is an act of love and math. Making a pie on Pi Day 2015 is an act of love, math, and geekiness. This is because on 3/14/15 at 9:26:53, the number will actually be 3.141592653. I mean, are you freaking/geeking out or what? Of course you are. Or maybe you're not, but you should still make a pie. Because it's fun. And an act of love. And also fun. Nerdiness just gets bonus points (but it also justifies any mid-morning pie eating that you wish to partake in).

A couple months ago, I set out to find the perfect apple pie. Not Dutch apple pie, or apple pie with caramel filling/drizzle/sauce. Just a plain old classic apple pie. (This was weirdly difficult to find on Pinterst.) I looked up the recipe in my America's Test Kitchen cookbook and also asked my friends for their favorite apple pie recipes. What surprised me about this was little experiment was that the four recipes I ended up getting were really quite shockingly similar. As a cook, it's kind of awesome when they happens--it means you're on the trail to a recipe that is probably pretty spectacular. And it was.

The two main (and in my opinion, weird) differences were the amount of apples used (this varied from 2 1/4 pounds to 3 1/2 pounds); and the baking temps, which varied from 350 degrees to 425/dropping to 375 degrees). But my friends' pies basically agreed on sugar, spice, lemon juice, and that we needed a decent combination of tart and sweet apples. Granny Smith were recommended across the board for the tart apple with things like Golden Delicious, Braeburn, or McIntosh filling out the sweet side.

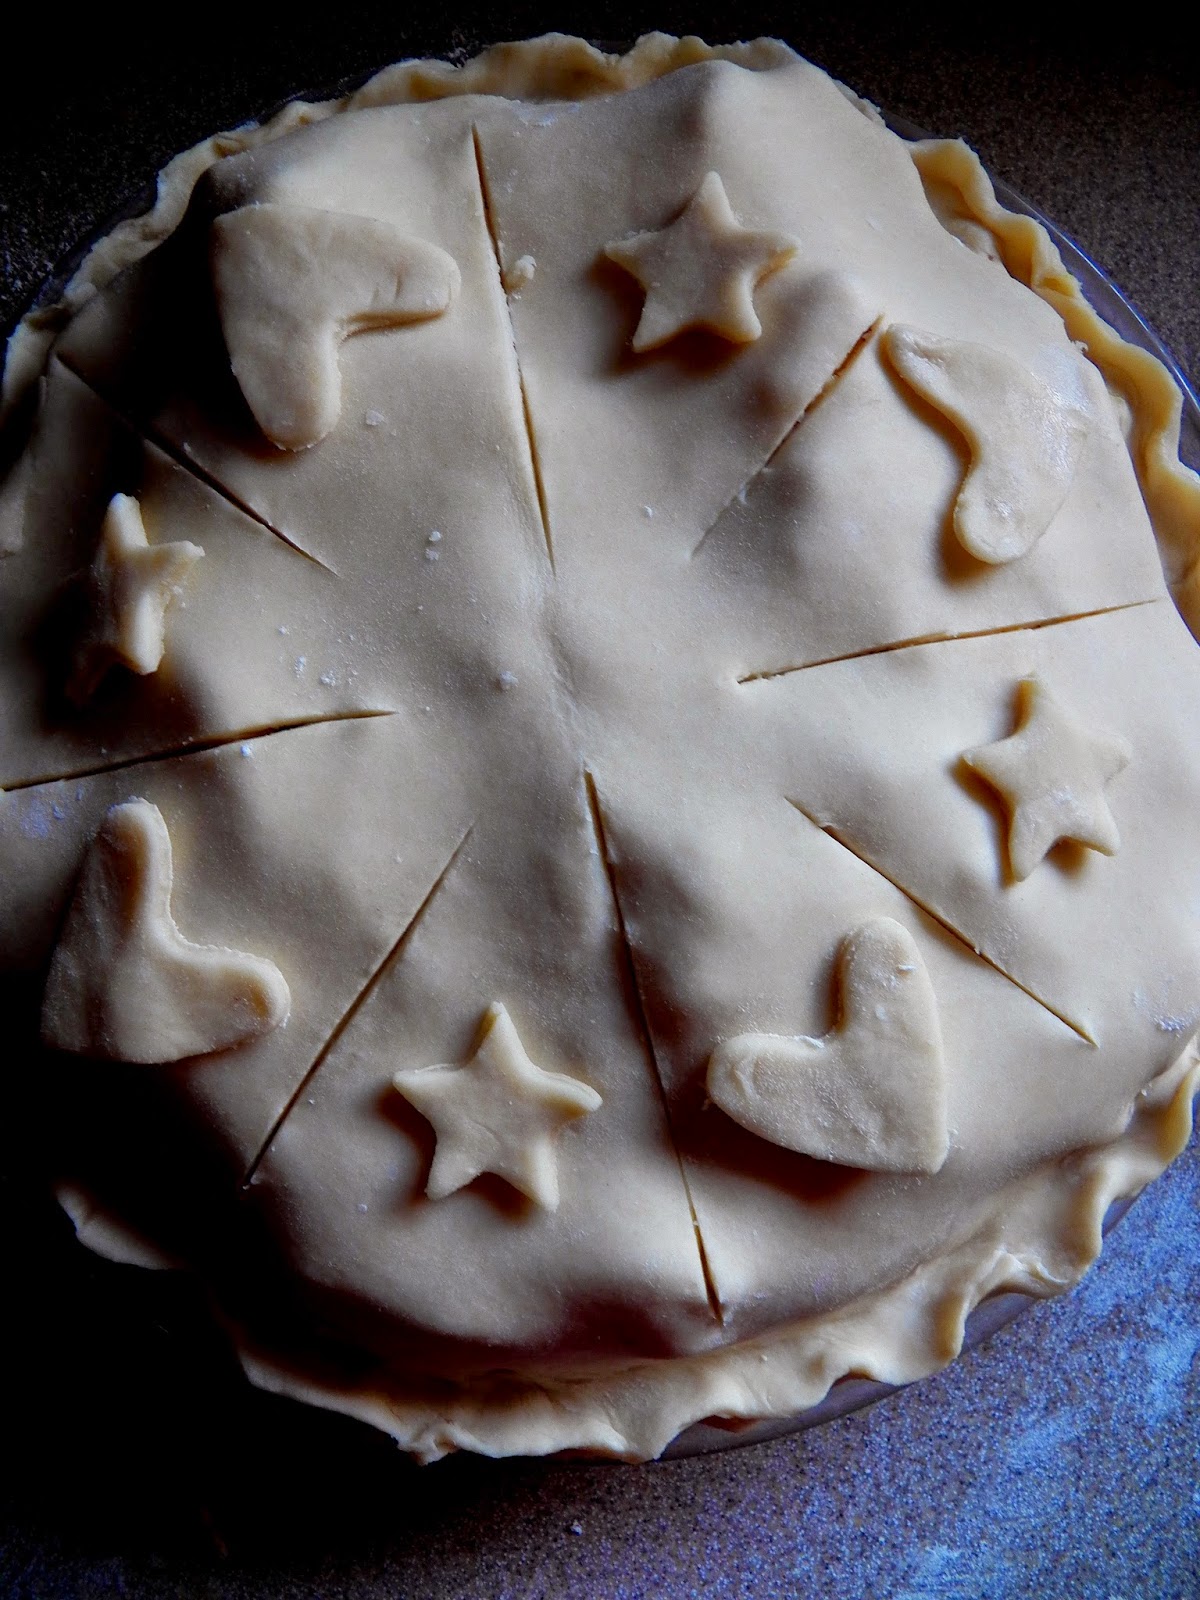
The pie I turned out was perfectly classic and delicious. And I decided to get my crazy on by using the leftover dough to make cut-outs for the crust. My kids helped and it was kind of fun


If you wanted to get your super super really over-the-top slightly mentally ill geek-star crazy on, you could cut out numbers for the number Pi.

Apple Pie
Makes 1 large pie
Prep time: an pleasant afternoon
Cook time: about an hour
Cost: $6.85 (more expensive than many recipes on here, but still less than $1/serving)
crust: 1.35, apples: 5.00, sugar: .20, egg: .10, other stuff: .20

1 recipe Butter Pie crust (or your favorite)
2 Tbsp all-purpose flour
3 1/2 lb apples; this is about 7 large apples (I used a combo of Granny Smith--about 1 1/2 pounds, then filled in the rest with Golden delicious and a fun and sweet variety called Pinata, but any sweet variety will do. I do NOT recommend red delicious or Jonathan. If that's what you've got, I suggest upping the sugar by 1/4-1/2 C)
1 Tbsp lemon juice and about 1/2 tsp zest (the zest is optional; the lemon juice is absolutely not)
1 C granulated sugar
1/4 tsp nutmeg
1/4-1/2 tsp cinnamon
1/8 tsp allspice
1/4 tsp salt
i egg white, lightly beaten, if you wish to brush your crust with it

Prepare your pie crust (or cheat and buy one if that's your thing). Roll it out as you normally do. Note: If you normally do no such thing, have a look here or here. Put your bottom crust into a lightly greased pie pan. Put the other ball of crust dough into the fridge while you do your filling.


Peel and slice your apples. It's going to seem like a ridiculous amount of apple. Trust, friends, trust. They will shrink down so much.

Now take your obscene amount of apples and mix in the flour, lemon juice, zest, sugar, spices, and salt.


Put these into your pie crust. You're going to think I'm nuts because these apples are going to just pile up in that pie pan. I piled mine this high and wound up with a pie like at the top of this post.


Now roll out your other pie crust and put it on top. It's going to look like a breast augmentation gone terrible wrong. Trust.


Trim the edges off. And if you'd like seal the two pie crusts together by putting a little water on your fingers and using that between the two pie crust edges. Just a little water will seal them up if you're worried.


You can now crimp the edges using your amazing artistic skills as you see I've done below. I know, people, sometimes it's just hard to compete with my artistic genius.


 Cut several slits in the top of your crust. This lets steam out and is essential.


Now you can decorate it with those obsessive compulsive pie numbers you cut out (31415926). Or whatever. Or not decorate it at all. Again, use a little bit of water on the dough to get your numbers/hearts/stars to stick. 


At this point you can brush the pie with egg white and sprinkle it with sugar if you want to. I did. Or you can throw that thing in the oven. It's up to you. 

Bake it at 425 for 25 minutes on the center rack. Then--without opening the oven--lower the temperature to 375 and bake for another 35-40 minutes. It's done when it's deep golden and bubbling at the edges and through the slits. You can also stick a fork in it to make sure all apples are tender. 

Note: You will absolutely want to put a cookie sheet or a sheet of aluminum foil on the rack beneath the rack your pie is on. This is because your pie as will ooze and bubble and get all over your oven floor if you do not. Trust. And thank me later. 

Now look how that shrunk down. 


 Allow to cool for several hours until it is just warm or completely cool. If you cut into it while hot, it will still taste good, but it will ooze all over itself and end up looking like cobbler not pie.


PRINTABLE RECIPE

Monday, March 2, 2015

Butter Pie Crust--Photo Redo in honor of Pi Day


Pi Day this year promises to be an epic event. Why not make an epic pie? To get you started, here are some prettier pictures for my butter crust. Wednesday, I'll post an apple pie to go with it.

This is the pie crust I always always use. With a more detailed tutorial here.


And for old time's sake, here's my original photo:

Recipe and instructions below:

Basic Butter Pie Crust
Makes 2 crusts
prep time: 5 minutes with food processor
Cost: $1.35

Note on using a food processor: For me (besides having a non-4-inch rolling pin) this is what has made making pie crust doable. I hate cutting in butter. Hate hate hate it. With the food processor (or a blender, which I hear also works), no butter cutting in is required. You'll sacrifice (supposedly) a bit of flakiness in your crust, but I still think it beats the heck out of anything you buy at the store. Which I guess is my general philosophy about homemade pie crust--it doesn't have to be cooking show perfect to be really great and so much better than the store bought stuff. And it takes less than 5 minutes. Less. than. five. minutes. 

2 1/2 C flour (you can sub in part wheat flour if you wish--start with 1/2 C and see how it works for you)
1 C butter, cold
1 Tbsp sugar (if making a sweet pie; otherwise, omit)
1/4-1/2 C cold water

Process flour, sugar, and butter in food processor or blender until the butter is in pea-sized chunks (my chunks are always a little smaller). (Or cut the butter in with a pastry cutter if you feel the same way about cutting in butter as I do about kneading bread.) 

Add water by the tablespoon till the dough comes together. (I just pulse it in the food processor.) Knead the dough a few times if necessary, but try not to handle it too much with your hands because that warms the butter and that means less flakiness (if flakiness matters to you in your crusts). 

Divide into 2 balls. If you only need one crust, put the other in a freezer bag in the the freezer. 

Sprinkle a generous amount of flour on your work surface and roll out the dough. Try to get it even (even-ish will do just fine). The dough should be about 1/8-1/4 inch thick. Lift it up and transfer to pie plate. (You can fold it and then lift and transfer and unfold, but I find it just easier to lift and flop it into a nearby pan.) Add whatever deliciousness to your pie. Add the other pie crust to the top if that is what you're supposed to do and bake. 

Note on rolling dough: The internet (which we all know is always right) says that a nice, easy, neat way to roll out your dough is to roll it between 2 pieces of waxed paper or parchment paper. Then the transfer is easy. Take off one layer of waxed paper and put your crust in the pan. Then take off the other layer and crimp your edges or whatever edge fanciness suits you. I tried this with 2 pieces of wax paper and it just scooted around annoyingly and wouldn't really roll out. I took off one layer and it still scooted around, but I got it to roll and it really did make the transferring way easier (though I'm still not sure I can recommend this tip), but do flour your wax paper.

LinkWithin

Related Posts Plugin for WordPress, Blogger...