Are you watching the 6 of us eat on less than $10.00/day?
If so, here are the numbers for August.
Total: $9.25/day --> 302.36 minus 25.00 for entertainment/birthday costs= 277.36. This divided by 30 comes out to $9.25/day.
Breakdown:
Produce: 90.84 (that's including our 27.00 CSA cost)
Dairy: 71.30
Sweets/sugars/chocolate chips: 36.04
Grain: 33.94 (you know it's bad when your sugars are costing more than the staff of life)
Fats (butter, oil, cocoa, etc.): 25.45
Nuts/Legumes/Beans: 22.45
Meat/Eggs: 20.52
Misc/Condiments: 1.82
If you're dying for more specifics because you are a sickly anal person, have a look at Costs.
I must confess I relaxed a little this month. We ate chips once and crackers a couple of times. I bought strawberry milk stuff for my kids (gross). I didn't always buy things from the cheapest place (meaning if we were at Walmart already and I didn't want to make a special trip to Aldi for a few things I knew would be cheaper, we sometimes didn't.) We celebrated a birthday. And we seem to have celebrated August in general with way too much ice cream. I will say that Kip has accused me of trying to make a vegetarian out of him a couple of times, but these accusations have come with a smile (usually). It's true that we've eaten less meat than usual and we already don't eat tons, but there have just been so many vegetables in the house; I've got to do something with them, right?
We've seriously been eating tons of fruits and vegetables (many of them local). I wish I'd kept track of the whole family's intake this month because I'm confident that we got a lot more than usual. For a look at how much I consumed, have a look at Jean's Food Journal. All told, we've eaten between 80 and 100 pounds of fresh fruits and vegetables this month plus some canned things. (This is a rough estimate. I've bought approximately 40 pounds and the CSA generally supplies between 10 and 15 pounds/week, for a total of 40-60. Admittedly, some has gotten frozen or preserved. However, we've also gotten a bunch from the garden and I have no idea how much of that we've gotten/eaten.) Chiggers be darned; summer is good.
What We Wasted:
1 1/2 popovers
lots of bread crusts; also an unpleasant number of half or partially eaten sandwiches
2 bowls raw corn soup--it just didn't work for any of us; I couldn't bring myself to eat the rest
several cups/sippy cups of partially drunk milk
1/2 C tomato sauce
Also: We had our refrigerator stop working for a day. That's frustrating. We saved most of the food by throwing it in the freezer for a few hours and rotating it like that, but we did lose our mayo, Miracle whip, half a loaf of bread (that got taken out of the freezer to make room for our fridge things and that went bad earlier than it would have had it remained frozen), Ranch dressing. Those things weren't our fault, but they did go in the garbage.
My goals for next month:
More fish. We've never eaten it the 2-3 times/week that you're supposed to, but we used to have it several times a month and haven't since I started this Cheap Eat Challenge. That's a shame because if one can buy Nestle Strawberry Yuck Drink, then one can buy a little more fish.
Heads Up:
We'll be out of town for the next several days. Consequently, I won't be counting those days and I probably won't be posting much either, though I'll try to get it together enough to have a few things post.
Look for menus when I get back.
Wednesday, August 31, 2011
Tuesday, August 30, 2011
Watermelon Milk
Cheap Eat Challenge, Part 2: Watch as our family eats on $6/day or less.

Lately Mark has had a terrible sore throat. This has made him unable, or at least unwilling, to eat much peanut butter. Since peanut butter is the very food that keeps the child alive, this has been a small problem.
As a result of this and the fact that we've got an overabundance of various melons in the refrigerator right now, you'll be seeing a smoothie recipe or two popping up this week as I try to feed my child and use up my food (why is it that such a simple-sounding thing should take so much creativity).
Now onto watermelon milk. It sounds weird. I get it; it sounded weird to me too when I first tried it. I think this is especially true since the word 'watermelon' contains the word 'water' and that we generally don't like to speak of combining water and milk because we all know what that makes: skim milk, right. Okay, okay, I'm kidding. Just a little jab there at my skim-milked past (although technically skim milk and all milks sold at the store, including organic milks, are in fact dry milks that have been reconstituted with water at high heat). But yes, I digress. My real point is that watermelon milk is totally awesome.
I first had it when I was in Taiwan for several months. In Taiwan the street vendors sell "milks" of various sorts, which are really a lot more like milkshakes (fruit, milk not of the skim variety, and plenty of sugar) only without the freeze.
For whatever reason I'd never recreated this, probably because I believed in my heart of hearts that it contained 4 gallons of sugar to every cup of watermelon. Maybe that was true at the stands in Taiwan (though probably not), but what I found when I began experimenting is that a decent summer watermelon is sweet enough to carry a lot of the sugar load on its own. I could have drunk my watermelon milk without any sugar, but I wasn't sure my kids would. And I have to say that by adding 1 1/2 Tbsp sugar this drink really soared to a whole new level. A level I like to call dessert--healthy style.
A few notes:
1. Do not oversweeten it. Sure, it'll taste, well, sweet, but you'll lose some of the pure watermelon-y goodness.
2. If you use skim milk, I can't guarantee it will turn out as well. A bit of fat does this recipe good. (Frankly, I think it does the body good too, but you can argue with me if you wish.) I used raw milk which is quite whole. I wouldn't recommend going below 2% milkfat.
3. If your melon is kind of blah, bland, this drink is a great way to redeem it, but yes, you'll probably want to add a bit more sugar.
4. Since different watermelons have different amounts of watery-ness to them, you're going to get slightly inconsistent results with this. Your drink is not meant to be thick--remember it's a 'milk' not a 'shake', but if it really just seems kind of overly thin (after you drink it), you may want to add a dash of cream to it. (Heck, why wouldn't you want to do that whether it's thin or not).
5. Use cold watermelon. It's just so much better.
Watermelon Milk
makes 3 C
Prep time: 3 minutes
Cost: $1.05
(watermelon: 1.00, milk: .03, sugar: .02)
3 C seedless watermelon
1/2 C whole milk
1 1/2 Tbsp sugar (more if watermelon is blah)
1 Tbsp cream (optional--I didn't do it, but wouldn't fault anyone who did)
Blend in blender until smooth and pink-frosty.
PRINTABLE RECIPE

Monday, August 29, 2011
Dark Chocolate Brownies
Cheap Eat Challenge, Part 2: Watch as our family of 6 eats on less than $10/day.

I've already shared Kip's brownies. Below you get an equally good brownie with even more chocolate. Hold me.
Note: I published this originally as a guest blogger on somethingswanky.com.
Dark Chocolate Brownies
adapted very slightly from smittenkitchen
makes 8x8 inch pan
Prep time: 7 minutes
Cook time: 30 minutes
10 Tbsp butter
1 1/4 C sugar (I thought this could lose the 1/4 C)
3/4 C plus 2 Tbsp cocoa
1/4 tsp salt (if using unsalted butter)
1/2 pure vanilla extract
2 large eggs
1/2 C all-purpose flour
In a microwave-safe bowl, combine butter (in chunks), sugar, cocoa, and salt if using. Microwave it in 20-second intervals until it's quite warm, but won't burn your finger. It'll be plenty grainy still, so don't worry.
Add vanilla extract. Whisk in eggs. (If you've accidentally gotten your batter crazy hot, give it a few minutes to cool down before adding the eggs.) Stir until well-blended, smooth, and shiny. Add the flour and mix it with a wooden spoon for a minute or so.
Bake at 325 for 30 minutes.
Note: The brownies pictured above were a bit hastily cut. We wanted them, like, immediately, and didn't mind an, er, rustic look with the ragged edges. However, if you want a clean cut, put them in the refrigerator or freezer and cut the brownie cold. They'll be prettier, but you'll have to wait for it.
PRINTABLE RECIPE
Saturday, August 27, 2011
Creamy Vegetable Spread
Cheap Eat Challenge, Part 2: Watch as our family of 6 eats on less than $10/day.

So you've got your sourdough bread, right? Now all you need is something to slather upon it.
And what better thing to slather upon it as summer's vegetables start to get uglier and smaller (mine always do at this time of year) and as your children venture into classrooms filled with other children and the diseases they all share, than a slightly unattractive, but so delicious you will lick out the blender (yes, you will) vegetable spread. (What run-on sentence?)
The mother of this recipe came to me in my inbox when I signed up for greensmoothiegirl's newsletter. If nothing else, signing up was worth it for that recipe, though it's a wonder I tried it at all. Because it seems kind of--I hesitate to use the word gross here--but odd, definitely odd. Yet at the time, I had the garden-ish odds and ends that made such a recipe practical and even attractive (a teeny little eggplant, an ugly tomato, a pepper no one wanted to eat, 1/2 onion--you know--that sort of thing).
I made it. I ate it. I licked the plate. And then I licked the blender. And then I was sad when it was all gone. I couldn't wait for more ugly vegetables to appear.
And the great thing about ugly vegetables is that they always do.
Speaking of ugly vegetables, this is going to give you a about 1 1/2- 2 C per serving. Roasted and pureed vegetables, how I love thee, let me count the ways. Next time I'm going to throw in a can of chick peas and some tahini and see how my vegetable hummus comes out. If it's any good you'll be the first to know.
Creamy Vegetable Spread
adapted from greensmoothiegirl
makes enough for 2 generously spread open-faced sandwiches
Prep time: 5 minutes at start and 5 minutes at finish
Cook time: 45 minutes
Cost: I'm going to have to say I have no idea. I haven't bought these vegetables all summer. I've gotten a CSA, but that doesn't help me to tell you how much this specific food will cost. I'd wager it's about 2 bucks if you get your vegetables at decent prices.
1 small eggplant or 1/2 large eggplant
1 tomato, seeded (though you don't have to be neurotic about it, just scrape out what comes easily)
1 red pepper (mine was the saddest wiltiest thing you've ever seen; didn't matter)
1 small onion or 1/2 large onion
1 clove garlic
2 Tbsp olive oil
salt and pepper for sprinkling
Heat oven to 400 degrees while you chop.
Chop vegetables into similarly sized bits and put onto a cookie sheet. Drizzle with olive oil and toss to coat. Sprinkle generously with salt. Sprinkle with pepper.
Roast for 45 minutes or until soft and just starting to brown at the tips.
Let sit for a minute to cool. Then throw it all in the blender and blend. You can leave it chunky or get it nice and smooth. Seriously, you'll be surprised how good it is.
I like it spread warm and thick on sourdough. Sometimes I butter my sourdough first. Sometimes it's nice with a little cheese on the sourdough also. I'm betting it's be great with pasta or gnocchi (oh, yeah, that'd be good) or even as a cracker or vegetable dip.
PRINTABLE RECIPE

Friday, August 26, 2011
"Reduced" Lunch
Cheap Eat Challenge, Part 2: Watch as our family of 6 eats on less than $10/day.

Today we're starting with a disclaimer instead of a confession: I fully support the school lunch program (and breakfast program). Truly, I think they are wonderful ideas. This post is not intended to criticize these programs or the people who utilize them in any way. I do not think children should ever go hungry and I think these programs are a good way to put a dent in child hunger as well as give a bit of nutrition to children who otherwise might get none. I know school lunches are always under fire for not providing good nutrition (and truly much of this criticism is merited), but it's still come a long way from a whole lot of no food at all, which is what I'm pretty sure it was a couple of generations ago, or maybe even less.
End disclaimer and on to my post.
At the beginning of every school year, I'm confronted with a small dilemma. Every school year all the school children are sent home the form you can fill out if you wish your children to be considered for free or reduced lunches. Our family, being a little heavier on the children end than the money end, is always sort of toeing the line of potential eligibility. So every year I stare at that form and think about filling it out. I don't really want to. My pride interferes as does my feeling about what comprises a healthy lunch. And then there are my personal views about self-reliance and my soap box about how very much many Americans enjoy while still considering themselves "poor."
Additionally, it's not like my kids would eat most of the school lunch offerings anyway. I believe I've mentioned--oh, a time or two--that my children are rather picky. Mark doesn't eat meat. At all. Elizabeth loves meat, but only in it's virginal cooked state--no sauces, toppings or spices of any kind. Both of them have issues with vegetables (who doesn't have issues with school lunch vegetables) and all sorts of other foods. I know if I got them school lunches that they would eat a) chocolate milk, b) pudding, c) tater tots. On Thursdays when it is served, they would also eat pizza. P.S. In case you haven't been around a public school for a while, the pizzas are exactly the same as when we were growing up. I suspect that somewhere in Kansas, there is a large warehouse that, during the cold war, was stocked with frozen school lunch pizzas in the event that the world would end and frozen school lunch pizzas would be no more (say it isn't so). When the world did not end, I suspect that they began using these pizzas and that, still today, they are delivering these same 1955 school lunch pizzas to eager children around the United States.
But that is a digression from this intense intellectual political post. Let's see, where was I? Oh, yes, reduced lunch. Despite my hang-ups, the idea of reduced lunch is always sort of tempting to me.
This year I looked at my form as I always do. I tapped my pen a few times. Reduced lunches are $.40.
And then I thought, as I'm inclined to think when it comes to money and the government, "I bet I can beat that. I bet I can beat that right here at home. In fact, I bet I'm beating it right now."
So I tallied it up. And I was a little surprised about at my findings.
My kids' standard lunch (no, they don't eat exactly this every day, but they eat something like it most days, which, for the record is because they want to eat such dull fare, not because I don't ever provide the poor children other options):
Peanut butter and jelly or honey sandwich
apple sauce
grapes (if they're cheap) or other cheap fruit
treat such as breakfast cookie or a few chocolate chips
water
I don't always get the 2 fruits in; it depends on what we have, but I always get one in and it is always one that they will eat, which I think is a better batting average than school lunch has. Also I don't always get a treat in; heaven knows they don't really need it.
This is how much it costs:
2 slices bread store 100% whole wheat bread: .08
1/2 Tbsp Welch's grape jam: .02
2 Tbsp bulk Skippy peanut butter: .10
1/2 C applesauce (not in the individually packaged things, but measured out from the big bottle into my own tupperware): .15 (Note: originally, this said .24; that was due to a math error on my part, which I noticed the next time I went to the store and looked at applesauce. It has been corrected.)
1/2 C grapes: .16
breakfast cookie: .10
Total: $.61
If I eliminated the applesauce and the breakfast cookie, which is a sometimes typical (as in out of stuff or in a hurry) amount for us, it would be $.36. My kids would still be full enough to make it home, but they'd probably make up for it by eating a bigger snack. But then maybe they wouldn't because I feel like they always want a snack when they get home whether they've eaten a school lunch or a small homemade lunch.
This is how many calories it contains:
bread: 150
peanut butter: 180
jam: 25
applesauce: 50
grapes: 55
breakfast cookie: 150
Total: 610 calories. If you chop out the apple sauce and breakfast cookie you get: 400 calories.
You may not know this (I didn't until recently), but schools have strict caloric guidelines and generally keep their lunches at (at minimum) between 633 and 825 calories, depending on the age of the children. This makes sense since this constitutes 1/3 of the meals of the day that they are supposedly eating (yeah, not counting those 20 snacks and sweets that the schools are helping to contribute to, but that's another rant for another day). And we have to remember that some of these meals are going to desperately needy children who may not get many calories at home. So if I chop out the applesauce and breakfast cookie, I'm not meeting the same caloric standards the school is. Of course, if I fried the whole wheat bread (the equivalent of what the schools sometimes do) I could get those calories back for only a few cents.
This is how nutritious it is:
-1 C fruit (some info on applesauce and grapes specifically)
-Whole wheat bread contains several vitamins (especially B vitamins) as well.
-10 grams fiber: 4 grams of fiber in the bread, plus 3 from the applesauce plus 1 gram from the grapes (wow, thought the grapes were higher than that), 2 grams from the peanut butter. There's also more from a breakfast cookie (should such healthy stuff be the treat; sometimes it's a few chocolate chips) since mine are whole grain, but I don't know how much--I'd guess 2-3 grams, but it's a guess.
-14 grams protein: 7 grams protein from the peanut butter, 7 grams protein from the bread (PB, in combination with whole wheat makes a full protein). There's also probably a bit from the fruit, but not much.
-15 grams (or about 3 tsp) added sugar: 3 grams from PB, 5 grams from bread (another surprise), 7 grams from jam (a breakfast cookie will add another 5 grams or so)
This is how much time it takes me to make: 5 minutes/lunch
Make sandwiches, lovingly cut one sandwich into triangles, pour applesauce into containers, put grapes in containers, pack it all up. (I'm assuming the breakfast cookies have already been made for breakfast at some point and am therefore not counting that as extra time, though--for purposes of full disclosure, it must be admitted that cooking homemade foods does take some time). Also, I haven't counted shopping time since these are things I would buy whether I made school lunch or not. In other words it doesn't add anything to my shopping time.
This is what gets tossed uneaten into the garbage at school:
Crusts. My kids bring home the stuff they didn't eat at lunch because they didn't have time or appetite and eat it after school when they're starving from not having time or appetite to eat it earlier. I think the use of Tupperware containers for fruit encourages that because they're not going to throw that away, so they just leave the uneaten stuff in it and bring it home. Also, I have trained them (i.e. threatened them) to do so. It's important to me that they not waste it. And it's more convenient for them as well. They don't have to wait for me to finish helping with the other's homework before they can have a snack.
Interesting, huh? Considering I've been keeping obsessive compulsive track of our expenses all year, I'm a little surprised that I had no idea how much our homemade school lunches were costing us. Or what we were getting from them. Overall, I'm pleased. Although I'm not sure that applesauce is worth it's weight in gold. Bring on the carrot sticks. Except that Mark will veto that. Which is why we do applesauce. And there we go around again. A dilemma as old as school lunch itself.
I know that's still too much money for some. I know that's still time not everybody has. But I have it. And I intend to use it. Because we all get a little attached to our soapboxes, right?

(Okay, so this picture may be a few things I slapped together on the counter after 10pm tonight. I'll try to get a more accurate shot Monday morning, should this blog manage to enter my mind in the course of the morning rush.)
Today we're starting with a disclaimer instead of a confession: I fully support the school lunch program (and breakfast program). Truly, I think they are wonderful ideas. This post is not intended to criticize these programs or the people who utilize them in any way. I do not think children should ever go hungry and I think these programs are a good way to put a dent in child hunger as well as give a bit of nutrition to children who otherwise might get none. I know school lunches are always under fire for not providing good nutrition (and truly much of this criticism is merited), but it's still come a long way from a whole lot of no food at all, which is what I'm pretty sure it was a couple of generations ago, or maybe even less.
End disclaimer and on to my post.
At the beginning of every school year, I'm confronted with a small dilemma. Every school year all the school children are sent home the form you can fill out if you wish your children to be considered for free or reduced lunches. Our family, being a little heavier on the children end than the money end, is always sort of toeing the line of potential eligibility. So every year I stare at that form and think about filling it out. I don't really want to. My pride interferes as does my feeling about what comprises a healthy lunch. And then there are my personal views about self-reliance and my soap box about how very much many Americans enjoy while still considering themselves "poor."
Additionally, it's not like my kids would eat most of the school lunch offerings anyway. I believe I've mentioned--oh, a time or two--that my children are rather picky. Mark doesn't eat meat. At all. Elizabeth loves meat, but only in it's virginal cooked state--no sauces, toppings or spices of any kind. Both of them have issues with vegetables (who doesn't have issues with school lunch vegetables) and all sorts of other foods. I know if I got them school lunches that they would eat a) chocolate milk, b) pudding, c) tater tots. On Thursdays when it is served, they would also eat pizza. P.S. In case you haven't been around a public school for a while, the pizzas are exactly the same as when we were growing up. I suspect that somewhere in Kansas, there is a large warehouse that, during the cold war, was stocked with frozen school lunch pizzas in the event that the world would end and frozen school lunch pizzas would be no more (say it isn't so). When the world did not end, I suspect that they began using these pizzas and that, still today, they are delivering these same 1955 school lunch pizzas to eager children around the United States.
But that is a digression from this intense intellectual political post. Let's see, where was I? Oh, yes, reduced lunch. Despite my hang-ups, the idea of reduced lunch is always sort of tempting to me.
This year I looked at my form as I always do. I tapped my pen a few times. Reduced lunches are $.40.
And then I thought, as I'm inclined to think when it comes to money and the government, "I bet I can beat that. I bet I can beat that right here at home. In fact, I bet I'm beating it right now."
So I tallied it up. And I was a little surprised about at my findings.
My kids' standard lunch (no, they don't eat exactly this every day, but they eat something like it most days, which, for the record is because they want to eat such dull fare, not because I don't ever provide the poor children other options):
Peanut butter and jelly or honey sandwich
apple sauce
grapes (if they're cheap) or other cheap fruit
treat such as breakfast cookie or a few chocolate chips
water
I don't always get the 2 fruits in; it depends on what we have, but I always get one in and it is always one that they will eat, which I think is a better batting average than school lunch has. Also I don't always get a treat in; heaven knows they don't really need it.
This is how much it costs:
2 slices bread store 100% whole wheat bread: .08
1/2 Tbsp Welch's grape jam: .02
2 Tbsp bulk Skippy peanut butter: .10
1/2 C applesauce (not in the individually packaged things, but measured out from the big bottle into my own tupperware): .15 (Note: originally, this said .24; that was due to a math error on my part, which I noticed the next time I went to the store and looked at applesauce. It has been corrected.)
1/2 C grapes: .16
breakfast cookie: .10
Total: $.61
If I eliminated the applesauce and the breakfast cookie, which is a sometimes typical (as in out of stuff or in a hurry) amount for us, it would be $.36. My kids would still be full enough to make it home, but they'd probably make up for it by eating a bigger snack. But then maybe they wouldn't because I feel like they always want a snack when they get home whether they've eaten a school lunch or a small homemade lunch.
This is how many calories it contains:
bread: 150
peanut butter: 180
jam: 25
applesauce: 50
grapes: 55
breakfast cookie: 150
Total: 610 calories. If you chop out the apple sauce and breakfast cookie you get: 400 calories.
You may not know this (I didn't until recently), but schools have strict caloric guidelines and generally keep their lunches at (at minimum) between 633 and 825 calories, depending on the age of the children. This makes sense since this constitutes 1/3 of the meals of the day that they are supposedly eating (yeah, not counting those 20 snacks and sweets that the schools are helping to contribute to, but that's another rant for another day). And we have to remember that some of these meals are going to desperately needy children who may not get many calories at home. So if I chop out the applesauce and breakfast cookie, I'm not meeting the same caloric standards the school is. Of course, if I fried the whole wheat bread (the equivalent of what the schools sometimes do) I could get those calories back for only a few cents.
This is how nutritious it is:
-1 C fruit (some info on applesauce and grapes specifically)
-Whole wheat bread contains several vitamins (especially B vitamins) as well.
-10 grams fiber: 4 grams of fiber in the bread, plus 3 from the applesauce plus 1 gram from the grapes (wow, thought the grapes were higher than that), 2 grams from the peanut butter. There's also more from a breakfast cookie (should such healthy stuff be the treat; sometimes it's a few chocolate chips) since mine are whole grain, but I don't know how much--I'd guess 2-3 grams, but it's a guess.
-14 grams protein: 7 grams protein from the peanut butter, 7 grams protein from the bread (PB, in combination with whole wheat makes a full protein). There's also probably a bit from the fruit, but not much.
-15 grams (or about 3 tsp) added sugar: 3 grams from PB, 5 grams from bread (another surprise), 7 grams from jam (a breakfast cookie will add another 5 grams or so)
This is how much time it takes me to make: 5 minutes/lunch
Make sandwiches, lovingly cut one sandwich into triangles, pour applesauce into containers, put grapes in containers, pack it all up. (I'm assuming the breakfast cookies have already been made for breakfast at some point and am therefore not counting that as extra time, though--for purposes of full disclosure, it must be admitted that cooking homemade foods does take some time). Also, I haven't counted shopping time since these are things I would buy whether I made school lunch or not. In other words it doesn't add anything to my shopping time.
This is what gets tossed uneaten into the garbage at school:
Crusts. My kids bring home the stuff they didn't eat at lunch because they didn't have time or appetite and eat it after school when they're starving from not having time or appetite to eat it earlier. I think the use of Tupperware containers for fruit encourages that because they're not going to throw that away, so they just leave the uneaten stuff in it and bring it home. Also, I have trained them (i.e. threatened them) to do so. It's important to me that they not waste it. And it's more convenient for them as well. They don't have to wait for me to finish helping with the other's homework before they can have a snack.
Interesting, huh? Considering I've been keeping obsessive compulsive track of our expenses all year, I'm a little surprised that I had no idea how much our homemade school lunches were costing us. Or what we were getting from them. Overall, I'm pleased. Although I'm not sure that applesauce is worth it's weight in gold. Bring on the carrot sticks. Except that Mark will veto that. Which is why we do applesauce. And there we go around again. A dilemma as old as school lunch itself.
I know that's still too much money for some. I know that's still time not everybody has. But I have it. And I intend to use it. Because we all get a little attached to our soapboxes, right?
Thursday, August 25, 2011
Vanilla Butter Frosting
Cheap Eat Challenge, Part 2: Watch as our family of 6 eats on less than $10/day.
I'm not one of those goddesses of cake decoration. This cake here is really really advanced for me. And unless you are 4 years old and intensely cute, you should not expect such efforts, even as this from me.

But there are 2 things that you can expect should you ever request a cake made at my hands:
1) It will taste really really great.
2) It will not be fat-free.
I kept making not enough vanilla frosting as a) I am spacially challenged and b) I kept opting to use more of the frosting in various places. Thus I had to keep making more (if you ever wish to torture yourself on someone's birthday, this is an excellent method). Which gave me plenty of opportunity to perfect my vanilla frosting and write down some measurements for you all.
It is a very good frosting. I have feelings about frosting. I will share them with you. I like buttery frostings. Or frostings with cream. Or cream cheese. I don't like frostings with shortening (an exception comes along once in a while). I don't like frostings that are just all sugar and milk. And I utterly hate hate hate Swiss buttercream frosting. I have very strong feelings about Swiss buttercream frosting and they are not good. I'll eat my whipped butter with some sugar (and more than just a measley cup per pound), thank you very much or I'll not eat it at all (that's what we call willpower, folks).
So when I want vanilla frosting, I want it buttery and creamy and smooth. I also want it sweet. Not too sweet, mind you. But sweet enough that one does not feel it should be eaten on toast. (Unless of course it is one's birthday in which case one may spread it one whatever surfaces one chooses.) In essence, I value the same qualities in a good vanilla frosting as I value in a good chocolate frosting (minus the cocoa, of course).
Vanilla Butter Frosting
Makes (oh, who knows how much really--it should ice a 3-layer cake; probably)
Prep time: 5 minutes
Cost: $2.85
(sugar: 1.50, butter: 1.35)
1 C (2 sticks) butter
2 lb confectioner's sugar
1 tsp vanilla
4-8 Tbsp milk or cream
Melt butter or get it pretty dang soft. Add sugar and mix it in. It will be stiff. Add vanilla and mix. Add milk, starting with 4 Tbsp. Mix. It will probably still be pretty thick, especially if you didn't melt your butter all the way. Add more milk in Tbsp increments. I do this by hand some of the time because I never want to get the beaters out (why that seems harder than hand-mixing, I do not know), but when you use beaters it gets especially light and creamy and nice.
Tip: Want something more grown up? Brown your butter first by heating it on low or medium low for 10-20 minutes, stirring occasionally. (Watch it, you don't want it burned.) If after 15 minutes or so, it's just sitting there looking melted, up the heat a bit, but watch it closely, until it's a medium caramel color.
PRINTABLE RECIPE
As for the cake itself, it was swoon-worthy. So, while I won't embarrass myself, by trying to give you some sort of cake decorating tutorial, I will tell you what I did.
The cake was Pioneer Woman's sheet cake (which is beyond excellent) cut into four equal (and by 'equal' I do mean not very equal at all) rectangles.
I put different colored frostings between the layers creating an internal rainbow (come on, tell me I'm brilliant).
 (If this project hadn't been dictated by a 4-year-old, I would have stopped here. As it was a chocolate frosting with a rainbow on top was the order of the day.)
After this, I cut the sides to even them out and then frosted the outside with a thin layer of white frosting. I then let that frosting set. I did this because the cake, having been cut, was very crumby. I wanted to cememt those crumbs so they didn't smear all into the other frosting. (I can't tell you what a relief it was to take a picture of food that isn't supposed to look great):

After this, I frosted the entire cake in Pioneer woman's sheet cake frosting (only I left it to cool so it was firm enough to spread). Then I made a rainbow on top, and realized I finally had made way too much vanilla frosting so I did little flowers all over the sides and voila--an amateur, but much loved cake. That tasted completely, ridiculously good.

I'm not one of those goddesses of cake decoration. This cake here is really really advanced for me. And unless you are 4 years old and intensely cute, you should not expect such efforts, even as this from me.

But there are 2 things that you can expect should you ever request a cake made at my hands:
1) It will taste really really great.
2) It will not be fat-free.
I kept making not enough vanilla frosting as a) I am spacially challenged and b) I kept opting to use more of the frosting in various places. Thus I had to keep making more (if you ever wish to torture yourself on someone's birthday, this is an excellent method). Which gave me plenty of opportunity to perfect my vanilla frosting and write down some measurements for you all.
It is a very good frosting. I have feelings about frosting. I will share them with you. I like buttery frostings. Or frostings with cream. Or cream cheese. I don't like frostings with shortening (an exception comes along once in a while). I don't like frostings that are just all sugar and milk. And I utterly hate hate hate Swiss buttercream frosting. I have very strong feelings about Swiss buttercream frosting and they are not good. I'll eat my whipped butter with some sugar (and more than just a measley cup per pound), thank you very much or I'll not eat it at all (that's what we call willpower, folks).
So when I want vanilla frosting, I want it buttery and creamy and smooth. I also want it sweet. Not too sweet, mind you. But sweet enough that one does not feel it should be eaten on toast. (Unless of course it is one's birthday in which case one may spread it one whatever surfaces one chooses.) In essence, I value the same qualities in a good vanilla frosting as I value in a good chocolate frosting (minus the cocoa, of course).
Vanilla Butter Frosting
Makes (oh, who knows how much really--it should ice a 3-layer cake; probably)
Prep time: 5 minutes
Cost: $2.85
(sugar: 1.50, butter: 1.35)
1 C (2 sticks) butter
2 lb confectioner's sugar
1 tsp vanilla
4-8 Tbsp milk or cream
Melt butter or get it pretty dang soft. Add sugar and mix it in. It will be stiff. Add vanilla and mix. Add milk, starting with 4 Tbsp. Mix. It will probably still be pretty thick, especially if you didn't melt your butter all the way. Add more milk in Tbsp increments. I do this by hand some of the time because I never want to get the beaters out (why that seems harder than hand-mixing, I do not know), but when you use beaters it gets especially light and creamy and nice.
Tip: Want something more grown up? Brown your butter first by heating it on low or medium low for 10-20 minutes, stirring occasionally. (Watch it, you don't want it burned.) If after 15 minutes or so, it's just sitting there looking melted, up the heat a bit, but watch it closely, until it's a medium caramel color.
PRINTABLE RECIPE
As for the cake itself, it was swoon-worthy. So, while I won't embarrass myself, by trying to give you some sort of cake decorating tutorial, I will tell you what I did.
The cake was Pioneer Woman's sheet cake (which is beyond excellent) cut into four equal (and by 'equal' I do mean not very equal at all) rectangles.
I put different colored frostings between the layers creating an internal rainbow (come on, tell me I'm brilliant).

After this, I cut the sides to even them out and then frosted the outside with a thin layer of white frosting. I then let that frosting set. I did this because the cake, having been cut, was very crumby. I wanted to cememt those crumbs so they didn't smear all into the other frosting. (I can't tell you what a relief it was to take a picture of food that isn't supposed to look great):

After this, I frosted the entire cake in Pioneer woman's sheet cake frosting (only I left it to cool so it was firm enough to spread). Then I made a rainbow on top, and realized I finally had made way too much vanilla frosting so I did little flowers all over the sides and voila--an amateur, but much loved cake. That tasted completely, ridiculously good.

Wednesday, August 24, 2011
Sourdough Bread
Cheap Eat Challenge, Part 2: Watch as our family of 6 eats on less than $10/day.

Let's start with a confession: Sometimes I eat bread with enough butter to give the president of the FDA nightmares.
No, wait, wrong confession. (And yes, I do start an alarming number of my posts with confessions.) My true confession is that several weeks (okay, possibly months--I lost track) ago, one of my dear friends emailed me asking if I had a good recipe for sourdough bread. "I have a great one," I said. "I'll post it next week." And this is where we get to the confession portion of this because you may have noticed that there has been no sourdough bread posted to this site. What you will not notice because you cannot notice such things (unless of course you are an alien life form that has equipment or body parts that do mind reading) is that I didn't even think about that bread. I completely and 100%-ly forgot about it. Until a few days ago. When it suddenly occurred to me as these things do.
So, Amber dear, this one's for you.
The very things that are cool about sour dough are the things that are so intimidating about it. 1) It's sour (although not always crazily so). 2) It requires no yeast as we know yeast (the stuff in the little packets at Walmart). 3) It lives. 4) You can leave it out on your counter for a long long time and it gets this kind of dirty-looking watery stuff on top and that doesn't phase you at all because it's supposed to be there and when you want to make bread, you just go mix that in and then bake with this stuff. Whee! We live on the edge, we sourdough lovers (also, we cannot seem to decide if sour dough is one word or two). Seriously, though, some people struggle with the whole process of making sourdough bread because the starter just seems too gross. To that I would challenge us to think of the sources of our food--sources like dirt, manure, decayed matter, and perhaps Monsanto. Such sources can seem a little sketchy (and one of them definitely is), but we still eat a whole lot of food that comes from those places. Sermon complete. Enjoy your sour dough/sourdough.
Alright, sourdough has several steps. They're easy peasy, but yes, there are several of them. Originally, I was going to make this several posts, but then I figured what the heck if people want to know how to make it they probably want all the info at once. You want it, you got it. You don't want it, just skip to the end for the recipe.
1) To make sour dough, you must first have a starter. You can order this online or get it from a friend or make your own by using a recipe such as this. If you make it homemade it's going to take about 10 days before you can use it. Also, as a note, sour dough improves with age, so the longer you have your starter, the better it gets.
2) The night before you want to make bread, take 1 C starter, 2 1/2 C flour, 2 C water.
3) Let it sit overnight. The next morning, it will be bubbly.
 This is how it looked after a good many hours longer than a night.
Here it is after a good stir. This is how mine usually looks in the morning:

4) Put 1 C of this back in your starter jar. Don't forget this or your bread will come out edible, but a little wonky.
5) To the remaining mixture, add the rest of your ingredients.
6) Let rise.

7) Shape it into bread, rolls, bread bowls, or make pizza crust with it (we're cuckoo for sourdough pizza crust around here)
8) Let it rise in bread pan or whatever pan you're using. (If making pizza crust you'll just top it and put it in the oven.)
9) Bake for 45 minutes at 375.
10) I love it hot and thick with butter. Oh yes I do. After it's cooled it is a lovely lovely bread for a meat sandwich or with reuben or spinach dip or soup. I even like it with peanut butter and jelly, but maybe I'm strange.
Now a few tips for your sour dough:
1) You might want to put your starter in a plastic container. Why? Because, not to point the finger or anything, but sometimes we're clumsy and if you drop and break a glass sour dough starter that you've been using for, like, 20 years, you will be very very sad. Drop the plastic, maybe spill a little, no big deal. Your posterity will still be able to use your starter. I use an old, but clean, quart container that once housed yogurt (and I change it out every once and a while into a new container).
2) The starters can get contaminated. If this happens, you'll notice a pinkish film on the top or the watery bit that separates out will get pink. Pink is bad. Greenish, grayish, or yellowish is just fine. Also, the starter should smell sour, but once you've gotten used to the sour smell, you'll notice if it starts to smell a different and ickier kind of smell. If it turns pink or gets an off (again, not a sour, but a truly wrong smell) throw it out and start again. I'm sorry, but that's the only way.
3) Your starter will separate. You'll get watery stuff on the top that is greenish (usually from use of some whole wheat), grayish or yellowish. This is called, charmingly enough, hooch. I have a very scientific theory that this is where alcoholic beverages got the nickname 'hooch' because sour dough hooch--I'm betting is alcoholic. (Note: I have not, personally, tested this theory.) It is, after all, a fermented grain. And we all know what people do with fermented grains. Anyway, do not drink it. If you are inclined to drink it, you have a serious serious problem (even more serious than normal alcoholics who sneak the fairly pure looking rubbing alcohol, as this is greenish gray and sour smelling) and should seek counseling. Amen. Just mix it in with the rest of the starter (Note: Any alcohol will cook off in the cooking process; don't worry.) and use the starter. If you start to get a lot of hooch at the top of your starter, it's still fine, but if you wish you can pour a bit of it off and mix the rest in. Here's a picture of hooch with starter for the education of all:

4) I've tried 100% whole wheat sour dough and I don't really love it. (oh dear, there's another confession; what will the president of the FDA dream tonight) I do, however, add about 2 C (or about 10% whole wheat to my starter). This gives me a loaf that tastes like a standard loaf of white sour dough with a bit of extra nutrition. You can add more if you wish and see how you like it, but it might start to taste less authentic.
5) This can sit on the counter for weeks, but if it's going to be very long between uses, put it in the fridge. It'll stay good for approximately 70,000 years in there, or maybe a little less. Truth is, I don't really know. I've left mine for a couple of months and it's always been great when I come back to it.
6) If you need more starter, add flour and water in equal amounts to the starter you already have and mix it in (lumps are fine). You just need a bit of starter to get it going.
7) Sour dough likes the open air, but I generally store it with the lid on securely. I don't want contaminants, bugs, or cats floating into it. It gets enough oxygen to keep living even with the lid on. That said, when I first replenish my starter (with flour and water--see #6) I do generally leave it open for a few hours or a day to give it a nice breath. I don't leave it completely open, because heaven only knows what would land in it; I just set the lid on it and leave a small crack.
8) It doesn't like metal. Supposedly, lots of things that grow don't (yogurt, Amish friendship bread, stuff like that). Why? Because something terrible will happen? Duh. And also, per the highly reputable source of random people who give answers on the internet (you know, like myself right now), the reason is 2-fold. One is that some types of metal have mild anti-bacterial qualities and could thereby destroy some of the micro-organisms necessary for the sourdough to work. Two is that the acid from the starter can, over time, ruin or uglify your metal if allowed to sit in it. If you stir or mix your starter with/in metal, I expect you'll be fine, but don't store the starter in metal (like that old pewter beer mug you were going to use, okay).
Sour Dough Bread
makes 3 loaves or 5-6 pizza crusts
Prep time: 30 minutes
Wait time: 1 night + 2 hours + 1 hour = 15 hours. This can be stretched out if that's actually more convenient for you.
Cook time: 45 minutes
Cost: .50/loaf
(starter: nearly free--let's say: .03, flour: 1.30-1.50, oil: .02, sugar: .02)
The night before, mix in large bowl:
1 C sourdough starter
2 C lukewarm water
2 1/2 C flour
The morning of (or afternoon or whenever the heck you get to it):
*Return 1 C of the stuff in the large bowl to your starter.
Then mix:
1 1/2 C water
2 Tbsp sugar
1/2 Tbsp salt
2 Tbsp oil
To this add:
10-12 C flour, but good heavens don't do it all at once.
I start with 2 C of whole wheat flour and mix. Then I begin adding white flour in 2 C increments until it's stiff enough to knead. Take it out of the bowl and knead it, adding more flour as necessary until you get a nice big ball of dough. (For tips on kneading, have a look here. Seriously, it's therapeutic and great for your triceps. Give it a try.)
Let rise until doubled. Sometimes sourdough is slower than regular yeast doughs at rising. I noticed this at first with my dough. Now that the starter is older, however, it rises up nearly as quickly as a yeast bread. My rise time is usually about 2 hours. However, you can let it go longer if you need to. Just punch it on down when you're ready for it.
[Note: If making pizza crusts, divide it into 5-6 blobs, and roll them out into round pizzas. Then top and bake as you otherwise would. No second rise is needed. (Note: I usually make the equivalent of 3-4 pizzas and then make a loaf of bread with the leftover dough.)]
When ready, punch it down and divide into three blobs. Grease 3 bread pans and put the blobs in them in a loaf-like sort of blob. (Alternately, you can form it into 3 rounds and cook it on a stone or a greased cookie sheet.) Allow to rise for another hour or so. Allow to bake at 375 for 45 minutes or until an instant read thermometer reads 180-190.
Have a slice hot. With plenty of butter (not margarine, for all that is right in this world). You won't regret it.
PRINTABLE RECIPE


Let's start with a confession: Sometimes I eat bread with enough butter to give the president of the FDA nightmares.
No, wait, wrong confession. (And yes, I do start an alarming number of my posts with confessions.) My true confession is that several weeks (okay, possibly months--I lost track) ago, one of my dear friends emailed me asking if I had a good recipe for sourdough bread. "I have a great one," I said. "I'll post it next week." And this is where we get to the confession portion of this because you may have noticed that there has been no sourdough bread posted to this site. What you will not notice because you cannot notice such things (unless of course you are an alien life form that has equipment or body parts that do mind reading) is that I didn't even think about that bread. I completely and 100%-ly forgot about it. Until a few days ago. When it suddenly occurred to me as these things do.
So, Amber dear, this one's for you.
The very things that are cool about sour dough are the things that are so intimidating about it. 1) It's sour (although not always crazily so). 2) It requires no yeast as we know yeast (the stuff in the little packets at Walmart). 3) It lives. 4) You can leave it out on your counter for a long long time and it gets this kind of dirty-looking watery stuff on top and that doesn't phase you at all because it's supposed to be there and when you want to make bread, you just go mix that in and then bake with this stuff. Whee! We live on the edge, we sourdough lovers (also, we cannot seem to decide if sour dough is one word or two). Seriously, though, some people struggle with the whole process of making sourdough bread because the starter just seems too gross. To that I would challenge us to think of the sources of our food--sources like dirt, manure, decayed matter, and perhaps Monsanto. Such sources can seem a little sketchy (and one of them definitely is), but we still eat a whole lot of food that comes from those places. Sermon complete. Enjoy your sour dough/sourdough.
Alright, sourdough has several steps. They're easy peasy, but yes, there are several of them. Originally, I was going to make this several posts, but then I figured what the heck if people want to know how to make it they probably want all the info at once. You want it, you got it. You don't want it, just skip to the end for the recipe.
1) To make sour dough, you must first have a starter. You can order this online or get it from a friend or make your own by using a recipe such as this. If you make it homemade it's going to take about 10 days before you can use it. Also, as a note, sour dough improves with age, so the longer you have your starter, the better it gets.
2) The night before you want to make bread, take 1 C starter, 2 1/2 C flour, 2 C water.
3) Let it sit overnight. The next morning, it will be bubbly.

Here it is after a good stir. This is how mine usually looks in the morning:

4) Put 1 C of this back in your starter jar. Don't forget this or your bread will come out edible, but a little wonky.
5) To the remaining mixture, add the rest of your ingredients.
6) Let rise.

7) Shape it into bread, rolls, bread bowls, or make pizza crust with it (we're cuckoo for sourdough pizza crust around here)
8) Let it rise in bread pan or whatever pan you're using. (If making pizza crust you'll just top it and put it in the oven.)
9) Bake for 45 minutes at 375.
10) I love it hot and thick with butter. Oh yes I do. After it's cooled it is a lovely lovely bread for a meat sandwich or with reuben or spinach dip or soup. I even like it with peanut butter and jelly, but maybe I'm strange.
Now a few tips for your sour dough:
1) You might want to put your starter in a plastic container. Why? Because, not to point the finger or anything, but sometimes we're clumsy and if you drop and break a glass sour dough starter that you've been using for, like, 20 years, you will be very very sad. Drop the plastic, maybe spill a little, no big deal. Your posterity will still be able to use your starter. I use an old, but clean, quart container that once housed yogurt (and I change it out every once and a while into a new container).
2) The starters can get contaminated. If this happens, you'll notice a pinkish film on the top or the watery bit that separates out will get pink. Pink is bad. Greenish, grayish, or yellowish is just fine. Also, the starter should smell sour, but once you've gotten used to the sour smell, you'll notice if it starts to smell a different and ickier kind of smell. If it turns pink or gets an off (again, not a sour, but a truly wrong smell) throw it out and start again. I'm sorry, but that's the only way.
3) Your starter will separate. You'll get watery stuff on the top that is greenish (usually from use of some whole wheat), grayish or yellowish. This is called, charmingly enough, hooch. I have a very scientific theory that this is where alcoholic beverages got the nickname 'hooch' because sour dough hooch--I'm betting is alcoholic. (Note: I have not, personally, tested this theory.) It is, after all, a fermented grain. And we all know what people do with fermented grains. Anyway, do not drink it. If you are inclined to drink it, you have a serious serious problem (even more serious than normal alcoholics who sneak the fairly pure looking rubbing alcohol, as this is greenish gray and sour smelling) and should seek counseling. Amen. Just mix it in with the rest of the starter (Note: Any alcohol will cook off in the cooking process; don't worry.) and use the starter. If you start to get a lot of hooch at the top of your starter, it's still fine, but if you wish you can pour a bit of it off and mix the rest in. Here's a picture of hooch with starter for the education of all:

4) I've tried 100% whole wheat sour dough and I don't really love it. (oh dear, there's another confession; what will the president of the FDA dream tonight) I do, however, add about 2 C (or about 10% whole wheat to my starter). This gives me a loaf that tastes like a standard loaf of white sour dough with a bit of extra nutrition. You can add more if you wish and see how you like it, but it might start to taste less authentic.
5) This can sit on the counter for weeks, but if it's going to be very long between uses, put it in the fridge. It'll stay good for approximately 70,000 years in there, or maybe a little less. Truth is, I don't really know. I've left mine for a couple of months and it's always been great when I come back to it.
6) If you need more starter, add flour and water in equal amounts to the starter you already have and mix it in (lumps are fine). You just need a bit of starter to get it going.
7) Sour dough likes the open air, but I generally store it with the lid on securely. I don't want contaminants, bugs, or cats floating into it. It gets enough oxygen to keep living even with the lid on. That said, when I first replenish my starter (with flour and water--see #6) I do generally leave it open for a few hours or a day to give it a nice breath. I don't leave it completely open, because heaven only knows what would land in it; I just set the lid on it and leave a small crack.
8) It doesn't like metal. Supposedly, lots of things that grow don't (yogurt, Amish friendship bread, stuff like that). Why? Because something terrible will happen? Duh. And also, per the highly reputable source of random people who give answers on the internet (you know, like myself right now), the reason is 2-fold. One is that some types of metal have mild anti-bacterial qualities and could thereby destroy some of the micro-organisms necessary for the sourdough to work. Two is that the acid from the starter can, over time, ruin or uglify your metal if allowed to sit in it. If you stir or mix your starter with/in metal, I expect you'll be fine, but don't store the starter in metal (like that old pewter beer mug you were going to use, okay).
Sour Dough Bread
makes 3 loaves or 5-6 pizza crusts
Prep time: 30 minutes
Wait time: 1 night + 2 hours + 1 hour = 15 hours. This can be stretched out if that's actually more convenient for you.
Cook time: 45 minutes
Cost: .50/loaf
(starter: nearly free--let's say: .03, flour: 1.30-1.50, oil: .02, sugar: .02)
The night before, mix in large bowl:
1 C sourdough starter
2 C lukewarm water
2 1/2 C flour
The morning of (or afternoon or whenever the heck you get to it):
*Return 1 C of the stuff in the large bowl to your starter.
Then mix:
1 1/2 C water
2 Tbsp sugar
1/2 Tbsp salt
2 Tbsp oil
To this add:
10-12 C flour, but good heavens don't do it all at once.
I start with 2 C of whole wheat flour and mix. Then I begin adding white flour in 2 C increments until it's stiff enough to knead. Take it out of the bowl and knead it, adding more flour as necessary until you get a nice big ball of dough. (For tips on kneading, have a look here. Seriously, it's therapeutic and great for your triceps. Give it a try.)
Let rise until doubled. Sometimes sourdough is slower than regular yeast doughs at rising. I noticed this at first with my dough. Now that the starter is older, however, it rises up nearly as quickly as a yeast bread. My rise time is usually about 2 hours. However, you can let it go longer if you need to. Just punch it on down when you're ready for it.
[Note: If making pizza crusts, divide it into 5-6 blobs, and roll them out into round pizzas. Then top and bake as you otherwise would. No second rise is needed. (Note: I usually make the equivalent of 3-4 pizzas and then make a loaf of bread with the leftover dough.)]
When ready, punch it down and divide into three blobs. Grease 3 bread pans and put the blobs in them in a loaf-like sort of blob. (Alternately, you can form it into 3 rounds and cook it on a stone or a greased cookie sheet.) Allow to rise for another hour or so. Allow to bake at 375 for 45 minutes or until an instant read thermometer reads 180-190.
Have a slice hot. With plenty of butter (not margarine, for all that is right in this world). You won't regret it.
PRINTABLE RECIPE

Tuesday, August 23, 2011
Zucchini Orzo
Cheap Eat Challenge, Part 2: Watch as our family of 6 eats on less than $10/day.
Now you see the zucchini...

Now you don't.

Which is one of the many many wonderful things about this recipe. If there are people in your family willing to consume large amounts of vegetable with their pasta, you can leave the skin of your zucchini on and include any of a number of other delicious and colorful vegetable add-ins (tomatoes, peppers, olives, peas...). If the people in your family would rather see their fingernails ripped off than know that their pasta contains a vegetable not in sauce form, then you merely peel the skins off the zucchini and I'll be darned if they don't get completely lost in that orzo. And just in case they're not completely lost, you can slather that stuff in a nice red tomato sauce and, by gum, they will be.
But first a few words on hiding one's vegetables in unsuspecting white starchy foods. I have a friend who studied nutrition who believes very strongly that hiding vegetables instead of serving them straight up just develops unhealthy habits in children (and, cough, husbands). She believes that while they may end up eating their hidden vegetables, they will not learn to be accepting of those poor vegetables that have the misfortune of actually looking the part, and that this will inhibit their making of healthy choices throughout life. I agree with my friend wholeheartedly. I believe that sometimes vegetables must be seen instead of just heard, um--tasted, um, whatever. Kids need to get used to trying things that don't look like a cookie or taste like a cookie or have a nifty cartoon character on the box.
And yet. And yet. There are those times. I think most of you know what times I mean--those times when a hapless vegetable is simply so unloved that something must be done to get the little guy in the gate. Or times when your kid is going through a little vegetable strike (Hello Emma). Or when you don't want a big fight at dinner. Or times when you, in your perfectly clueless first few years of parenting--years in which you may or may not have allowed your oldest child to have a peanut butter sandwich or a bowl of cereal every night for dinner because the little dear just wouldn't eat anything else and you were so (hands wringing) concerned that the little guy would perish from his own perfectly darling stubbornness that you gave in every night even though every other mother who had been a mother of more than one child for more than 60 seconds counseled you not to give in--yes, you may be one of those parents who may or may not (this is not a place of judgment) have neglected to develop said healthy habits in your children and therefore must resort to measures of stealth. At least occasionally while you backtrack and try to make up for lost vegetable time and establish some better habits, conking your head on the countertop wondering why--why I ask you--you did not listen to those more experienced mothers and tell little Junior Cute Cheeks to eat up or go without.
The solution: hide some vegetables in your food, but don't forget to set a few whole on the table as well.
By the way, orzo, should you not know what it is (I'd never cooked with it before either), is a small pasta that looks like rice, or as Mark pointed out, small seeds. You will be shocked how much zucchini can be stuffed into a serving of it without it being noticeable. I went conservative the first time (the peeled zucchini picture) because I really didn't know how my audience would react, and we still each got 1/2 C. The next day I made more for my lunch (the un-peeled zucchini picture) and I put a whole medium sized zucchini in one large serving and wished I'd added more.
And if you're still not convinced how awesome this can be, it only takes 20 minutes from start to finish (and that includes zucchini grating time). Marry me, 20-minute meals.
Zucchini Orzo
adapted from Animal, Vegetable, Miracle
Makes 2 main course or 4 side dish servings
Prep and cook time: 20 minutes
1/2 lb orzo pasta
1 large zucchini or about 4 C grated zucchini
1/4 grated onion or a couple dashes onion powder
2 cloves garlic minced (or a couple dashes garlic powder)
2-4 Tbsp olive oil
1/4 C Parmesan cheese or sharp cheddar (supposing you happen to run out of Parmesan on the day you're to make this, not that I ever would)
salt and pepper to taste
a few pinches chicken bouillon granules
other chopped vegetables (optional--peppers, olives, tomato, spinach, peas--all these would have been great additions)
Cook orzo according to instructions on box.
While it's cooking, heat oil in a skillet and grate your zucchini and onion if using (and any other hard vegetables such as peppers that you may be using). Add salt, pepper, and onion/garlic powders to oil and let them sit for 20 seconds. Add vegetables to oil in skillet (should sizzle, but not go nuts). Mix it around to get it all kind of oily. Turn heat to medium or just below that and allow the zucchini to cook fully (uncovered), stirring occasionally. Add garlic (if you didn't add powder above.
Drain orzo. Add it to skillet and turn heat to low. Mix it up with the zucchini mixture. Add pinches chicken bouillon granules. Add any soft vegetables you may be using such as tomatoes or spinach. Add cheese(s). Give it a stir or two. Taste, adjusting seasoning and serve. Note: I liked this best simply plain, but Kip liked his best with a bit of tomato sauce mixed in. Of course, you can also add meatballs or sausage or whatever if you wish to de-vegetarian it.
PRINTABLE RECIPE
Monday, August 22, 2011
Lemon Muffins with White Chocolate Chips
Cheap Eat Challenge, Part 2: Watch as our family of 6 eats on $10/day or less.
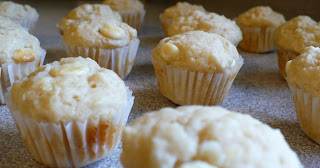
Today is Secret Recipe Club reveal day. Can I get a whoot whoot. Thanks to Amanda and Amanda's Cookin' for cooking up such a fun idea. (Click here if you're interested in signing up)
This month I got Debbi Does Dinner Healthy and Low Calorie. And truly Debbi's blog is full of healthy ideas. I printed off several of her recipes and have already tried more than one. Which did make picking which one I used for today a little tricky.
I chose the Lemon Muffins because a) I love lemon and b) I had a decent picture.
Debbi's recipe actually called for all white flour. But I had some white whole wheat that I've never used before and have been wanting to audition. This recipe seemed like the perfect opportunity (no one wants to eat a brown lemon muffin).
One thing I loved about these muffins was how very much you could play with them. I added white chocolate chips. Here are some other ideas:
-Add dried cranberries or macadamia nuts or both for a lemon cranberry macadamia muffin. Yum.
-Top or fill with raspberry or blackberry jam.
-Create a lemon glaze to pour over them (a little lemon juice and about 1 C of powdered sugar)
-Use lemon extract instead of vanilla extract for a more lemony punch.
-Try orange instead of lemon.
-Roll them while warm in sugar as Debbi does.
Lemon Muffins with White Chocolate Chips
adapted from Debbi Does Dinner Healthy and Low Calorie
Prep time: 10 minutes
Cook time: 12 minutes
makes 12 large muffins
Cost: $1.42/ per muffin: about .12 cents, a little more with chocolate chips
(lemon: .30, milk: .10, flour: .10, whole wheat flour: .18, sugar: .09, butter: .30, egg: .10, yogurt: .25)
1/4 C lemon juice (I used fresh squeezed, but you could probably get away with bottled)
3/4 C milk
2 C all-purpose flour (I used 1 C all purpose and 1 C white whole wheat)
1/2 C sugar
2 1/2 tsp baking powder
1/2 tsp salt
1/4 C butter, melted
1 egg
1/2 C vanilla yogurt (I used plain and didn't miss the vanilla-ness; you could probably use lemon to very good effect)
1 tsp lemon zest
1 tsp vanilla extract
1/2-1 C white chocolate chips
Debbi rolls them in 2 Tbsp melted butter and then sugar when they're warm, but I skipped this since I took the lazy road and added white chocolate chips.
Heat oven to 400. Prepare muffin pan.
In small bowl combine lemon juice and milk and set aside. In a large mixing bowl, whisk flour, sugar, baking powder, and salt.
To milk/lemon juice, add butter, egg, yogurt, lemon zest and vanilla (don't worry if it's clumpy or curdled looking)
Add wet ingredients to dry and stir just until combined. When there are still a few wisps of flour left, throw in the white chocolate chips if using.
Spoon batter into muffin pan. Bake about 12 minutes or until a knife inserted comes out clean.
Debbi likes hers warm, but I preferred mine cooled. I thought it brought out the lemon more. I'm weird like that with muffins.
PRINTABLE RECIPE
Saturday, August 20, 2011
Strawberry Sauce
Cheap Eat Challenge, Part 2: Watch as our family of 6 eats on less than $10/day.

We still had more strawberries that needed to be used. And since our church has changed from starting at 9:00 to starting at 11:00, Sunday has become fun pancake day. Fun pancake day meet sketchy strawberries transformed.
Of course ice cream, yogurt, pound cake, angel cake, and possibly oatmeal would welcome this as well.
Strawberry Sauce
Makes a couple cups
Prep and cook time: 10-15 minutes
Cost: $1.15
(strawberries: .99, sugar: .16)
16 oz. strawberries, hulled and cut
1 C sugar
1 Tbsp cornstarch
1/2 C water
In saucepan, combine sugar and cornstarch, so the cornstarch doesn't go all lumpy on you. Whisk in water and bring to a gentle boil. Add strawberries. Simmer until fruit is tender and squishable. Mash with a potato masher. (You can also puree if you want a super smooth sauce, but I leave it a little chunky.) Taste to be sure it has enough sugar for you. Sometimes if you're strawberries are really dreadful, you might need a little more. On the flip side, if they're very sweet, you can start with less sugar.
Serve warm or cold. This will keep refrigerated for several weeks (which is a whole lot longer than your molding strawberries will).
PRINTABLE RECIPE
Friday, August 19, 2011
Balsamic Strawberries
Cheap Eat Challenge, Part 2: Watch as our family of 6 eats on less than $10/day.

We had a refrigeration malfunction yesterday. Which is kind of a pain when you went big-shopping on Tuesday. As a result, I felt like we needed to get a bunch of that food into either usable condition or extended-life condition. What better way to do that than to add sugar? Oh, I know, let's add sugar and vinegar.
I've heard tell of these strawberries for a while and today with my fading strawberries and barely rejuvenated fridge, it seemed like the perfect time to try them out. I found several recipes that were pretty much identical except for the amount of balsamic vinegar which was used. It ranged from a mere teaspoon to a whopping 2 tablespoons. I tried both and decided I prefer to settle in the middle with 1 tablespoon. If you are afraid, start with a teaspoon and see what you think. It gives it a little kick and some complexity that strawberries with only sugar lack (for the record, I'm perfectly happy with strawberries coated only with sugar as well).
This can be eaten alone if you're sort of a strawberry pig like me. It can be used as a sauce on cakes, ice cream, or yogurt. It can rescue dodgy strawberries from their compost bin future. And it can impress your gourmet friends.
The best part about this, however, is that because of it I got my kids to consume fruit for dessert. Big deal, right? Not in this neighborhood. Fruit and fruit-like things have no birthright as desserts in this chocolate/ice cream/peanut butter obsessed family. So even though the fruit had plenty of added sugar, and even though I served it with a lovely heap of whipped cream, I feel the experiment a success. We can eat fruit in some form for dessert. We can call it dessert. And we can be excited about it. You should be too.
Balsamic Strawberries
Serves 4 (in a smallish sort of way)
Prep time: 1 minute
Cost: 1.05
(strawberries: .99, sugar: .05, vinegar: .01)
1 lb strawberries, hulled and sliced
1/4 C sugar
1 Tbsp balsamic vinegar
dash pepper (everyone swore this was completely awesome in every way, but I forgot it so I can't say)
Put the first three ingredients in a bowl. Mix gently. Let sit for at least an hour at room temperature. Some recipes said not to let it go for more than 4 hours, but mine sat all day and tasted good at the end of it. (For the record, I also tasted it at various points throughout the day and found that after the first hour or two there was little change in taste. I refrigerated them in our now working refrigerator after 4 or 5 hours.)
Right before serving, add a dash of black pepper.
Snark them up.
Note: You can stop there. However, there was a bit of vinegar sweet strawberry juice left (probably about 1/4 C). I kept it and plan to add a bit of olive oil and salt to it tomorrow and see how it tastes as a salad dressing. I'm betting it will be pretty good. It would also be a stunning glaze for chicken or fish. Oh, and while we're throwing out ideas, I sliced some peppers and let them marinate in it for an hour or so this afternoon and thought it did right by them as well. Think of the possibilities: cucumber, daikon radish--the sky's the limit.
PRINTABLE RECIPE
Linked up to Sweets for Saturday
Thursday, August 18, 2011
Vegetable and Ricotta Stuffed Pepper Boats
Cheap Eat Challenge, Part 2: Watch as our family of 6 eats on less than $10/day.


Until a few years ago, I just couldn't stand peppers. At all. They were one of the few vegetables that just didn't work for me. I tried to love them. After all, they were so very very pretty. I'd try them every year or so when I saw some lovely slices on someone's vegetable tray. And every year I thought, "Nope, still not working for me." It got to the point where I thought they were destined to be picked off of my supreme pizzas forever. And then one summer, it happened. We were at a friend's house, she had a plate of red, yellow, and green pepper slices. I was starving. I pulled off a red, gave it a bit of dip. It was sweet--sweeter than I remembered. I had another and another. I tried a yellow. Soon enough I was porking out on them dip-free and I was eager to get more. I started buying them after that--just occasionally when I was in the mood. And then, one day, they made their way into my garden. There's no going back after that. It's too much work not to love them. (I'm feeling a marriage analogy coming on, but I'll try to limit my marriage analogies to my discussions involving brownies, and maybe cookies.)
I still love the reds best. And although the greens and I have made peace, we're still not, like, BFF. Not this year at least.
This summer I've been using my lunches to try to work my way through some of summer's bounties. In the midst of eating my way through a large zucchini and more than a windowsill full of garden tomatoes, my friend gave me some of the prettiest banana peppers ever--some were still pale, some had turned orange, and some were red enough for party lipstick. Would that we all aged as well as peppers do.

So I made stuffed peppers. Only these couldn't possibly stand upright, so I laid them down and made pepper boats. I know; I know; I'm completely brilliant. I just can't help myself sometimes.
Seriously, though, there are several advantages to the banana boats as opposed to the average stuffed pepper:
1) They take less time in the oven because they're skinnier.
2) They're less messy to cut up and eat.
3) When you sprinkle cheese on the top, you have more surface area for more cheese. I ask you, do you need more reason than this? I don't.
Vegetable and Ricotta Stuffed Pepper Boats
Makes 4
Prep time: 5 minutes
Cook time: 20 minutes
Cost: Guys I'm struggling here as most of my vegetables have been free, so this is a bit of a guess: $1.57
(zucchini: .15, tomato: .35, onion: .02, peppers: no idea really; I've honestly never purchased them; let's say: .40, ricotta: .50, feta: ..15)
Note: One of the great things about stuffed peppers is that you can substitute whatever you have. (In fact, I kept mis-typing this to read 'stuff peppers' which can be uncannily accurate.) You can use whatever fresh veggies you've got. You can sub cottage cheese for the ricotta. You can sprinkle it with any cheese that milks your cow (although I like something with some punch like sharp cheddar, Parmesan/Romano/Asiago, or feta). You can use couscous, rice, or quinoa in place of some or all of the ricotta. You can add bacon or sausage or ground beef if you wish to de-vegetarian this. Bread crumbs, sure. Paprika on top, why not? Hot peppers instead of banana; you're brave, but go for it. And, yes, you can even use just a regular old bell pepper. The point is that, if you like peppers, these babies are tough to mess up. They're even tough to uglify. Who doesn't love that in a food?
Another Note: I prepare the filling and just make one pepper at a time for lunch. So I make my pepper and then I put the leftover filling in the fridge so I can use it the next day to stuff another pepper for lunch.
One final note: While I'm preparing the filling I like to throw the (de-stemmed, de-seeded) pepper I'm going to use into the oven while the oven heats and while I prepare the filling on the stove. This way it cooks a bit before I put the fillings in and the whole thing cooks a bit faster.
Okay, this is really really the final note: It is possible you could skip sauteing the vegetables and just mix everything up, stuff the pepper, and then cook it a little longer in the oven. I think it goes faster with the stove to oven method, but if you've got plenty of wait time for things to cook and less hands-on time to be standing at a stove, this might be a great option for you. I've got to warn you, though, that I haven't tried it. If you do and it works as well as I think it would, let me know, would you?
4 banana or other long peppers
1/2 C diced zucchini
1/8-1/4 C sliced onion
1 tomato, diced
1 C ricotta cheese
2 Tbsp feta cheese
salt and pepper to taste
Lay your peppers down and cut a generous sliver our of the side facing up. (Leave the stem in tact so your filling doesn't leak out.) Cut out the seeds and any ribs that are in your way.
Heat a bit of olive oil in a frying pan. Add zucchini and onion to hot oil and saute until the onions are clear and tender. Add tomatoes and salt and pepper. Cook another minute more until tomatoes are warm.
Put this vegetable mixture into a bowl. Add ricotta. Taste and adjust your seasonings. Stuff the peppers and sprinkle with feta cheese.
Bake in oven at 400 for 10-15 minutes.
PRINTABLE RECIPE

Wednesday, August 17, 2011
Pizza with Garbanzo Sauce and Tomatoes
Cheap Eat Challenge, Part2: Watch as our family of 6 eats on less than $10/day.


Let me start off with a disclaimer: If you or someone you love hates beans, you or someone you love will hate this pizza.
If, however, you like beans--especially in nearly hummus form, this may be just the thing for you. It's particularly welcome if you are in a bit of a pizza funk and bored to tears with whatever kind of pizza you usually eat. This was the case with me. I wanted something different. I got this idea from Debbi at Debbi Does Dinner Healthy and it got me out of my funk very nicely. This pizza is hardy, nutritious, and tasty. If--I must re-emphasize--beans are something you like. Because there is no escaping the beans in this. I thought that they might just subtly blend in with the tomato sauce. They do not. They are their own layer, not one of those hidden nutritious foods that you can just slip under your kids' noses in order to get more plant proteins and fiber into their diet. The beans are there. You will either embrace them or not. Take your stand.
Pizza with Garbanzo Sauce and Tomatoes
adapted from Debbi Does Dinner Healthy and Low Calorie
Prep time: 10 minutes
Cost: $3.80
(crust: homemade is about .80, beans: .66, tomatoes--free for me; I'm guessing .80, mozzarella: 1.50, other stuff: .04)
1 large or 2 small pizza crusts
1 14-oz. can garbanzo beans (chick peas)--drained and rinsed
1 tsp olive oil
1 Tbsp water
1 garlic clove, minced
2 tsp Italian seasoning
about 20 small pear tomatoes or 25 cherry tomatoes
4-8 basil leaves
8 oz mozzarella cheese
meat such as pepperoni or sausage if desired
Note: This can be prepared with any old marinara sauce in lieu of the tomatoes listed above. However, if using a marinara that contains salt, omit at least 1 tsp of the Italian seasoning from the bean concoction because it is very salty. In this recipe that's fine because it balances with the plain tomatoes. However, a salted sauce would push it over the edge if you don't reduce the Italian seasoning.
Prepare crusts. Heat oven to 425.
Mash garbanzo beans in food processor or blender. Add olive oil, water, garlic clove, and Italian seasoning. It won't quite be as smooth as hummus, but it will be close.
Spread bean paste onto crust.
Wipe out food processor or blender and put tomatoes and basil in. Give them a few pulses until they are the texture you wish (I was going for very slightly chunky because I knew this wouldn't be approved by my kids no matter what I did.)
Pour the tomato sauce over the beans. I used yellow tomatoes because that's what my garden had. However, something red would have been prettier.
Top as you wish. You can add spinach, olives, meat, or whatever. Top this with mozzarella cheese.
Bake at 425 for 12-17 minutes.

Tuesday, August 16, 2011
The Food Journal
Today I have a quick question for you all:
Does anybody care about "Jean's Food Journal"? In it, I keep a sometimes haphazard record of what I and my family eat each day. Lately it's been less fun for me to do.
However, if people are interested in it, I will certainly do it, and I will try to do it more diligently and more often (I've started slacking a bit in the last month or two and have been skipping days). I expect, in fact, that if people really are interested in it or have suggestions for how to improve it, it might even become more fun again.
And so, if you are interested in it or perhaps if you aren't, but you think you could be, please tell me what you'd really really like to see in it.
Do you want it to be more specific?
Do you want portion sizes included?
Do you want to know how many fruits and vegetables the rest of the family consumes?
Do you want to know how much time I spend in the kitchen cooking and/or cleaning?
Do you want to know how very many delicious foods I make just for me because I am purely confident that they will bomb with my family?
Do you want to hear the comments my children sometimes make at the dinner table about my food (hint: it doesn't start with 'This is delicious Mom; how do you do it all)?
Do you want to know my anti-aging secrets (sorry, you got the wrong blog, honey)?
At any rate, let me know what kind of food journal you would be interested in (if any)?
Monday, August 15, 2011
Peanut Butter Balls
Cheap Eat Challenge, Part 2: Watch as our family of 6 eats on less than $10/day.

My mother made these for us when we were kids. Happy sigh. I believe they're still a favorite treat of my littlest brother, but then maybe I just have the poor man frozen forever in childhood.
In addition to being hopelessly nostalgic, these are a quick dessert staple around here. In fact, if you have a look at my food journal often enough, you'll notice them popping up quite frequently. They're the perfect treat when your kids come in at 7:00, needing to get ready for bed, but telling me they're starving and begging for dessert. I also like that they give a little calorie/protein punch in the evening. This is not the type of thing middle aged women need, but kids who eat at 5:00 and then play for a couple hours are sometimes getting hungry just before bed.
So why the heck haven't I posted the recipe before? Recipe? Who said anything about a recipe? I throw some peanut butter in a bowl, add some chocolate chips, then some powdered sugar. Oh, and I rarely actually roll them into balls (though I'm pretty sure my apparently-more-loving-than-I mother did). I just plop them down, a la raw cookie blob.
For you, Savannah and I rolled them up nice and neat. Oh, and I measured out the ingredients too.
Want to get fancy?
-Add some cream cheese to the peanut butter. This will give them a more grown up flavor. (Have a look here for an idea of how much.)
-Dip them, entirely or halfway, in melting chocolate.
-Include white chocolate chips.
-Add nuts, raw or lightly toasted.
-Add coconut. Yeah, I love it in everything. You can also add dried cranberries or raisins to good effect.
-Add a dusting of confectioner's sugar or cinnamon on top.
Peanut Butter Balls
Makes about 20 small balls
Prep time: 5 minutes
Cost: $.75
(PB: .30, sugar: .25, chocolate chips: .20)
1/3 C peanut butter
2/3-1 C powdered sugar (I try to keep these healthier--not healthy mind you, but healthier--by adding less sugar. Of course this results in a much looser ball, one you might even be inclined to refer to as a blob. My kids don't care. However, if you want them to look neat, pretty, and to roll easily, you'll need more sugar.)
3-6 Tbsp chocolate chips (depending on how very generous you are; I'm stingy)
Put peanut butter in a bowl. Add chocolate chips and mix. Add sugar. Start with the smaller amount and continue adding more as needed to get it to a consistency you consider firm enough. Roll into balls if you're a proactive person. Whether you're proactive or not, make sure the toddler doesn't shove them all into her mouth at once and choke.
PRINTABLE RECIPE
Saturday, August 13, 2011
Three Iced Delights
Cheap Eat Challenge, Part 2: Watch as our family of 6 eats on less than $10/day.

In case you've missed it, it's August:
August = heat
August = back to school
August = great need for iced delights
Recently I've found 3 online that I think perfectly fabulous. Only 1 needs an ice cream maker. Two are so healthy they can be served for breakfast. One I'll be eating for my last meal and, unless a great deal of willpower is exercised, every day until then. And all three could easily qualify as a perfectly perfect after school snack. Or weekend fun snack. Or Sunday breakfast snack. Or, you know, just about an any-old-time snack.
1. Strawberry Banana Sorbet
-No ice cream maker.
-Made with only fruit.
-If you're dealing with not very sweet strawberries, you may want to add a Tbsp of sugar, but do taste it first to be sure.
-Perfectly virtuous, yummy, and pretty in every way.
2. Peanut Butter Cinnamon Ice Milk
-Ice cream maker required. (Although I'm willing to bet if you froze it in ice cubes and then blended it up with a good blender, that would totally work with this recipe.)
-Made with skim or low-fat milk, so the PB's the only fat.
-This called for some hot spices, which I omitted, but if you and yourn are brave, go for it. Mine ended up merely peanut cinnamon-y, which gave it a fun exotic taste. Not into exotic? Omit the cinnamon and mix in some chopped strawberries at the end of freezing to get a PBJ effect and some extra nutrients.
3. Grapefruit Gelato
-No ice cream maker required.
-If you've only got heavy whipping cream, lighten it up by using a bit of whole milk in the mix: I used the lowest-fat cream I could find, which was about 36% milkfat. Donna recommends 25-30%, so I used 1 3/4 C cream and 1/4 C 2% milk.
-This one is the least healthy, but it could make a person look forward to her last meal. It is much better than any gelato I've ever purchased from fancy stores in the states.
-Try it with lemon, limes, or any highly acidic fruit. And if you do, please please please let me know how it turns out.

Friday, August 12, 2011
Tomato Bum Rot
Cheap Eat Challenge, Part 2: Watch as our family of 6 eats quite well on less than $10/day.

I have, sadly, no recipe to post today. My last several have been a bust. In fact, if I ever open a pastry shop, I'm going to call it The Ugly Crust. (Oh my gosh, I just wrote a poem with meter and rhyme without even meaning to. Perhaps I've been reading too manychildren's books plays by Shakespeare.) The Ugly Crust being the least of tonight's dinner issues.
And then I went out to the garden tonight and was greeted by these rotten bottomed tomatoes. They were all from the bush with Romas. And so I thought I'd take rotten bottomed tomatoes and make rotten bottom tomato juice--no, no, that's all wrong (although I do wish to point out the internal rhymes that I also just inadvertently created). What I mean to say is that I thought I'd take a bad situation and try to make it better. So I thought I'd ask ye ol' internet community: Does anyone know why this tomato bum rot happens and how to stop or prevent it? If so, don't be shy--let me know. Because, not to be threatening or anything, but if you don't, you might be getting some wonky recipes on this site (tomato bum stew, tomato sauce with rotten splotch [ooh, a slant rhyme]), and surely some accidental angst-filled poems as well.

I have, sadly, no recipe to post today. My last several have been a bust. In fact, if I ever open a pastry shop, I'm going to call it The Ugly Crust. (Oh my gosh, I just wrote a poem with meter and rhyme without even meaning to. Perhaps I've been reading too many
And then I went out to the garden tonight and was greeted by these rotten bottomed tomatoes. They were all from the bush with Romas. And so I thought I'd take rotten bottomed tomatoes and make rotten bottom tomato juice--no, no, that's all wrong (although I do wish to point out the internal rhymes that I also just inadvertently created). What I mean to say is that I thought I'd take a bad situation and try to make it better. So I thought I'd ask ye ol' internet community: Does anyone know why this tomato bum rot happens and how to stop or prevent it? If so, don't be shy--let me know. Because, not to be threatening or anything, but if you don't, you might be getting some wonky recipes on this site (tomato bum stew, tomato sauce with rotten splotch [ooh, a slant rhyme]), and surely some accidental angst-filled poems as well.
Thursday, August 11, 2011
Fried Green Tomatoes
Cheap Eat Challenge, Part 2: Watch as our family of 6 eats on $10/day or less.

This is the part of the show where I pretend once again that I am from the south. The even-more-ironic-than living-in-southern-Indiana part of that is that I actually learned to make fried green tomatoes when I lived in southern California. Which is one of the beautiful things about the internet.
When we lived in SoCal (also, can people older than 30 use the term "SoCal" without sounding like idiots?), we lived in the dessert where we owned a slightly ghetto condo with an itty bitty plot of garden-able land surrounding its side. Don't get me wrong--I have great memories of that small plot of land. It was there I began my life as a gardener. At least it was there that I planted the most beautiful rose of my life (purchased at a yard-sale type sale from a sweet elderly Latin man), where I learned you could grow herbs and cook with them, and where I planted a singular tomato plant which grew enormously huge and was filled to the absolute brim with tomatoes--green green tomatoes that utterly refused to ripen. I realize now that it was probably the result of the entire lawn/garden area being automatically watered every morning and night. Or because I had not plucked back the greenery of the plant, thereby allowing it to become so monstrous that it was sucking all the everything away from the fruit that needed to ripen. Or merely because my gardening stars had decided to visit different galaxies that August. Whatever the case, I had a bunch of green tomatoes--not orange-ish, not pink--but hard green tomatoes.
I am sad to say that I didn't pick them off and make a green tomato chutney or green tomato chili or green tomato pie, but cooking was nearly as new to me as gardening then, and the only association I had with green tomatoes was the title of the movie, "Fried Green Tomatoes" (a movie that, for the record, I've never even seen and for which I don't even know the plot). So I went to our trusty computer with its then, er, "trusty" dial-up internet connection and I looked up a recipe for fried green tomatoes. And I made them. And, oh mama, they were just as eye opening to me as okra would be a few years later. Those southerners, they know a thing or two about summer vegetables, ripe and otherwise.
A few tips for fried green tomatoes:
Note: Some of this stuff is a matter of personal preference, so don't be afraid to experiment.
1. Many recipes tell you to dip your slices into egg or milk/buttermilk or both before coating with the flour/cornmeal. Tonight I tried several methods and found that just frying the tomatoes with nothing wet on them worked just fine. The taste was slightly different (the ones I dipped in buttermilk were somewhat tangier), but only slightly. Still, you may wish to experiment with dipping. I myself am lazy so I think I'll be skipping the milk bath in the future.
2. I much much much prefer thinnish slices of tomato. They come out nice and crispy. Maybe I have a potato chip fettish that I don't know about. Some people online prefer the slices thick. I tried this tonight and did not like it much at all. The outside is still crispy, but (and truly I'm embarrassed to say this) there's just too much tomato on the inside and the texture contrasts--crispy outside, slightly mushy inside--were not pleasing to me in the least.
3. Many recipes call for a combination of flour, cornmeal, and bread crumbs. I believe I mentioned that I'm lazy, so you shouldn't be surprised when I say that less seemed better to me, so I skipped the bread crumbs. I do feel like the flour helps to keep the outside from falling off in the frying; otherwise I might just skip it too since the cornmeal is where the flavor is.
4. Be absolutely sure to get the tomatoes thoroughly coated in the flour/cornmeal mixture. Thoroughly. Like, if I see that the seedy middle is still uncoated, I sprinkle some of the flour/cornmeal in. I like them crispy, I say, crispy.
5. While they're cooking or just after they've come off the stove, I sprinkle more salt on them. It makes them yummier. (It is becoming clearer by the moment that I really do have a potato chip fettish.)
Fried Green Tomatoes
serves 2
Cook time: 15 minutes
Cost: nearly free in the summer
(flour: .03, cornmeal: .05, oil: .08, tomatoes: .25 or free)
3 smallish green tomatoes (You want them truly green, not ready to turn to orange; they should be firm)
3 Tbsp cornmeal
3 Tbsp all-purpose flour
a few dashes of cayenne pepper
salt and pepper
vegetable oil for pan-frying
Heat a skillet (I used cast iron) to medium and add the oil. I just give it a good coating ( a millimeter or two of oil). No reason to float the tomatoes in oil. Let it get hot while you slice and coat your tomatoes.
Combine flour, cornmeal, cayenne, salt and pepper. Slice tomatoes into thin slices (not paper thin, mind you, although that really might work if you, too, have an un-addressed potato chip fetish), but about 1/4 of an inch thick or less.
Put tomatoes in oil (careful you don't splash). They should sizzle just a bit, but not burn or smoke or otherwise go nuts. Cook tomato slices on one side until golden, then flip. You want them to cook slowly enough that the inside of your tomatoes gets done and crispy. It should take a couple minutes and they'll start to smell good. At that point check them and give them a flip with a fork if they're golden.
When both sides have cooked, drain on paper towels.
I think these are great served alone, but you can eat them dipped in hot sauce or mayonnaise or any kind of dip that melts your little summer heart.
PRINTABLE RECIPE
Subscribe to:
Posts (Atom)