Thursday, December 29, 2016

Berry, Pecan, and Greens Salad with Caramel Vinaigrette


Who needs champagne?

Did you read that part about caramel vinaigrette? Yeah, I thought it sounded weird too. But it totally works. More than works. It is delicious. The fruit, the greens, a sharp cheese. It's the perfect salad for a perfect new year. It's healthy. Just a tiny bit indulgent. And lately berries have been on sale everywhere (why? I don't understand myself... At Meijer today blackberries were $.77, twice as many blueberries were $.99.)

You can eat this as a meal if you're on a New Year's diet, but if you'd like to make it more of a filling meal, you can add chicken.

Berry and Greens Salad with Caramel Vinaigrette
serves 6
Prep time: 15 minutes
Cost: $6.60 (that's $1.10/serving!)
blackberries: 1.00, blueberries: 1.00, raspberries: 1.00, greens: 1.00, caramel sauce: 1.00, pecans: 1.00, cheddar: .50 vinegar: .10

4-6 C greens
1 handful blackberries
1 handful blueberries
1 handful of raspberries
1 C pecans
1/4-1/2 C crumbly cheese--we used a very sharp cheddar; a feta would also work
3/4 C caramel sauce (store bought or homemade)
sugar (for candying the pecans)
1/4 C apple cider vinegar
optional add-ins: caramelized onions, chicken

First, prep the dressing. If you're making homemade caramel, you'll have to do that. Otherwise, take your caramel sauce and whisk it together with your vinegar. Done.

Now throw your pecans into a skillet with about 1/4 C sugar, turn up the heat to medium or just above that. Stir occasionally and cook until the sugar is melting and adhering to the pecans. Remove them and place them on some parchment paper to let cool.

Assemble your salad--greens, berries, crumbly sharp cheddar, then the cooled pecans. Dress with the dressing. And you're done.

Note: If you wanted to skip the candying of the pecans, you totally can. I did once and this salad was still amazing.

PRINTABLE RECIPE

Tuesday, December 20, 2016

Easy Double Chocolate Chip Cookies


Generally, I really hate dessert recipes that "cheat." I pretty much loathe all cake box recipes, for example (yeah yeah, haters gonna hate) as well as things made with cinnamon rolls in a tube or Jello in any form (ugh, Jello, why?). But this. For this I will break all my rules. For this perfect and dumb easy cookie, I will add a box of instant chocolate pudding into a regular cookie dough and have some of the best double chocolate chip cookies you will ever taste. I'm not sure what dark magic that pudding uses, but it gives the cookies that moist, fudgy consistency, yet still lets the butter shine through and has a little crisp to the edges. Fool proof every-time-perfect cookies. #welovedarkmagicbutonlyincookiesandmaybefantasynovels


On over HERE I've got a triple chocolate cookie recipe that is amazing in every manner, yet a pain in the bootyttocks to make (it is still forgiven due to its utter awesomeness, but it's not a lazy afternoon cookie). But these. These are simple, yet with the perfect flavor, perfect texture and consistency. Perfectness (yes, I know it's not a word; what of it?). Plus ease.


I got the recipe from my good friend, Becca, who baked them for December's book club, thereby making the universe completely happy. So add some Christmas M&M's to these things and make the people in your life happy.

Easy Double Chocolate Chip Cookies
Prep time: 10 minutes
Cook time: 10 minutes/batch
Cost: $.4.90
butter: 1.35, brown sugar: .20, white sugar: .05, eggs: .20, cocoa: .15, chocolate pudding mix: .85, flour: .20, chocolate chips: 1.90

1 C (2 sticks) butter, soft or a tiny bit melted
1 C brown sugar
1/2 C white sugar
1 tsp vanilla
2 eggs
a little less than 1 tsp baking soda
a little less than 1 tsp salt
1/4 C cocoa
1 small packet instant chocolate pudding mix (NOT cook and serve)
2 C flour
2 C chocolate chips (or 1 C chocolate chips and 1 C M&M's)

Preheat oven to 375. (You're going to drop the temperature to 350 after you put the cookies in.)

Cream butter and sugars. Add vanilla and eggs. Add soda, salt, cocoa, and chocolate pudding mix. (Note: You may want to stir those powdery cocoa ingredients in by hand at first, so you don't get a puff of chocolatey powder in your lungs and die or at least cough and then have to clean all the walls near your mixer.) Add the flour. Mix until combined, then add chocolate chips and M&M's.

Put in preheated oven, drop temperature to 350. Bake for 9-10 minutes.

Refrain from consuming them all and then blaming science, or at least social science for forcing upon you this experiment on impulse control. Give some to Santa for goodness sake. Or, well, maybe a few of your neighbors if Santa also has poor impulse control.

PRINTABLE RECIPE


Thursday, December 15, 2016

Beef Stroganoff


In my continuing efforts to throw a few quick, painless dinners into your holiday repertoire and thus rescue you from only eating cookies this holiday season, I've got another meal for you that can be pulled together in 20 minutes. It's hearty and comfort-y and could even be considered healthy as long as you're cool with fat and dairy products (at any rate, it's healthier than stale cookies and/or another night of take out).


It can go with any veggie on earth although spinach and/or mushrooms are especially good pairings (because we're talking about pairings because this is a sophisticated blog about sophisticated stuff). Ahem. In actuality, my mother used to make beef stroganoff by combining browned beef with a can of cream of mushroom soup--a thing which you could still do and live to tell the tale and still be eating healthier than cookies and fast food. But. We're going to raise the bar just the tiniest smidgen and make this whole foodsy and even chop some garlic and throw in fresh spinach, folks. It's that kind of awesome.

Beef Stroganoff
adapted from Learning Patience
Serves 4-6
Prep and cook time: 15-20 minutes
Cost: $7.25
noodles: 1.00, beef: 4.00, cream cheese: 1.00, sour cream: .50, spinach: .60, other stuff: .15

1 lb egg noodles
1 lb ground beef
1 fat clove of garlic, minced
1 Tbsp fresh thyme or 1 tsp dried
8 oz cream cheese
8 oz sour cream
salt and pepper to taste
2-3 handfuls chopped fresh spinach, lightly chopped

Get the water going for your egg noodles. When it's boiling, put the noodles in to cook.

While the noodles are cooking, brown your beef with a bit of salt in a skillet. When it's brown or mostly brown, add your garlic, thyme, and salt and pepper. Then add the cream cheese and sour cream. Stir until combined and creamy. This makes for a fairly thick stroganoff. If you want to loosen it up a bit, add some milk or pasta water to the mix.

Throw in your spinach and cook until wilted.

Serve over the egg noodles.

PRINTABLE RECIPE

Thursday, December 8, 2016

Pizza Dip

(bleh; photos in the early evening darkness of winter; so hard)

I was going to do a post titled, "Three Healthy Soups When You're Feeling the Blahs," and that is still coming. Because sometimes with the cold weather and abundance of cookies, it gets really easy to feel the blahs. But today I wanted to address another December problem that sometimes contributes to eating the junk that contribute to feeling the blahs: Time. When you don't have time to cook, what do you do? You buy crap food. I know, we all do it sometimes. I do it too. I've felt it more keenly as I've been working the Santa Shop at my kids' school this week.

P.S. Teachers, a hundred hats off to you because just doing a fun Christmas shopping activity with kids can be pretty exhausting. Teaching the little lambs for seven hours a day. You all deserve a really long nap. And then this pizza dip.

Yes, pizza dip. Because it's better than going to Little Caesar's and helping yourself to a self-medicating dose of $5 pizza. It just is. It's basically the same sort of thing and it gives you the same self-medication you might need. But it's made with whole foods (well, whole-ish--I mean, that is a picture of pepperoni above) and it's not full of preservatives and chemicals. Seriously, it tastes better. And you'll notice that it feels better in your body too (even though it's still a far cry from the spinach soup I was planning to post). Also, it only takes 30 minutes to prepare, with less than 10 minutes of actual hands-on work. We all know that that's less time that it takes to drive to Little Caesars and place your order. And of course, it's cheap, coming in at a dollar a serving. 

Pizza Dip
serves 4
adapted from An Affair from the Heart
Prep time:
Cook time:
Cost: $4.45 (that's $1.10/serving)
cream cheese: .50, sour cream: .15, mayo: .10, mozzarella: .90, Parmesan: 1.00, pizza sauce: .80, bread: 1.00

4 oz cream cheese, softened
1/4 C sour cream
1/4 C mayonnaise
1 C shredded mozzarella cheese (divided)
1 C shredded Parmesan cheese (divided)
1/2 tsp oregano
1 C pizza sauce (I make my own, but any will do)
pepperoni or other toppings
bread for dipping (French or sour dough work nicely; sour dough is our favorite)

Combine cream cheese with sour cream and mayonnaise, 1/2 C mozzarella, 1/4 C Parmesan, and oregano. Spread into bottom of a deep dish pie plate or that size-ish casserole dish.

Top with pizza sauce, sprinkle with remaining cheeses. Add pepperoni or toppings.

Bake at 350 degrees for 20-25 minutes, or until bubbly and yum.

Serve with slices of bread or breadsticks.

PRINTABLE RECIPE

Friday, December 2, 2016

Zinnegael's Cinnamon Oat Crispies (aka Cinnamon Lace Cookies)


Just in time for the holidays I have a perfect recipe for you.


And a perfect book to go along with it.

Grey Stone
In Grey Stone (the young adult fantasy that I wrote that was released this summer), there's a witch named Zinnegael. She likes to bake and has lots of extinct cats as friends, and the king can't kill her even though he can kill whoever the heck he wants. And did I mention Zinnegael likes to bake? So I stole one of her recipes. It was the right thing to do.


These are soooo good and soooo sweet. They're easy to adapt to gluten-free if that's something you or one of the people on your cookie list is needing this year. They are a thin little cookie that spreads and caramelizes at the edges. Since they spread so much, a batch of batter goes a LONG way and you get a bunch of cookies from them (which actually makes them cheaper per cookie if the cheapskate in you is looking for a way to gift a lot of people something buttery and sweet without breaking the bank. It also makes them less heavy and filling than many holiday cookies. I'm not going to call them diet food, folks, but they're not intensely calorie dense either since they're so thin). You can drizzle them in chocolate or not. You can fill them for an oatmeal cream pie effect. You can even add orange rind or almond extract or coconut flakes for awesomeness. I used cinnamon. Because that's what Zinnegael does.


Cookies are good for everyone. So is the book Grey Stone. But it's especially good for fantasy lovers, especially those in the 10-16-ish age range. So if you've got one of those kids on your Christmas list this year, hop on over to Amazon (or Barnes and Noble) and order your copy today. If you get the hardback, it ships for free. Now check that off your list, Santa.

Grey Stone

Zinnegael's Cinnamon Oat Crispies (aka Cinnamon Lace Cookies)
adapted from Add a Pinch
Makes 50-ish cookies
Prep time: 5 minutes
Cook time: 5-8 minutes
Cost: $2.25 (that's $.04 per cookie. I didn't even realize how cheap these actually were till doing the math)
butter: 1.25, sugar: .50, oats: .25, egg: .10, other stuff: .15

For gluten-free adaptation, use a gluten-free flour or skip it altogether. You may also need to use oats that haven't been grown or harvested with wheat or gluten-y foods.

1 C (2 sticks) butter
2 1/4 C brown sugar
2 1/4 C rolled oats
3 Tbsp flour
1 tsp salt
1 tsp cinnamon
1 egg
1 tsp vanilla

Preheat oven to 375 degrees. Line baking sheets with parchment paper or silicon baking mats. You must do this. Don't skip it or these will not come off.

Heat butter and brown sugar in a saucepan over medium heat, stirring frequently with a wooden spoon  until butter is melted and mixture is smooth. Stir in oats, flour salt, cinnamon, egg, and vanilla.

Drop the batter by the teaspoon or half tablespoon onto the baking sheets (did you notice how little those scoops are. They must be little; they are going to SPREAD and if you use too much you will have one huge pan-sized rectangle of cookie at the end).

Bake to 5-8 minutes until the edges have browned (you can make these blonder, but they crumble more easily).

Allow to cool. Then remove from parchment paper.

Store in airtight container. These will last well for several days and freeze wonderfully.

PRINTABLE RECIPE

Tuesday, November 22, 2016

Ebates: A Reminder Before You Get to Your Hardcore Holiday Shopping


If you don't use Ebates, you should (if you shop online). It's free money and I like free money.

For more details, have a look at my post from last year right HERE. (The promotions are slightly different right now, but the gist and the setup are the same.)

So suppose you spend $500 this year for Christmas in online shopping and earn a measly 3% back (it's often more), well, then you'll earn $15 for doing ABSOLUTELY NOTHING, except what you would have done anyway.

Want to try it? Use THIS LINK and then you and I both get free money when you make your first purchase.

Sunday, November 13, 2016

Secret Recipe Club: Sweet Potato Waffles


I mean, just, yes. These are awesome. Like perfect fall food. Seems indulgent, but actually super healthy. Perfect texture. Easy to make and work with. Makes your house smell like autumnal heaven as they cook. And cheap, totally cheap. So good in every way.

I made these for my Secret Recipe Club recipe this month. I had A Day in the Life on the Farm--a blog written by Wendy who lives on a farm in a small town. Le sigh. I was looking for something homey and farmy for Thanksgiving, but then I saw these, and one day I needed a quick meal. So I made them. And fell madly in love. Madly. I'm still swooning over their awesomeness. You have to make them and eat them and love them.

Also, if you have leftovers, you can pop them in the toaster (they're fairly sturdy) and then they come out perfect all over again. You know what this means, right? You should make a million.


Sweet Potato Waffles
adapted from A Day in the Life on the Farm
makes 12-14
Prep and cook time: 30-40 minutes
Cost: $1.65
sweet potatoes: .50, buttermilk : .20, eggs: .40, butter: .25, flour: .10, other stuff: .20

2 sweet potatoes (on the larger side)
1/2 C buttermilk (or 1/2 Tbsp vinegar and 1/2 C milk, which is what I did since I had no buttermilk)
4 eggs
6 Tbsp butter
1 tsp cinnamon
1/2 tsp cardamom
1/2 tsp nutmeg
1/2 tsp salt
1 C all-purpose flour
1 tsp baking powder
1/2 tsp baking soda

Peel, cube, and boil your sweet potatoes until they're fork tender. Drain.

Put the sweet potatoes in a food processor (or blender if you don't have a food processor). Then add butter and process. Then add the buttermilk, then eggs, then cinnamon, cardamom, and nutmeg. Blend. Then add the salt, flour, baking powder, and baking soda.

Now you just cook the waffles according to your waffle makers instructions.

Note: I served them with this caramelized pear syrup that was also beyond awesome. I haven't written down proportions yet (coming soon...) because I just throw stuff in and don't measure, but if you'd like an idea of what I do, here you go: Peel and cut the pears. Melt butter in a skillet and then add pears, cooking until soft. Sprinkle generously with brown sugar. When it's cooking and bubbling and smells like sainthood, add a glug of cream and stir. Yeah, it's amazing. But it's not really sainthood...

PRINTABLE RECIPE


Tuesday, November 8, 2016

Pumpkin Alfredo with Gnocchi


Hello November. And happy election day. Whether you're elated about your choice for president, or entered your voting location feeling a little conflicted (like I did), I think it's time for some comfort food, don't you? Even better when that comfort food has a sneaky dose of Vitamin A folded into its creamy crevices. And you know what might make it even better. Fifteen minutes. Start to finish. Yeah yeah, you're welcome.

I like to make my own Alfredo and I'm going to tell you straight up that I favor a recipe that is a lot thinner than what most people have come to expect from their Alfredo (because it often uses thickeners to thicken it whereas I prefer to just stick with cream and cheese, if you please). That said, this is easy to thick up if that's your thing. You'll find instructions for both below.

Also, this could easily be served on regular old pasta, but at this time of year I always get a hankering for those thick doughy bites of gnocchi, so that's what I went with. I even found a pumpkin variety at Aldi. Perfect. And to top this off, mushrooms sauteed in butter. It was just the perfect fit, but if mushrooms embody everything that is childhood food angst for you, you can skip them. This is just fantastic on its own.


Pumpkin Alfredo with Gnocchi
Serves 4
Cook time: 15 minutes for everything
Cost: $5.25
gnocchi: 2.00, cream: 1.25, pumpkin: .10, butter: .40, Parmesan cheese: 1.00, mushrooms: .50

1 package gnocchi
1 2/3 C cream
3-4 Tbsp pumpkin puree
5 Tbsp butter
1 C Parmesan cheese
mushrooms, optional
salt to taste

Boil water, then cook gnocchi according to the package directions.


While the gnocchi is cooking, add butter and cream to a pot. Simmer it for several minutes. After 5-8 minutes it will reduce just a bit.

(While it's simmering, you can slice a few mushrooms, and saute them in butter with salt.)

After your cream has reduced, remove it from the heat. Whisk in the pumpkin, then add the Parmesan cheese and some generous sprinkles of salt (taste as you go to get the right amount). Whisk until it's smooth. Then drain your gnocchi and add it to this sauce.

Note: As stated, it will be a thinner sauce. If you must have it thicker, then while the butter/cream mixture is simmering, combine 1 tsp cornstarch and 2 tsp milk in a small cup. Pour that into your simmering cream, whisking as you go. It will thicken slightly. Then continue with the recipe by adding pumpkin, cheese, etc.

Top with sauteed mushrooms if desired.

PRINTABLE RECIPE

Tuesday, November 1, 2016

Coconut Cream Brownies


Happy Halloween friends! I realize that I'm getting to this late, so now you're all probably passed out on the floor in a candy coma. So, uh, sorry about that. I should have gotten this to you before all the Halloween parties... Because it's pretty much like a Mounds Bar on steroids. But don't worry because there are still plenty of festivities coming up in the next few months and I think these would be a beautiful little addition for your Christmas cookie plate this year.

I actually made them for our book club. We read by Brandon Sanderson and so I made us some chalkling brownies. I don't have a great picture of those since it was night and I was rushing getting things ready for book club.


And then, between book club and my family (and, uh, my own snitching of these amazing brownies) I only had one lonely soldier left when I did get around to getting some decent pictures. At least he posed well for the camera.

This is a fancy-looking brownie, but pretty easy to make. You do need to have your regular brownies cooled first, so be prepared for that time-wise.

To make them, use THIS RECIPE for brownies.

Then THIS RECIPE for the coconut cream and ganache.

Now, go on and enjoy that sugar coma.


Monday, October 24, 2016

Chicken and Potatoes with Creamy Garlic Parmesan Sauce


So crock pot meals are great when you're busy and all, but I realize that in order to make a crock pot meal, you have to think about it in the morning (or at least by early lunch). What's that all about, right? So for those of you who get to 4:00 o'clock and start thinking, "My tummy just growled, which means--wait--a meal-time is approaching; I have literally not thought about it until this moment, and soon my children will begin eating each other," then this meal is for you.

This meal is awesome because all the stuff goes into one pan and then that pan goes into the oven and then you can resume reading your book or breaking up fights over Candy Land or telling Tommy to stop licking the baby--whatever is your past time of choice. And then you'll get the pan out of the oven and, guess what? Dinner will be done. There will be meat, and potatoes, and healthy leafy greens, and a delicious sauce to pour over it all. Congratulations! You're a rock star and nobody had to smash a guitar or eat the baby.


Chicken and Potatoes with Creamy Garlic Parmesan Sauce
adapted from here
Serves 6
Prep time: 30 minutes
Cook time: 30 minutes
Cost: $8.35 ($1.55/serving)
chicken: $5.00, spinach: .60, potatoes: 1.00, butter: .65, chicken broth: .10, half and half: .15, Parmesan: .50, seasonings: .35

4-6 chicken breasts, depending on how well-endowed your chicken was (or bone-in skin-on thighs if dark meat is your thing)
salt and pepper
1 Tbsp Italian seasoning
3 Tbsp butter, melted
3 C spinach, roughly chopped
2 Tbsp parsley, chopped
1 lb potatoes, diced into centimeter-sized cubes (peeled or not)

For the garlic Parmesan cream sauce:

1/4 C butter
4 cloves garlic, minced
2 Tbsp flour
1 C chicken broth
1 tsp dried thyme (twice as much if using fresh)
1/2 tsp dried basil (twice as much if using fresh)
1/2 C half and half (or 1/4 C milk and 1/4 C cream)
1/2 C grated Parmesan

Preheat the oven to 400 degrees.

Season chicken with Italian seasoning, salt, and pepper. If you're feeling fancy, you can then melt 2 Tbsp butter in a skillet and sear the chicken on both sides. But if you're pressed for time, or can't bear thinking of dirtying that skillet, just skip this step and put the seasoned chicken in a 9x13 inch pan.

Now add the chopped spinach and pour the remaining butter over all of this. (If you already got out the skillet, you can cook the spinach in the butter in the skillet and then put it in the pan, but again this step is skip-able for the lazy at heart).

Chop your potatoes and put them in the pan with the chicken and spinach and butter.

To make the garlic Parmesan sauce:

Heat butter in a pot over medium heat. Add garlic cloves and cook until fragrant (30 seconds or so). Add flour and whisk until smooth. Let it cook about a minute. Add chicken broth, thyme, basil--whisking as you add them.  Add half and half and Parmesan, whisking away and let it cook for another minute or two until it is slightly thickened.

Pour this over the chicken, spinach, and potatoes.

Put in the oven and cook for about 30 minutes (longer if your chicken breasts are big or your potato cubes are big).

Take it out and serve.

PRINTABLE RECIPE


Monday, October 17, 2016

Three Favorite Crock Pot Recipes


I really love making dinner. I love the ritual, the smell and sound and sizzle. But lately, as I've been spending some time promoting my book at various events (and let's not even talk about marketing and figuring out computers and learning not to be an idiot with social media). Anyway, lately there have been days when I've been gone and known I wouldn't get back home until dinnertime. And let me tell you that pulling out the crock pot has made me feel like kinda the super star of the world. It is so amazing to come home to a hot, yummy dinner. It's so much better than swinging by and picking up a pizza. And while we're talking about swinging by and picking up a pizza, let me say that that takes time too. And sometimes, if you want to eat as a family, there just isn't time for it. Like Saturday, when I spent the afternoon at Tri-con being out-geeked by pretty much everyone; and Kip was leaving to go to work at 5:30 and I buzzed in just after 5:00. There's no way we could have all eaten together if a meal hadn't been at my house and ready to go. Which it was (see super star comment above). And while we're talking super stars, let me say that my kids have been a bit super starry in their own way--making rice, setting the table, cleaning the kitchen. Here's to a family working and eating together.

1. Crock Pot Italian Chicken. This one is so simple--even if made completely from scratch (though you don't have to do that if you don't want to; this time I bought me that packet of Italian dressing, and I didn't look back).

2. Ranch Roast. Another dry dressing-inspired crock recipe. And our all-time favorite. What I love about this is if you throw in carrots and potatoes, it's a full on meal when you get home. None of your kids even has to learn how to make a pot of rice because it's all there in the crock pot.

3. Crock Pot Chicken Enchilada Soup. And to move away from the hunk of meat in the crock...

Sunday, October 9, 2016

Secret Recipe Club: BalsamicBeef Roast


It's been busy and comfort-food-y around here. Which is why when I saw this recipe for Balsamic Roast on my Secret Recipe Club blog: I'm Hungry: Words of Growing Boys, I knew it was the one for me. And it was. Dead simple. But also flavorful, tender, and delicious. It uses a crock pot in the way I like to best use crock pots (the dump and forget method).

I can't tell you how amazing this was to come home to at the end of a busy day when it felt a little bit like I was drowning, and maybe even a little bit like I was failing (you guys know that feeling, right?) But I came home to this, and then all the sudden, I was a little bit of awesome. Amazing home cooked meal, check. Never mind that it took me less than three minutes to put together (less than three minutes people). Throw a 1/2 bag of baby carrots in there (time commitment: 9 extra seconds) and you've even got a vegetable to go with this.

Balsamic Beef Roast
from I'm Hungry
Serves 4-6
Prep time: 3 minutes
Cook time: 6-8 hours
Cost: $6.25
roast: $6, other stuff: .25

2 lb beef chuck roast (or any other similar hunk of beef)
1 tsp garlic powder
1/2 C beef broth
1/2 C balsamic
salt and pepper

Put the roast in the pot. Add garlic powder and then sprinkle on salt, and pepper. Pour broth around it. Pour balsamic vinegar over it. (I'll confess I wish I'd thrown in a couple handfuls of baby carrots to go with this when we ate. Do so if you wish to live without regret of any kind.)

Cook on high for 6 hours (low for 8).

Told you. Dead simple.

PRINTABLE RECIPE

Monday, October 3, 2016

Asian-y Noodles


 Mondays can be hard. Some might say that Mondays are inevitably hard. Which is why I'm giving you this recipe for Asian-y noodles of awesomeness. Because they're easy. And you can make them on a Monday. And your kids will probably eat them. And if you make them with some sort of veggie on the side, you can even feel good about your parenting. And if you don't, you can still feel good about your parenting. Because, guess what, you just made your family a delicious, home-cooked meal that somebody else would have gotten paid to make and put in a little Asian-y box for you to take out of their restaurant. But in the time it would take you to park your car, walk to the restaurant and wait to carry something out, you can make this meal. Also, it costs you $.20/serving, or less. So do it. (If you want; because Mondays are hard.)


 And maybe these don't seem like a big kid pleaser (note: they're brown; I know), but my kids--who are some of the pickiest kids alive (like, almost kind of clinically picky--I'm looking at you, Mark)--love these noodles. And try to eat them with chopsticks (which also makes you a good parent; or at least that is what I tell myself).


So get out the chopsticks, and some broccoli if you're rocking this Monday thing, and make these.

Asian-y Noodles
adapted from The Cooking Jar
Serves 8
Cook time: 20 minutes
Cost: $1.50 (See that price; it's about $.20/serving. Yeah, I know there's not a butt load of nutrition going on here, but there IS a lot of flavor, and go on and tell me how healthy your take out lo mein was, okay... Also you can add bean sprouts if you want, and that makes everything healthy, so there.)
noodles: $1.00, butter: .20, soy sauce: .10, teriyaki sauce: .10 (okay; I admit to BS-ing a little on the Asian sauces since I'm really not sure how much these small amounts would cost; maybe I'll figure it out on a day that is NOT Monday), other stuff: .10

1 lb spaghetti noodles
3 Tbsp butter
1 Tbsp minced garlic
3 Tbsp sugar
3-4 Tbsp soy sauce (Note: I use about 3 and add 1 Tbsp of water to get it a little less salty)
1 Tbsp teriyaki sauce
Optional toppings: Green onions, seseme seeds, bean sprouts, chicken, whatever sounds good

Cook and drain your noodles. Try to get them al dente.

Melt butter in a frying pan. Add garlic and saute for a minute or so until fragrant (don't burn, so don't have your heat up way high).

Toss in noodles and stir to mix.

Add sugar, soy sauce, teriyaki sauce, and mix.

That's it. You're done. I know it sounds too easy. That was kind of the point. So make it already. Become a believer.

PRINTABLE RECIPE

Monday, September 26, 2016

Chocolate Volcano Cake


Don't worry. It doesn't blow up. It's not that kind of volcano cake. But "molten lava cake" was taken, so I couldn't use that name. And, frankly, this one is better. And you should all make it. It's easy. And perfect. And it oozes chocolate. So win. Win. And win.


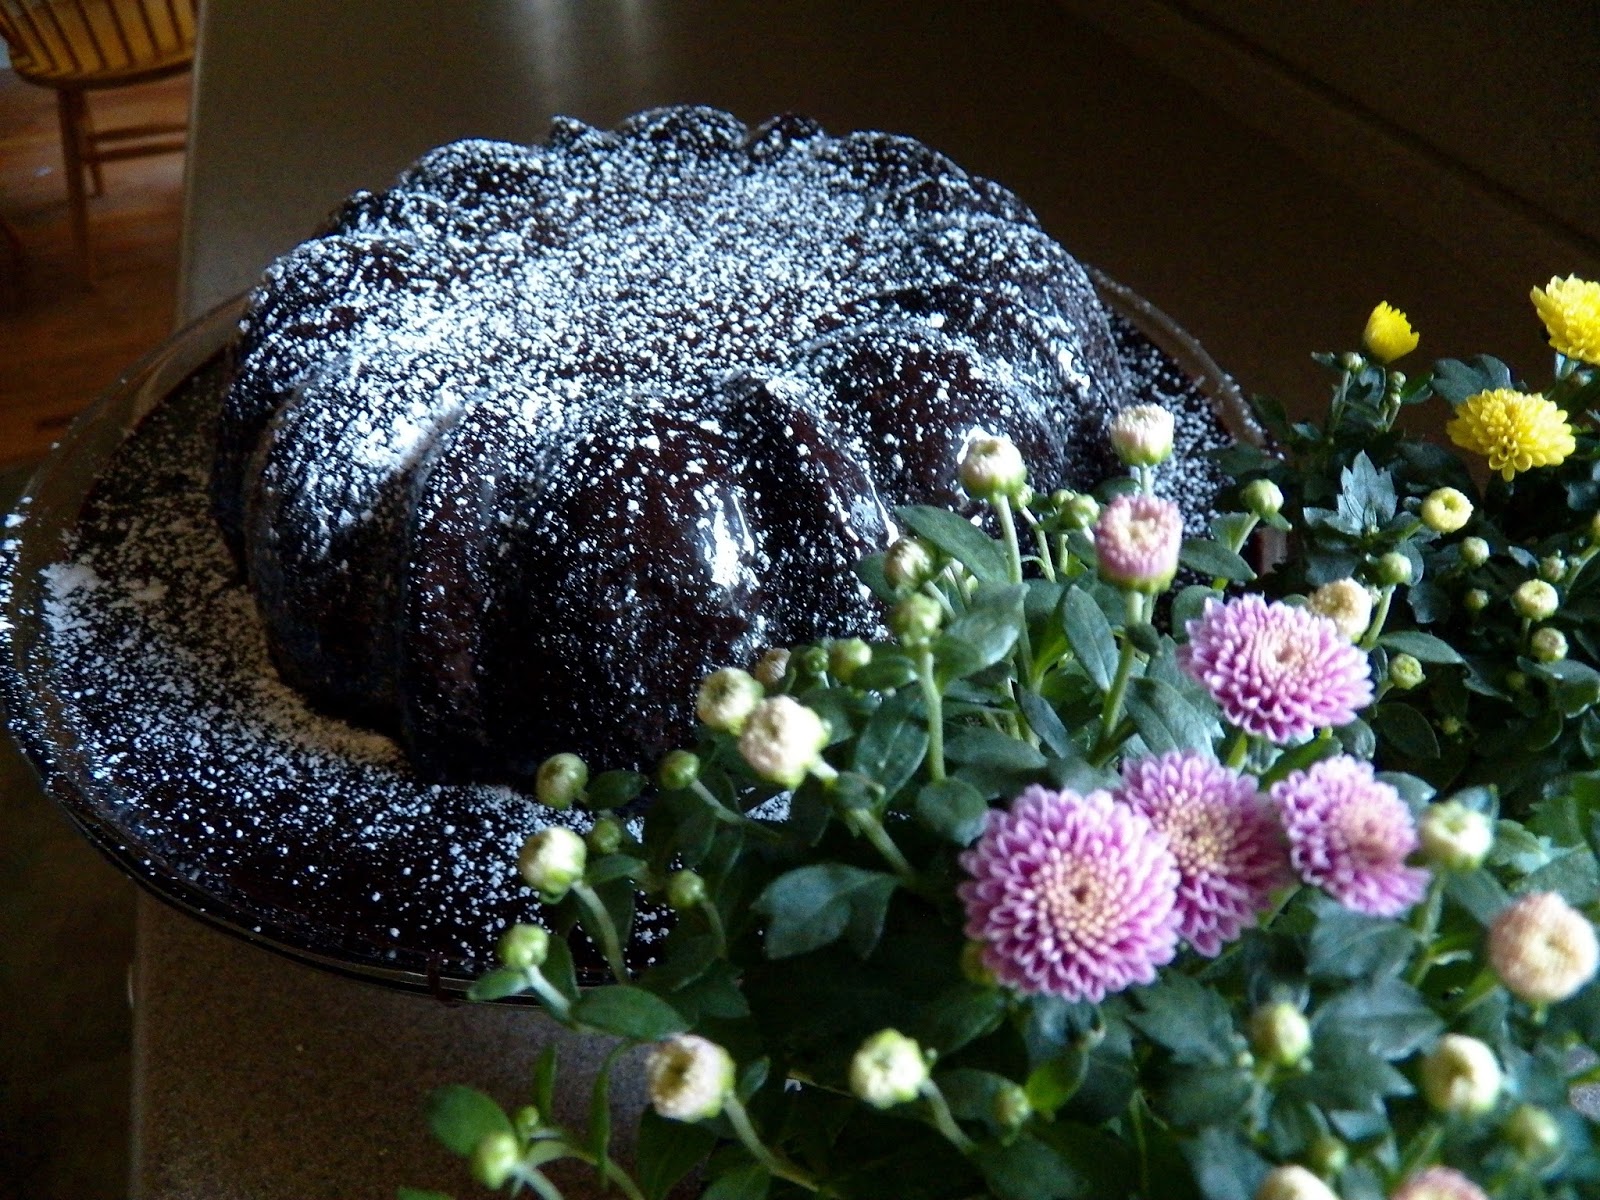
(Gratuitous display or excessive chocolate)

The nice thing about tube and/or bundt cakes is that you don't have to mess with layering, yet they're still showy (especially when they ooze chocolate). You do need to grease your pan mighty well with cooking spray. I'm sorry if you're opposed to cooking spray on moral grounds and only use butter and/or coconut oil and/or the hair grease of virgins. I understand this snobbery, I do. But I don't know what it is about cooking spray (it probably has silicone in it or something dreadful), but it keeps bundt cakes from sticking in a way other greases won't. So, you can be a grease snob if you want, but your cake might stick.

While we're speaking of snobbery, this cake also calls for a partial package of instant chocolate pudding mix (1/2 C to be exact). How annoying, I thought. How cheaterly. And it kind of is. But it's worth it. Totally worth it.

Honestly, it looks pretty good naked too. 


Chocolate Volcano Cake
adapted from Through Her Looking Glass
Makes one large bundt cake
Prep time: 15 minutes
Cook time: 1 hour
Cost: $8.00 (much more than a usual cake in this house, but it's birthday season and I will splurge on those birthday cakes. Plus, as I sometimes point out, it's so much cheaper than buying a lousy cake make from lousy ingredients from the store. And it will feed a crowd. It's at least 16 servings making this only $.50/serving)
sugar: .30, butter: 1.25, eggs: .30, flour: .25, cocoa: .50, chocolate pudding mix: .50, chocolate chips: .90, more butter: .60, cocoa: .50, powdered sugar: .90, other stuff: .30

Cake:

2 C sugar
1 C butter, somewhat softened
1 1/2 tsp vanilla
3 eggs
2 1/2 C flour
1 C cocoa
2 tsp baking soda
1/2 tsp salt
1/2 C instant chocolate pudding mix
2 1/4 C buttermilk
1 C semi-sweet chocolate chips

Chocolate Icing:

1/2 C water
1/2 C (1 stick) butter
1 tsp vanilla
1 C cocoa
3 1/2 C powdered sugar

To make the cake: 

Grease that bundt pan, baby. Grease it, or you will regret it.

Preheat oven to 350 degrees.

Beat sugar, butter, and vanilla. Add eggs

Add flour, cocoa, baking soda, salt, instant chocolate pudding mix. Of course you're supposed to sift this, and if you're a person with grit, I suppose you will. I always just dump it in the bowl and then sort of fluff it around with a fork or, heck, the beaters. Because I'm lazy. My cakes turn out anyway.

Now add the buttermilk.

Then the chocolate chips.

Pour it into the bundt pan (or a tube pan).

Bake at 350 for 30 minutes. Then, without opening the oven, turn the temperature down to 325 and bake for another 30-ish minutes (mine was about 35 minutes). Insert a knife or other long cake testing device. It should come out with moist crumbs, but not batter.

Let it cool for 10 minutes. Then turn it out onto a cake platter. Here I must issue another warning. Don't leave this thing in the pan for an hour or few and then expect it to come out. The longer cakes sit in pans, they less they want to leave them. So give it just a brief cooling period and then turn it out.

When it is completely cool, you'll add the frosting.

For the frosting:

Heat water and butter. Melt butter. Then remove from heat and whisk in cocoa and vanilla. Add the powdered sugar and beat (I always have to move it to a bowl for this step because my pan isn't big enough and is non stick and I like to beat icings so the ingredients incorporate fully).

When the cake is cool, pour this into the center. It will overflow down the sides. I should tell you that I also like to spoon it up onto all the sides so that it is on all sides. In fact, I do this a few times (every couple hours or so) to get a chocolate glaze coating on the cake. Because I like it like that, okay.

Afterwards, my daughter sprinkled it with powdered sugar for beauty's sake. Then my husband took a picture of it with flowers. Because, apparently, that's what he thinks food bloggers do.


PRINTABLE RECIPE


Monday, September 19, 2016

Sweet and Sour Meatballs


I never knew how many ways there were to prepare meatballs until adulthood. I love these basil meatballs and we've made meatballs wrapped in croissants and wrapped around mozzarella balls. These give meatballs an Asian twist (even though it's probably totally fake Americanized Asian--it's still delicious). You can serve it with brown rice if you want to healthy it up, or quinoa if you want to drop all pretense that this is some variety of Asian food. Also, try to add a vegetable unless you don't care about dying and stuff. But if you do care about dying, then try to eat a vegetable. Because, despite what my son and husband try to tell me, I really don't think barbecue sauce counts as a vegetable.


Also, this is one of those meat meals that cheapskates can really get behind. Most of the other ingredients are dirt cheap (as is white rice if that's how you serve this). Even when you remember to add your broccoli, you're only adding a buck or so to this meal. Six normal, non-teenage people can eat for about $1.00-$1.50 each.


Sweet and Sour Meatballs
adapted from Mel's Kitchen
Serves 4-6 (depending on how delicate your eaters are)
Cook time: 20-30 minutes
Cost: $3.90
beef: 3.00, oats: .05, eggs: .20, onion: .05, milk: .05, other stuff: .10, sugar: .20, BBQ sauce: .15, other stuff: .10

For the Meatballs: 

1 lb ground beef
1/2 C quick oats that you pulse in the blender (a course oat flour will also work)
2 eggs, slightly beaten
1/4 C grated onion
3 Tbsp milk
3/4 tsp salt
1/4 tsp pepper
3/4 tsp Worcestershire sauce

For the Sauce (you can half this if you're not into sauce and just want enough to glaze the meatballs, but we're into sauce around here): 

1/2 C brown sugar
1/2 C apple cider vinegar
1 tsp yellow mustard
1/2 C barbecue sauce
2 tsp Worcestershire sauce

Meatballs: 

Mush together all the ingredients and form into balls that are 1- 1 1/2 inches big. 

Cook on a skillet, browning on all sides. (They don't have to be cooked through because soon we'll be simmering them in the sauce. 

Now whisk all the sauce ingredients together and pour over the meatballs. Let it simmer for 15 minutes or so. It will thicken a bit and be lovely and sweet and amazing. 


Sunday, September 11, 2016

Secret Recipe Club--Pretzel Bites


If I've learned anything from Pinterest, it's that the moment September hits, I'm supposed to start craving pumpkin. Now, with all due respect to pumpkin, it's not my true fall craving. The thing I really start craving when autumn hits is BREAD. Bread bread bread. Clearly I'm bracing for a hard winter by padding my body with those carbalicious calories or something. Like this week, how I went to the store to pick up a loaf of Italian bread to go with our pizza dip (recipe coming soon), and then was compelled to purchase several bagels as well. And then, because I clearly hadn't had enough, I sought out bread on the blog I had for this month's Secret Recipe Club.


And I was richly rewarded. My blog this month was I am a Honey Bee, which has delicious food lurking on every page. It's created by Nicole (you can call her Nic)--a mom/wife/architect/crafter/builder/creator. I chose to make these pretzel bites due to my autumnal bread addiction and they were FANTASTIC. Delicious texture and flavor, and they kind of burst open like some pretzels do, creating a seam of awesome. Delicious.


We made several bites and several pretzels and my kids went nuts making all kinds of crazy stuff and adding all kinds of crazy toppings. I think my favorite were the sesame seed. (Mmmm, and I'm already dreaming of bread for breakfast; I have a problem.). 

Pretzel Bites
adapted from I Am a Honey Bee
Makes: a whole lot
Prep time: 15 minutes
Rise time: 1-2 hours
Cook time: 30 minutes (about 8 minutes a batch, and we had several batches)

4 tsp active dry yeast
1 tsp white sugar
1 1/4 C warm water
1 C white whole wheat flour
3 1/2 C all purpose flour
1/2 C sugar
1/4 C light brown sugar
1 1/2 tsp salt

For the bath before baking (Note; I used 1/2 C baking soda; I think you could go less for a less salty-ish pretzel)
1/2 C baking soda
4 C water

Your choice of toppings. We tried cinnamon sugar, sugar, salt, poppy seed, and sesame seed (my favorite). 

To Make:

In a small bowl, dissolve the yeast and 1 tsp sugar in warm water. 

Let it stand while you mix the dry ingredients in a large bowl: flours, sugars, and salt. 

Make a well in the center of your dry ingredients and add the wet. Then use a stand mixer with the hook to mix. If it's too wet, add a bit more flour up to 1/2 C (but don't go over that). (Note: If you don't have a mixer or like to make bread by hand, I would add the dry ingredients cup by cup to the wet ingredients--so you'll need the wet ingredients in the big bowl. Then mix until you have to turn it out to knead it. Then knead it, adding more flour mixture as necessary.) 

Knead until smooth and then put in a bowl and cover with a clean dishtowel. Let rise 1-2 hours. 

When you're ready to make the pretzel bites, cut the dough into long pieces, then roll them (like you're rolling playdough snakes). Then cut the snakes into bite sized pieces, unless you're making traditional pretzels (though I really do recommend the bites because they were delicious--perfect texture and so easy to cook, so easy to dip). 

Boil your four cups of water and add 1/4-1/2 C baking soda (as water dissolves, add more or the pretzels start tasting too salty). Drop the bites into this liquid. Give them 30 seconds or so and they'll float to the top. Put them on a pan, covered with parchment paper (yeah, you want it; otherwise, these can stick). Sprinkle with desired toppings. Bake at 450 degrees for 6-8 minutes. 

Snarf them down. Prepare body for hibernation. 


Monday, September 5, 2016

Chocolate Chunk Chocolate Pie


On Sunday night I wanted pie. And chocolate. So I adapted this recipe I found on Pinterest. It said I could eat it warm or cold. I ate it warm. Because I have the patience of not-Job. I probably have more the patience of Nebuchadnezzar or the King Xerxes or someone who was like interpret my dream or bring me a new wife (or bring me chocolate pie) or I'll kill you all. Yeah, that's more my speed of biblical patience. Anyway, so I ate my pie warm. And it was delicious. Just like any chocolate pie or chocolate chess pie you might have whipped up for yourself.

(See this crust. It's another example of having the patience of not-Job. I had a pie crust in the freezer, so I got it out, let it "thaw" for, like, 10 minutes, then nuked it for a few seconds, then just tried to bully the thing down into pie crust form. It mostly worked, though it was a bit thick, but still honestly completely amazing with this pie.)


And then today I had a bit of pie after lunch--just a bite (or three). And it was amazing. The chocolate chips I'd added to the batter, which I'd assumed had just assimilated when warm were there and bite-able when cold. So you got this intensely chocolate pie with delicious bursts of cold, hard chocolate within. Amazing.

Even better is the fact that this is easy (as pie, ha!) to throw together (15 minutes, tops for the filling). And that you can make it the level of darkness that you want (though I wouldn't admit going anything sweet/milkier than semi-sweet). I made mine on the darker side while still sweet (55%-60%). You can do whatever you want.

Chocolate Chunk Chocolate Pie
makes 1 9-inch pie
Prep time: 15 minutes
Cook time: 30 minutes
Cost: $2.75 (that's .35/slice for something decadent and amazing)
butter: .35, 1.10, flour: .05, sugar: .10, brown sugar: .20, eggs: .20, crust: .75

Note: There may be a small chance that I forgot to add the flour to this when I made it. Whoopsie. It still turned out. In fact, it was great. I'll try it again soon with flour and see if it's any different than the thing I actually made. You know what they say--there's nothing better than a competent food blogger. I think our takeaway from this is that this pie can be messed up and still be awesome.

1/2 C melted butter, hot
3/4 C chocolate chips (whatever level of dark you prefer)
1/2 C flour
1/2 C brown sugar
1/2 C white sugar
2 eggs, lightly beaten
1 tsp vanilla extract
1/2 C chocolate chips
1 premade pie crust (store bought or recipe here)

Preheat oven to 350.

Put your crust in a 9-inch pie pan.

Melt butter in microwave (in a large-ish bowl, so you can add other ingredients later). Add chocolate chips, and stir. Let them sit and stir. They'll melt and you can mix them with the butter. If they don't, throw it all in the microwave for another 15-20 seconds. Stir until smooth.

Add in flour and sugars. Stir. It will be grainy.

In a separate bowl, combine eggs and vanilla and whisk. Now whisk that mixture into the chocolate mixture.

Add the 1/2 C of chocolate chips.

Bake at 350 for 30-40 minutes, or until the temperature reaches 180 degrees or so at the center. It will still be wet and you'll be like, "Should I take this out? Will it hold it's shape? Yes, and yes.)

Let cool somewhat; you can eat it warm, but not hot (it won't hold it's shape is you straight up cut it out of the oven, so take a lesson from Job and let it cool just a little, okay?).

You can eat it warm. Or put it in the fridge and eat it with those amazing chocolate chunks. (I want to go eat some more out of my fridge right now. I want to, but I shouldn't, but I want to...)

PRINTABLE RECIPE


Monday, August 29, 2016

Avocado Egg Toast


It's the simple things. I have been eating this too-good-to-be-true breakfast on and off all summer. Why is it too good to be true, you ask? (You always ask just the right questions.) Because it's perfectly balanced health food that tastes like the most decadent, indulgent breakfast that you would probably eat if you were a queen living on an island paradise somewhere. And it costs less than anything on the dollar menu would. And it only takes about 5 minutes to prepare (which is less time than you'll spend in the drive thru waiting to get your food).

It's just so so good. Yet it's full of vitamins, healthy fats, protein, and (maybe if you go righteous on the bread) whole grains. But beyond healthy, it's just amazing. I mean, you'd want to eat this regardless. You'd be happy if someone was like, "Hey, that's got 2% vitamin C in it like fruit snacks." You'd be like, "Morning meal justified." But you don't even have to be like all that because it really is so nutritious (vitamin K, folate, Vitamin C, potassium, Vitamin B5, Vitamin B6, Vitamin B12, Vitamin B2, Vitamin E, iron, phosphorus, selenium, I could go on). It makes you feel good in 100 ways. Eat it.

Avocado Egg Toast
Prep time: 5 minutes
Cost: $.80
bread: $.20, avocado: .50, egg: .10

Note: Don't skimp on the quality of the bread. Life will go on if you do and this will still be very good, but if you get a good loaf of bread, it will be out of this world amazing, fantastic, exclamation points!!!! kind of good. I had this with a sourdough Parmesan bread when we were on vacation and I still have sweet dreams about that. Although any good sourdough is delicious or a nice hearty whole wheat. Whatever bread you love--use it with this.

1 piece of toast
1/2 avocado
1 egg
mayonnaise
a little salt
maybe butter (you don't need it but since when do people eat butter on toast because they need it? the butter ups this to a whole new celestial level. That said, I've eaten this without it and it's still amazing)

Cook your egg so that the yolk is just the tiniest bit runny. You can poach it or do it over easy (which is what I did). If you cannot handle any runny at all, that's okay; just get it so it's barely firm. I've done this lots of times by accident and it's still delicious. Also, salt your egg as it cooks.

While your egg is cooking, toast your high quality bread. Then spread it with butter if you like to eat like monarchy.

Slice up your avocado and add that to the bread. Top with your hot egg, and some mayo (you can also put the mayo on the bread if you wish).

Eat warm. Imagine being royalty. Make your kids act like they're your servants for the day (well, we can still dream, right?)


Monday, August 22, 2016

Review of Walmart's Free Grocery Pickup


Walmart, ah, Walmart.

When I first heard about Walmart's Free Grocery Pickup--where you can order your groceries online and then you go to the store and stay in your car and they bring your groceries out to you, I felt like I was living in the future. And a glorious future it was. When my kids were young and I would drive to the store and someone would fall asleep and I would sit there in the car thinking, "Do I wake my kid and go in, or just go home, or just sit here in the car for 30 minutes not doing anything so they get a little nap in?" At that time in my life, I remember thinking that if there were drive thru groceries like there was drive thru fast food, all the problems in my whole life would dry up and go away. 

Well, folks, now there is in reality drive through grocery pick up just like drive through fast food.

And the truth is that I really do like it. But I'm going to start this review with a tiny vent because there was a learning curve to ordering and they seriously almost lost me as a customer and a promoter of this whole thing. If you want to skip the vent, hop down a few paragraphs.

There are a few glitches. This is a review and I'm going to be honest. The first time I did this on the computer, I HATED it. I was like, "Seriously, Walmart, how can you muff this up and make me still hate you?" But they did. I'd tried to use a friend's code, but it wasn't working. I had to call. They didn't have a bunch of stuff that I was sure they had (like, they only offered me organic bananas; where were the regular bananas?). Then when I went to use the groovy feature where I can change my order before pick up, it looked like it charged me again, so I had to call (it didn't; it just looked that way). Then there weren't pick up times I wanted. I seriously just hated Walmart with my soul. Until I sat in my car at that pick up and a polite young man brought out my groceries and loaded them into the back of my car. It was like small town 1950's market meets the future. And it was awesome.

Since then I've learned the ropes a bit and become a convert. You will too.

What I hated: 

1. Glitches, glitches, glitches. The website is surely a work in progress, and it just needs to be refined. And I feel like certain things aren't clear. After a few orders you know the ropes, but at first certain things seem confusing.
2. Sometimes it's hard not to see an item. The first time I accidentally got a small applesauce just because it looked big in the picture and I didn't read it closely enough. Not really their fault, but something to be aware of as you shop with thumbnail pictures instead of actual products.
3. There is not, as near as I can tell, a way for your to use regular clipped out coupons for cereal or Tide or whatever. You can use Walmart type promotions, but no newspaper type coupons.

What I loved: 

1. Have I mentioned the pick up where a polite Walmart worker comes to your car and puts your groceries in the back. And you don't have to do anything and could stand there catching Pokemon if you wanted to.
2. The other feature I just really love love love is that you can start a grocery cart just like you might start a grocery list. So if I'm planning to shop on Saturday, I can just start adding things to my cart on Monday. Oh, we need pasta and vinegar and olives. Then Wednesday I realize that we need toilet paper and peanut butter. Then on Thursday I look in the fridge and realize we're completely out of ketchup and that won't do. Etc. I just keep adding things to my cart instead of a shopping list. And it's wonderful and glorious because then they won't be forgotten when you forget your list, or remember your list, but mysteriously forget some of the things on it, or whatever frazzled people do when they shop. I love using it as my grocery list.
3. You can change your order. So if you decide you're not making pizza for dinner, take that pepperoni off the list. Note that when you do you have to re-check out, but they're not re-charging you (unless you add more and then they charge you the difference).
4. Even if you're late for your time, they'll hold your order till 8:00 (or whenever your Walmart stops doing the pick ups). I don't recommend abusing this, but it's nice to know.

What you need to learn to navigate their not-always-as-user-friendly-as-it-should-be website Walmart:

1. Sign up by clicking through the link if you want the promotion ($10 off your first purchase of $30 or more). If you're using the code I post below to get $10 off your order, you have to click through that link. If you don't, and sign up on your own and then try to use the promo code, it won't work. You have to click through the link to get the promotion.

2. Add stuff to your grocery cart. I actually think this is mostly a great feature. It's easy to add, easy to remove, easy to put that you want more than one item of something.

3. Choose a pick up place.

4. Choose a pick up time. You can choose the time early in the week if you want, even if you haven't checked out. This is nice because some of the slots go kind of quickly, so you can get them early if you'd like--even before you've officially checked out.

5. Give them your credit card info. Then add promos if you have them.

6. Know that if you change your order (which you can, which is nice), you have to "Place order" again. This threw me off the first time because I'd taken things out of my cart and I was worried they'd charge me for both transactions. They didn't, and they won't for you either.

7. Call and complain if something is awful. They answer quickly and try to resolve your concerns and are really trying to make this work and make you happy.

8. If something glitches and it won't let you place your order, just go back a few steps and try again.

HERE'S THE LINK. Remember to click through it if you want to save $10 on your first purchase ($30 minimum).

Monday, August 15, 2016

Lemonies (Lemon Brownies)


I started seeing lemon brownies making the rounds on Facebook and Pinterest quite a while ago, but you can imagine that in this household, it was a pretty tough sell.

Me: So I'm thinking of making these lemon brownies for dessert tonight.
Kip: Let's just make normal brownies instead.
Me: But these look so good. They're like a cross between lemon bars and brownies.
Kip: (getting out the cocoa) Yeah, regular brownies are better.
Me: But you've never even tasted...
Kip: (mixing cocoa with butter and sugar; licking off mixing utensils shamelessly)

So anyway, the lemon brownies had to wait. But them one day I was craving lemon and we had a church function and thus the stars aligned and I made lemonies and they were the super best most delicious thing ever. And you should make them and be happy and establish world peace.

These really are amazing. Like brownies in texture (dense, almost fudgy except of course they can't be fudgy because they're lemony; it's like baked goods racism or something the way I can't describe the moist and perfect texture without using the term fudgy...). Anyway, the texture is denser than cake, but of course not like a lemon bar either. It's just really good and has an intense (but not acid your mouth off) lemon flavor. They're awesome.


Lemonies (Lemon Brownies)
adapted from I Sing in the Kitchen
Makes 16 small lemonies
Prep time: 15 minutes
Cook time: 20 minutes
Cost: $2.55
flour: .15, sugar: .25, lemon: .50, butter: .85, eggs: .20, confectioner's sugar: .60

Note: I used fresh lemon for this. You can cheat and supplement some non-fresh juice, but you must have the zest. You must or it will not be as good. That said, my measurements were sketchy. I zested one lemon and gave about a tablespoon to the lemonies and about a teaspoon to the glaze, but I didn't stress if it wasn't exact.

For Lemony: 

1 C flour
1 C sugar
1/4 tsp salt
1/4 tsp baking powder
1 Tbsp lemon zest
3/4 C (1 1/2 sticks) butter, melted and cooled
2 eggs
3 Tbsp lemon juice
1 tsp vanilla (I used, but might omit next time to see if it becomes even more lemony)

For glaze: 

1 1/2 C confectioner's sugar
2 Tbsp lemon juice
1 tsp zest

To make the lemonies:

Preheat oven to 350 degrees. Grease an 8-inch square pan.

Mix flour, sugar, salt, baking powder, and zest together.

Add melted butter, lemon juice, eggs, and vanilla. Beat.

Pour into pan and bake for 18-25 minutes (remember that metal pans cook faster than glass, so you might want to check a few minutes earlier if using metal).

Remove when a tester comes out with some moist crumbs (or clods), but not liquidy batter.

To make the glaze: 

Now, while it cools for just a few minutes, make the glaze. If you're thinking of skipping the glaze, give your face a good slap and then make the glaze. If you're thinking about halving it or something else, please slap yourself again and let's move on.

Okay, once you've slapped yourself into proper diet-breaking submission, combine all ingredients for the glaze and whisk until smooth. Pour this over the top of the warm lemonies. It will kind of sink in, but mostly not, but kind of and it will be amazing. And you will be so glad you slapped your own face instead of skipping this step because it was worth it.

Allow to cool and eat.

PRINTABLE RECIPE

LinkWithin

Related Posts Plugin for WordPress, Blogger...