
Looks pretty good, doesn't it. Even in the late night light.
And it was good. But not as good as it looked and not as good as it sounded (chocolate pumpkin spice cake with caramel cream cheese frosting and ganache). You see, for the very reasons it looked and sounded so good, it was just trying to do too much. Way too much. As I ate it, I kept wishing it was pumpkin cake or chocolate cake or spice cake. With cream cheese frosting. Or caramel frosting. Or chocolate ganache. [For the record, the reviews were mixed. My brother-in-law said it was a masterpiece and my daughter who hates cream cheese frosting loved it enough to beg for it for her birthday this week.)
It was fussy too. And as I ate it, I couldn't help but pine for simple pumpkin-y muffins we had a couple weeks ago (don't worry, I'll get them up soon enough). Easy to make, easy to eat. Easy to add a little whole wheat flour to, thank you very much.
The best thing about this cake was that for it I made a perfectly perfect salted caramel. You should too. And with this fail-proof method you can. Only you shouldn't mix it with a cream cheese frosting. Because the cream cheese-y goodness will eat up most of the perfect caramel-y goodness and they're both too lovely to confuse like that.
Thus, today is a reminder about my fail-proof caramel (with an extra, even more fail-proof step compliments of my sister-in-law), so that any ice cream cravings you have at this time of year can meet their autumnal fullness. This sauce also makes a butt kicking gift.
And just to draw a metaphor because that's what people who spent large amounts of time in English departments like to do, let's also make today a reminder to keep the season simple as well. We should all try to remember that it's best like that.
Note: If you are trying to make a good caramel buttercream frosting, I recommend one of two things.
1. Either mix 1 recipe of the below caramel into your normal vanilla frosting (not a cream cheese frosting--cream cheese has too strong of a flavor and the caramel gets lost). (If you use the frosting in this link, be sure to halve it or double the caramel below.)
2. Frost your cake with a vanilla frosting and then drizzle your caramel topping over it just as you would a ganache. It'll be gorgeous and you'll have some very caramel-y bites of goodness.
Fail-Proof Salted Caramel
adapted from Simply Recipes and New Best Recipe Cookbook
makes a good 1 1/2 C
Cook time: 20-30 minutes
Cost: $.86
(sugar: .16, cream: .50, butter: .20)
1/2 C water
1 C sugar
6 Tbsp butter, cut into chunks
1/2 C cream
1/2 tsp vanilla, optional
1/8-1/4 tsp chunky sea salt (optional, for salted caramel, yum)
1. Put water in a pan. Please do not use the cheapest, flimsiest-bottomed pan you have.

2. Pour sugar in a mound in the middle of the water in the pan.

3. Put the lid on the pan and turn the heat to medium or just above medium.

4. Let it boil. Do not stir it or mess with it in any way.

La di da. This is going to take 10 minutes or so. You don't need to watch your pot too much at first. Do the dishes, make the kids lunch. Whatever. (Do NOT leave the kitchen and then forget you were boiling sugar.) This method of caramel making does take a little longer than just letting your sugar melt and adding butter and cream. However, at this point of the process, you don't have to be super duper attentive. Give it a glance here and there to see if it's starting to change color. Also, take a few minutes to get your other ingredients ready... (see step #5). [Note: You can remove the lid when it starts to boil as long as the sugar is entirely dissolved. If it's not, leave the lid on.]
5. Get your other ingredients ready.

At a certain point in caramel making, a little speed is required. It helps to have your cream measured and your butter cut. You can warm the cream if you wish (I used the microwave to get it warm--took me 25 seconds or so). It might make your life a little bit easier, but it's not essential with this method. (Cold cream--and sometimes even warm cream--can cause the boiled sugar to seize--or get kind of hard for a few seconds--worry not, even if it seizes, you just keep mixing and it will, um, un-seize--which is a totally technical term, I assure you.)
Here I'm going to update this post and add a tip from my sister-in-law--a tip which made this easier and less stressful and more perfect. Put your butter and cream together in the microwave and microwave (and mix) at 20 second intervals until the butter is melted and the mixture is warm. Then just pour this into your amber caramel. I believe this helps in a couple of ways. It doesn't foam as furiously. It doesn't seize. It mixes in faster, making it less likely for your perfectly amber sugar to burn while it waits to get mixed up. It's faster. And it's just easier.
6. When the boiling sugar turns the color of straw, remove the lid and REDUCE THE HEAT to medium low.

7. It's still going to boil for a few minutes, but watch it now. If you're stove is even the teensiest bit un-level, rotate your pan. DO NOT UNDER ANY CIRCUMSTANCES STIR THIS MIXTURE. Let it boil until it becomes an amber color. If your stove really is uneven or the sugar is cooking in an obviously uneven way (this is how my stove is), give it the gentlest of swirls every few moments (if it's really really uneven, take it off the heat and swirl it so so absolutely gently with a spoon--I will not even call it stirring; it is like moving the mixture with a spoon). You don't want the melted sugar to swish up on the sides of the pan AT ALL.


But take care not to go darker or you will probably burn your caramel. If you are nervous as I often am, or if you are making this for guests or a gift, err on the side of light amber. It may not be as rich as complex as the amber caramel, but it will be un-burned and perfectly delicious.
8. When it is an amber color, it's time to move quickly. Don't get nervous, just be ready.When it's amber, take the pan off the stove and whisk in the butter (I use a flat whisk
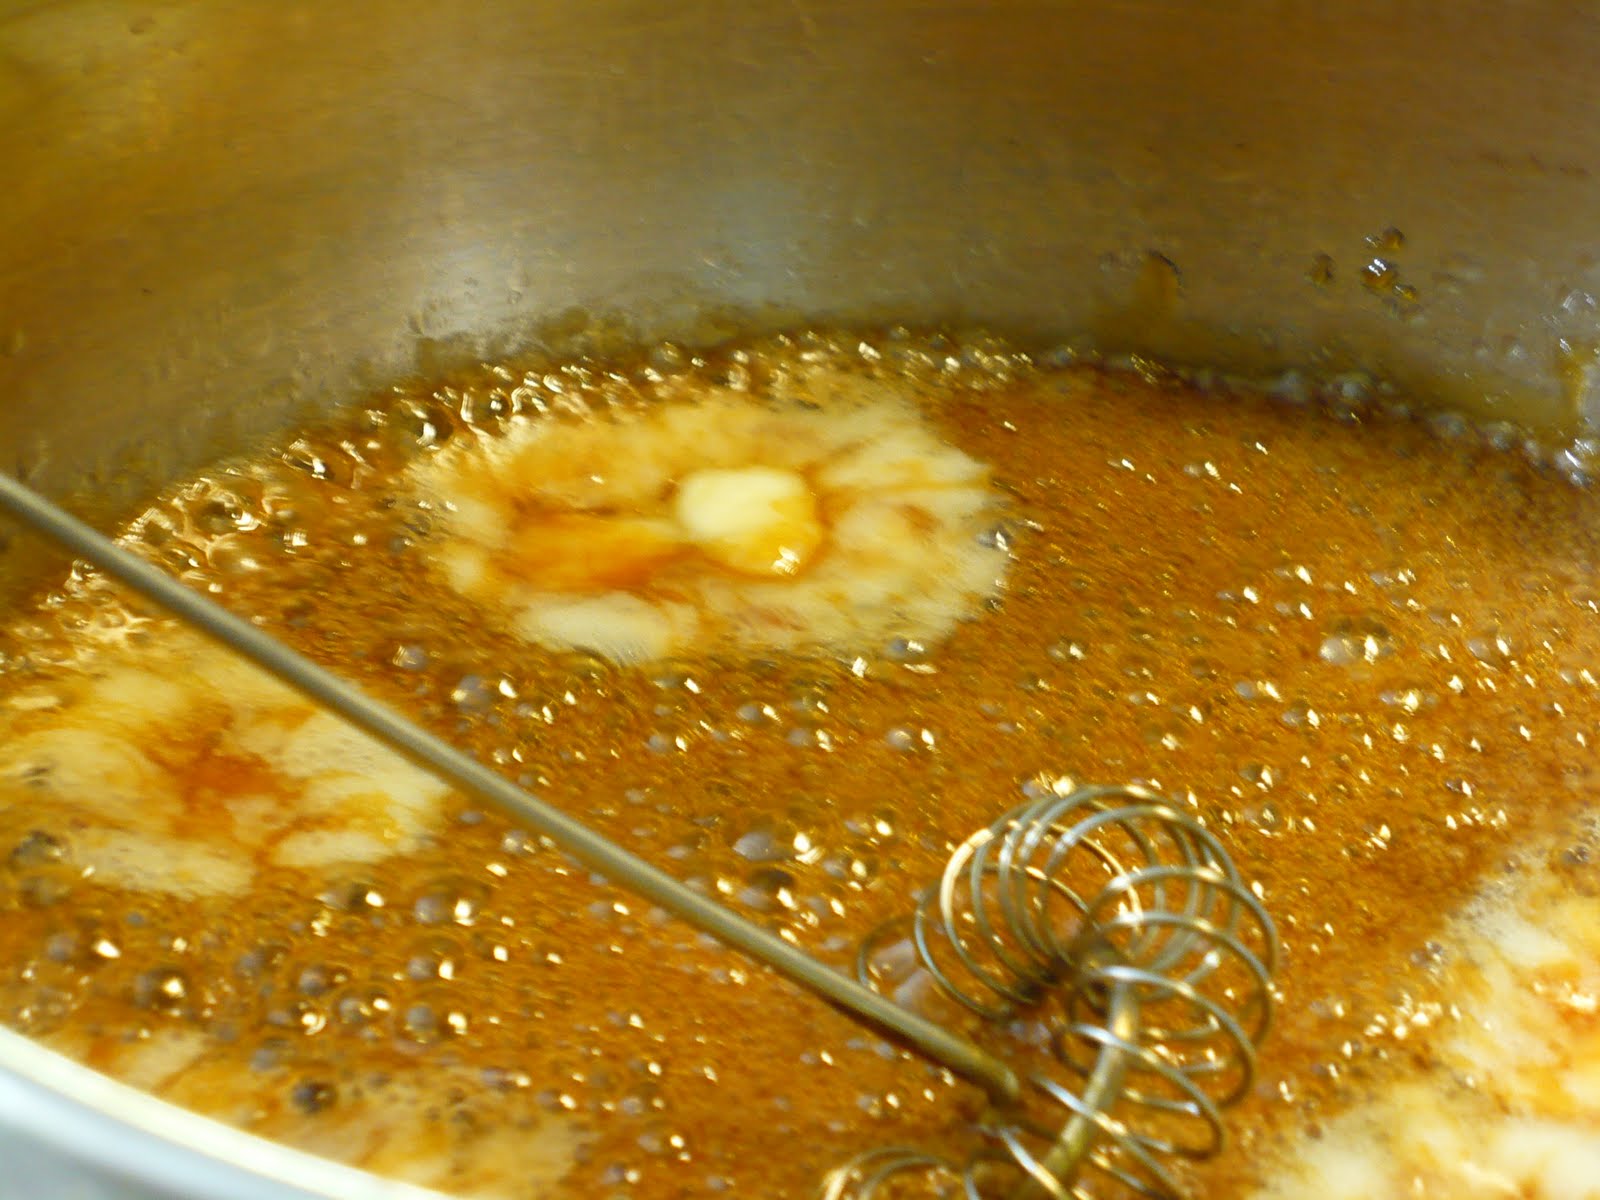
9. As soon as your butter is incorporated, whisk in the cream--you're still moving quickly here, but you're almost done. When all is incorporated, add vanilla and sea salt if using.

10. My friends, it is finished. And it is delicious. Stir it for another minute and pour it into a bowl that can handle some heat because it is really really hot. Put some on a spoon, blow it a lot, and taste it. Good, huh?
11. Allow it to cool in a bowl and then cover it for storage. It'll last quite a while just on the counter. It can also be refrigerated for really long-term storage (i.e. if you have a will of iron).

And now, at the end of this very long post, I have a confession. I burned my first batch. Oh, it wasn't the method's fault. I was trying to take pictures you see. And pictures are distracting and they take time to take, especially for me. First of all, I forgot to reduce the heat after I took the lid off. And then, I was trying to nail that right on perfect amber color and, um, my stove is not level and things just got away from me. By the time I'd clicked a few times, the sugar was burned. Just barely--just 30 seconds too long, but yes, it definitely tasted burned. It does give me the chance, however, to

The spoon on the right is burned, the one on the left is good (they'll both look darker in a bowl or pot--the one in the bowl above is the good caramel). You'll notice that there's a little place in between these two shades. The name of that shade is 'risk.' Hit it right on and you'll have the best most heavenly caramel to ever cross your lips (this will be easier with the melted butter/cream). It will be deep nutty sweet, complex, and perfect, but miss it and you've burned your sugar and there's no going back. If you wish to try to hit that mark, I have a bit of advice. Go there slowly. Turn your heat to low (as opposed to medium low) after the lid is removed and rotate the pan a bit as it cooks. Remember that your pan is hot, so even when you take it off the stove, it's going to keep cooking for a few moments (which is sometimes all the time it takes to burn sugar), so keep your heat at low which will give you a lot more control and a little more time after the pan is removed from the burner. If your heat/pan is too hot, you're going to go from perfect to burned too fast to get the butter and cream in there.
Now, go forth and conquer thy caramel sauce.
PRINTABLE RECIPE
Linked to Sweets for a Saturday and Fusion Fridays
No comments:
Post a Comment