
There's something quintessential about homemade bread. Which is why people don't give it a go more often. They want it homey, warm, soft, inviting, and of course pretty--with a golden crust and a middle that melts in your mouth. It's like trying to create the perfect Christmas day. And there's more than a little pressure in that. Also, homemade yeast bread takes some time--maybe not in hands-on effort, but in raw hours. And who wants to spend time mixing, kneading, waiting, punching, and waiting some more to come out with a tasteless burned brick or something gooey in the middle. Yeah, not me either.
But wait, don't leave just yet. There is a simple method that will make it come out each time and I even have some tips for the working or the time-pressed. Because, as most of us know, good homemade bread is something else. And it's cheap too. Also, below I have pictures.
First, a basic recipe. There are fancier recipes out there. There are things that call for potato flakes, gluten, and molasses. And there are more expensive recipes too--ones requiring eggs, milk, butter, and honey. None of these recipes is bad. In fact, I've had lots of homemade bread in my day and when made well, it's all very good. I'm using this recipe because it is very basic and because it is very cheap. When you're eating on $6/day, you need to keep things as skinny as possible without allowing them to get gross. This recipe does just that. If, however, you'd like to replace the water with milk or the sugar with honey or molasses. If you'd like to throw in some potato flakes or several teaspoons of gluten, you certainly may. But know this: You don't need to.
A few notes on yeast:
1. In the little containers at the grocery store, it can be pricey. It's one of the few purchases that I think is way more affordable at a store like Sam's. If you don't have a membership, beg this gift from relatives or friends who do. 4oz from Walmart costs about $3.50; 32 oz from Sam's costs about $4.50. That's $.87/oz versus $.14/oz. The estimated cost below is from warehouse pricing.
2. You can freeze yeast. This is most likely necessary if you buy the bulk packages. One of my sisters claims she's kept hers in the freezer for years. You can also use it straight from the freezer.
3. If it's old, it won't rise as well. Just give it more time; it'll get there.
4. If you don't want your bread to rise quickly, use less yeast--I'm going to recommend 1 Tbsp instead of the 3 Tbsp in the recipe. Put it in the fridge if you want it to take even longer. This way you can start it in the morning and go to work. Or do it at night and finish it in the morning. If you've refrigerated the dough, you'll want to warm it a bit once it gets in the loaf pans (unless you want that to take a while to rise too). Put the pans in the oven and set the oven for 200 degrees for one minute. Then turn the oven off. Leave the loafs in and they'll rise up happily in about 30 minutes. (Just remember to take them out before heating the oven to cook or you'll end up cooking them a bit early.) Some people love the slow rise because they feel it enriches the flavors of the actual wheat.
Basic 100% Whole Wheat Bread
Makes 2 loaves
Hands-on time: 30 minutes
Wait time: 1 1/2 hours
Total time: 2 hours
Cost: $1.15/loaf
3 Tbsp yeast
10-12 C whole wheat flour
2/3 C sugar
4 C warm water (about 110 degrees F or warm, but not hot to the skin)
1/2 C vegetable oil
1 Tbsp salt
Mix yeast, water, and 4 C wheat flour. Let sit until doubled (about 1/2 hour). It'll be wet and bubbly.
Add oil, sugar, salt, and 2 more C wheat. Mix. Continue adding wheat by the cup-ful until you can't mix it. Then throw it out on the counter to knead it. (If you've got a Kitchenaid, you play by your own rules. Put ingredients in the bowl, adding the flour gradually as you mix it using the dough hook.) You'll knead it about 8 minutes until it's tacky, but not super sticky.
Place it in a covered (I use a dish towel, but plastic wrap works too) bowl and let rise until doubled (about 30 minutes).
Punch it down and divide it in half. Shape into loaf-looking things and put in greased loaf pans. Let rise until double (30 minutes).
Preheat oven to 350 during last part of rising. Bake bread 40-50 minutes or until an instant read thermometer
Leave in pan for about 10 mintues, then loosen sides and turn out to cool completely.
I like to slice it up and put all but 1/2 loaf in the freezer. Homemade bread doesn't keep as long as regular because it has no preservatives (halleluiah). Freezing it keeps it nice and fresh. It also keeps you and yourn from eating the whole loaf hot in the first hour.
Should you allow it to get a bit stale, don't despair. You can microwave it for about 10 seconds and that perks it right up. Or you can toast it. It makes the greatest toast.
PRINTABLE RECIPE
And now, the pictures.
After you've gotten the dough so it can't be stirred anymore, you'll turn it out for kneading. Don't kill yourself trying to stir as much as possible in. Just turn in out when the going gets tough. (Note: This is a good tip for bread, but not for life. Thank you.) Smash the dough with hands and fists, turning and flipping it as you go. When it gets sticky, add more flour (by the 1/2 C at first and then as your dough looks more like dough, just sprinkle it on).
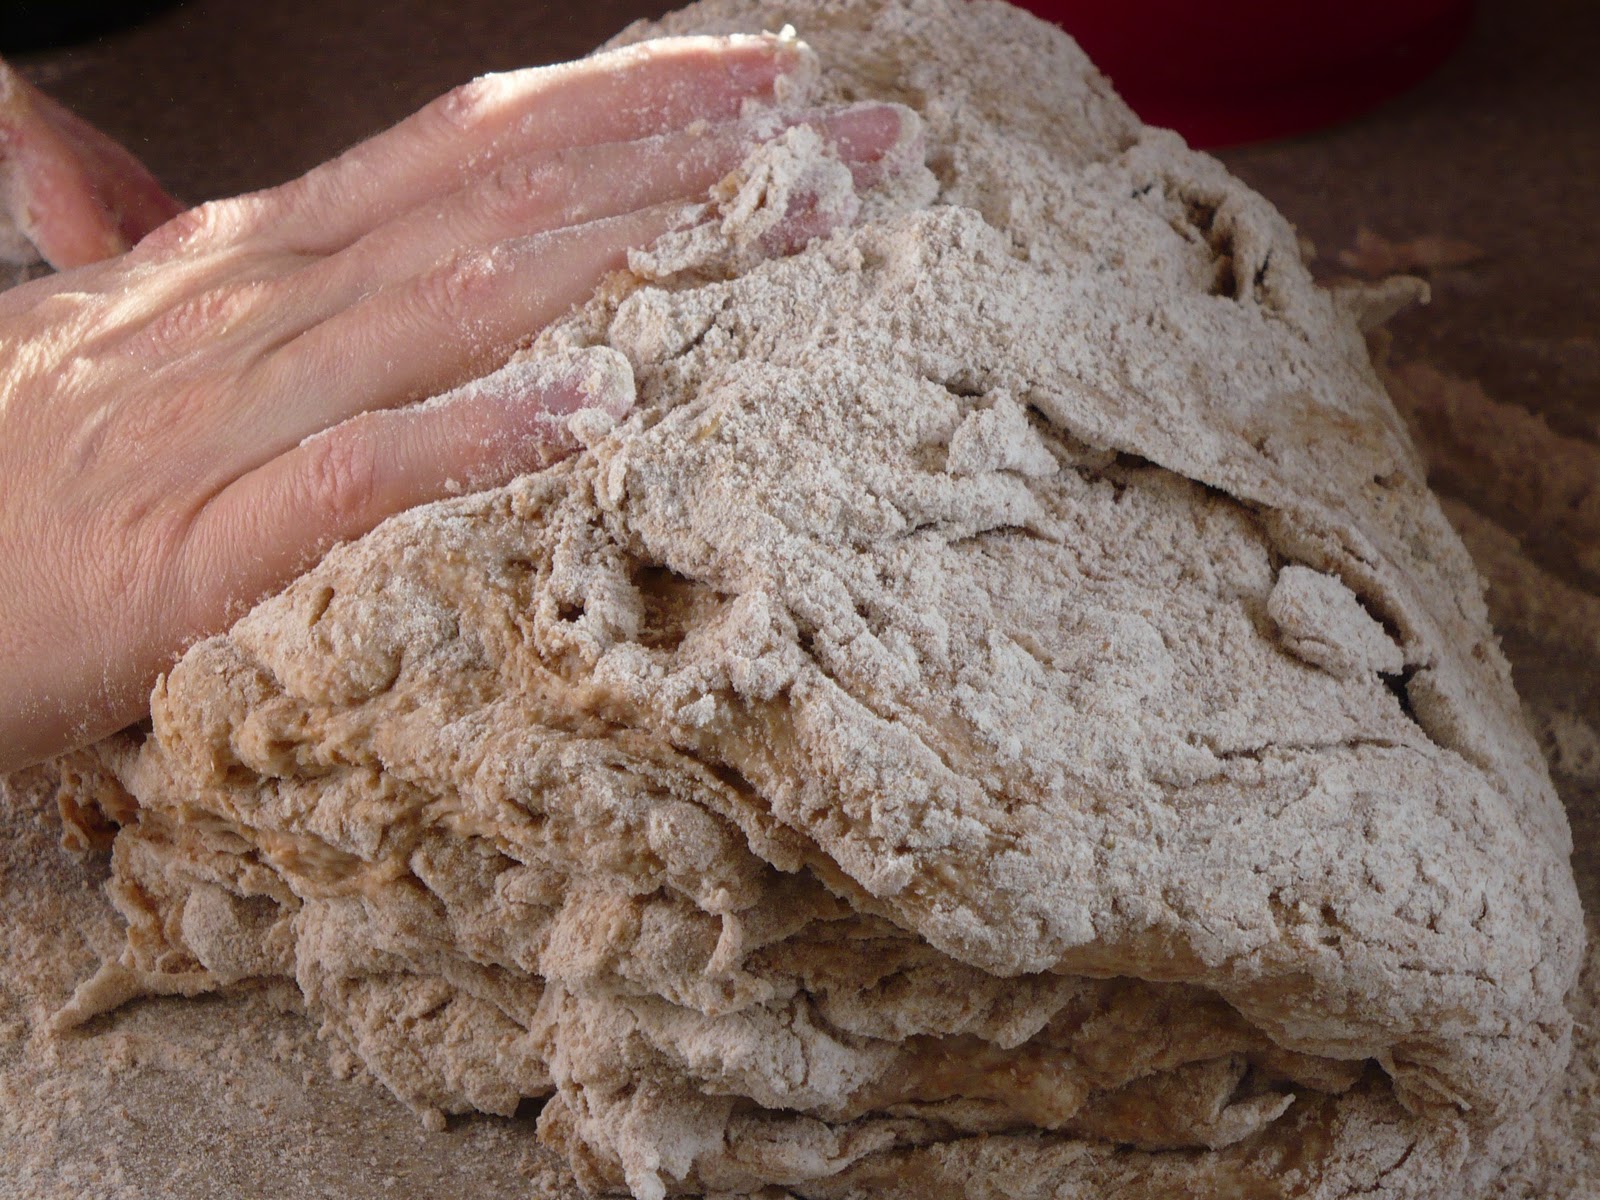
In a couple minutes your messy blob will start to look more like bread dough. 


I even had Kip do a video if you really don't get the whole kneading thing. Because that's the type of food blogger I am.
When the dough is slightly tacky, but not sticky and not hard as a rock, put it in a bowl to rise. Cover it with a clean dish towel or some plastic wrap. Recipes always say to use an 'oiled' bowl. I have never once oiled my bowl and do not know why you would need to.

Let it rise.


When you've got it punched down form it into 2 loaf-like blobs and put them in 2 greased loaf pans. Cover the pans with a dish towel or plastic wrap.

Let it rise.


Bake at 350 for 40-50 minutes or until an instant read thermometer reads 180-185 degrees. The temp will rise another 10 degrees or so while it sits there. Note: Until I got an instant read thermometer, I always had to cut into mine to check. It's a terrible method, but it let me know if it was done or not. And bread split in half and thrown back in the oven was better than bread with a big circle of dough in the middle. Or bread that is burned after all that (weeping) waiting. If you don't have a thermometer and you're not sure, I recommend cutting it open. Of course, if your oven temp is fairly reliable, you can probably trust 45 minutes and save your bread the violence.


I admit I just like to look at it.
Leave it in the pan for 10 minutes to cool. Then loosen the sides with a knife and turn it out to cool the rest of the way. (Or cut it open hot and eat it messy chunks of it like a big pig.)

Breaking bread together. Just because it's quintessential doesn't mean it has to be impossible. Enjoy it, friends, with those you love.
Newsflash: If you read the comments, you may notice there was a discussion of how much yeast is necessary. I tried this bread today (2/12/11) with half the yeast (1 1/2 Tbsp) and I'll be darned if it didn't rise just as fast as it did with the 3 Tbsp. The texture, etc. seemed just as it always does. Save yourself some money and don't worry about using quite all that much yeast. Unless you just like to inhale the stuff. In which case, I won't stop you.
That looks yummy! I can almost smell it...
ReplyDeleteHave you ever tried a dash (1-2T) of vinegar in your bread? It's pretty cheap and I think it really makes a difference.
ReplyDeleteI am with you as far as most of your ingredients, but I have to admit I was shocked (really, my jaw almost hit the ground) when I saw THREE TABLESPOONS of yeast in your recipe! I can't imagine that much for just two loaves, though I will say mine doesn't rise 'quite' as quickly as yours. I was raised in a strict "You NEVER use more than 1.5 teaspoons" cheapskate family. Even now, when I use a bit more to speed up a big batch, I feel an undeniable sense of frugal guilt. :) Guess that explains how I make all our own bread but I've only gone through two bags of yeast in 5 years of marriage!
OK one more question: regarding your loaf size. I have always thought a 12 cup batch should make about 4 loaves (that is what my bread book says, I just checked.) I make 2 big loaves par batch (in my big Cuisinart pans, I love em) and use about 7-8 cups of flour. Are you using a cast iron pan or some other large size of pan? Maybe it is the longer rising time that I use to balance out the scanty yeast? Now I wish I had a scale so I could weigh my loaves.
Just thinking out loud. You know, always perfecting the recipe. :) Thanks for the great discussion and beautiful photos.I can vouch, your bread is delicious!
First off, the size of my loaf pans. I have 3 loaf pans. One is small (7 x 3-ish inches); the other 2 are larger (8x 4-ish inches). Truly, I don't know which is normal. I used the big ones for these loaves and the loaves were quite big.
ReplyDeleteI only used 10 cups of the 10-12 cups of flour and I don't know how I would have gotten 2 more cups in, but things go differently with this stuff, so I don't want to say it couldn't happen.
Next time I'll try to weigh them. I will say they're, like, 300 times more filling than store bought bread and they have a tight, um, fabric--not sure what the right word is--they're dense (in the best way--not rock hard or sit-in-your-belly-for-days dense, but toothsome and in my opinion, great). They're not light and airy like some store-bought breads. I dislike light and airy store-bought breads. In fact, I would rather not eat than eat them, so a tight bread fabric is just what I want. We cut our slices for sandwiches very thin so that we're not completely stuffed after eating them. They cut beautifully, even when very thin.
As for the yeast...3 Tbsp is a lot. We didn't grow up baking bread on a regular basis, so I guess I couldn't remember well enough to compare it to anything. A version of this is the bread my sister makes and it's awesome, so I've just been copying her:). If you buy cheap yeast, it's still very cheap to make this bread. However, I can see how it would add quite a bit to the cost to use this much if you just used non-warehouse store yeast. This bread does also rise quite fast (which, to its defense, makes it a lovely Saturday morning project). Most bread recipes require twice as much rising time. I'm sure you could reduce the yeast by half (or more) and just let it rise longer.
I haven't tried vinegar. I've been meaning to because it's supposed to help breads and I believe it can do wonders for certain cakes. I just haven't done it. I will say this though--this recipe doesn't need it, at least as it stands. I'll have to try reducing the yeast and see if I still feel the same. Fortunately I'll be having plenty of chances to make my own bread this coming year:). Thanks for the input and ideas. I'll keep you updated with my experiments.
8x4" sounds really big to me! That definitely explains the difference. I think my regular size pans are the 7x3".
ReplyDeleteMy mom always makes her bread early in the morning (about breakfast) and bakes it in the afternoon before dinner. Often she lets it rise overnight in the fridge. I'm sure that's why she banged the "1 and a half teaspoon" rule into my head. Otherwise the bread would take over the kitchen! :)
As far as the vinegar, when I make a regular loaf it is usually LOVELY for eating but mine tends to be harder to slice thin for sandwiches. The vinegar seems to give it a little more cohesiveness, more "stand up and stick togetherness" than my usual moist, crumb-y homemade loaf. I like the flavor both ways.
OK one more question - do you ever use white wheat or do you always use red? I can't remember. I'm wondering if they raise differently and require different amounts of yeast. Clearly, we need to have a bread bake-off and comparo with all the different bread techniques out there! I made my first boiled-potato-water bread today and it turned out tasty! I would say a little lighter texture than usual but delightfully moist.
Oh, Vanessa, we can't have a bread bake-off, because I have only one really great one under my belt (and some awesome rolls and cinnamon rolls too). You're the pro with the no-kneads and refrigerator breads and the (wow) potato-water bread. That sounds like a cheapskate bread from heaven. As for my wheat, I use (not to disillusion anyone) whatever the heck kind is in the Gold Medal 5 lb bags. I'm sure it's not white; does that make it red?
ReplyDeleteAh, Jean, I wasn't suggesting a competition between me and you, but a group exploration and comparison of various cheapskate methods. Wouldn't it be interesting to take a big batch of bread and break it up into a vinegar, a gluten, and a potato water loaf and then see how they all stack up? Or we could try different amounts of yeast with the same recipe. You are better at that kind of stuff because, as you know, I may be able to MAKE bread, but I couldn't give you a RECIPE if my life depended on it. I lack discipline. So we would have to use your recipe. ha!
ReplyDeleteIt would be fun. We should do it one of these cold dreary mornings.
ReplyDeleteI just can't make the inner argument that making bread is cheaper than buying bread. I won't pretend that store bought bread is superior or even equal to homemade! But, the cost... that gets me. I just figured out how much flour it takes me to make a loaf of bread, and how much of a sack that is, and the flour alone is 83 cents. I can buy bread for 69 cents. Okay, so that's only 14 cents. But still, not cheaper.
ReplyDeleteIt would help if I actually liked bread (I do not but have a carbivore husband), or could stand whole wheat anything (I can not - the last straggler of a processed prepackaged childhood is my love of white carbs!). I do think your loaves are lovely. :) I just can't convince myself it's the way to go.
I won't make you bake bread, Heather. If you don't like bread much, it'd be kind of crazy (much better to make brownies, right:). But if you do like bread, the .69 stuff will pretty much satisfy you as much as a hunk of styrofoam, so you might as well make bread--all the more yeast to get high off of my dear.
ReplyDeleteOne more thought about the yeast - are you using instant yeast (like SAF) or regular grocery store yeast? With SAF, I never need to use more than 1.5 teaspoons per loaf and I wouldn't necessarily use double if I made a double recipe; I would probably go to 2 tsp. and let it rise longer. Even with using only whole grain bread ( I do usually add gluten, but I bought a big bag from the bulk section and it lasts a while).
ReplyDeleteI'm guessing 69 cents is for white bread at an outlet. In AK, the cheapest 100% whole wheat bread I can buy is 3 loaves for $5 on sale; usually it is 2.50 a loaf. If you want wheat bread~ 50% whole wheat & additives and preservatives, it's about 1.50. I prefer spelt and I can't buy it for under $4 if I can find it at all, so making bread is cheaper. I also make sandwich/dinner rolls, and monkey bread (from the same roll recipe). White Whole wheat also makes a difference; King Arthur is the brand I can get up here and I use it for everything, even cookies and cakes.
I'm really enjoying your blog!
Hi Davette! Thanks for joining the discussion. Who knew bread could be so interesting. I'm using Fleishmann's (however you spell that) instant dry yeast from Sam's Club, which is intensely cheap and also seems to be of good quality.
ReplyDeleteThanks for your thoughts and I'm so glad you're enjoying the blog!
Why not just do the classic "tap the bottom of the loaf" to check for doneness? Sure, if you've never done it you'll want to cut the bread open to check your ear, but it works once you're used to it.
ReplyDeleteHey Christine! You've clearly over-estimated both my skill level and my non-laziness. For me, the thermometer is just the laziest, easiest way to go:).
ReplyDeleteSo Jean, if I were to freeze say... two of the loaves and bake one. At what point in this process would I be able to throw them in the freezer?
ReplyDeleteI think the easiest (and most energy efficient) thing to do is to bake them both, let them cool, and then freeze the loaf you want to save (you could even slice it and then use it slice by slice). If you don't like that idea or only have one loaf pan or something, you could also put the dough in after it's risen and you've punched it down. You'll freeze it, then you'll take it out, let it thaw, and rise again. This takes several hours so just be sure to plan accordingly.
DeleteAnother awesome recipie from you which is from whole wheat. Thanks a ton!! Please make any tasty recipies from millet. Millets are so easily digestable and they are packed with antioxidants. Anyone can try who wish and crave to be fit and healthy.im using organic homemade millet flour from which i can make tasty dosa poori and rotis. Wanna try it out!!!!???? Please click here for milti millet flour from krivaan Mixed Millet
ReplyDeleteIf you looking buy Flour Mill for Home, jagruti appliances is a best place. The offered plants can be installed with ease and provide long term service to the customers. Their energy efficiency and high capacity makes them highly appreciated by the customers. Optimum quality materials are utilized for manufacturing these plants that are in strict compliance with industry standards.
ReplyDelete