Monday, May 30, 2016

Key Lime Bars


Chocolate is amazing and all, but I find that in the summer especially, I get to craving other things (don't tell Kip I said that). Enter the berries, citrus, ices, and stone fruits.


As for non-chocolate desserts, this was a very good place to begin this summer. In fact, writing about these makes me want to eat them RIGHT NOW. So it's probably good they're all eaten up. They were so delicious and refreshing and sweet without being cloying. They'd be perfect for pretty much any summer activity ever. Amen and amen.

(I put lime zest on the top to "decorate." 
It looked like chopped broccoli. 
You win some; you lose some.)


Key Lime Bars
adapted from Little Spice Jar
Makes 16 squares
Prep and cook time: 40 minutes
Cool time: 3 hours
Cost: $3.25
graham crackers: .70, pecans: .20, sugar: .10, butter: .50, eggs: .30, sweetened condensed milk: 1.00, limes: .45 (Asian store pricing),

12 large graham cracker rectangles
2-4 Tbsp pecans
1/3 C sugar
1/4 tsp cinnamon
1/2 C (1 stick) butter, melted
3 egg yolks
1 can (14 oz) sweetened condensed milk
4 tsp lime zest (2 limes or so)
1/2 C key lime juice (or regular lime juice)

Preheat oven to 350. Spray 8x8 inch pan.

In blender or food processor, combine graham crackers, pecans, sugar, and cinnamon. Ground it to powder. (Alternately, like if you need your workout for the day or something, you can put this stuff in a bag and crush it with a rolling pin or the sheer strength of your inhuman arms, but I always take the low road and blend it).

Dump it into your pan and add the melted butter. Mix together and press into the bottom of the pan. It should be a lovely thick crust.

Bake for 10 minutes.

While it's baking whisk the yolks for two minutes (I used a kitchenaid, but a mixer will work). Add the condensed milk and continue to whisk for another 2 minutes. Add the lime zest and mix. Then drizzle in the lime juice and mix for 2 minutes. The mixture will be slightly thicker when you're done than when you started.

Take out your crust and let it cool for just a couple minutes. Then add the lime filling.

Put it back in the oven and bake for 15 minutes. It should NOT be sloshy at all when done, but if there's a TINY jiggle, that's probably okay. It will set completely as it cools.

Cool on rack then refrigerate for 2 hours (and, yes, that's important).


PRINTABLE RECIPE

Monday, May 23, 2016

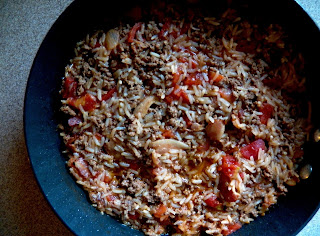
Dumb Easy Dinner: Mexican Rice Skillet


Summer is nearly upon us. With it comes the pitter patter of little feet. Or rather the stomp stomp stomp of bigger feet, the sometimes pajama days, the summer reading program, the bike rides, the park visits, the pool visits. And then we must not forget the messes, the muddy shoes, the bitter arguments over which cartoon character you are and why your sister is not allowed to be the cartoon character she wants to be. Oh, yes, and the plaintive cries of "I'm hungry."

Sometimes in summer it's actually easier for me to cook. Things are a little more laid back. We have fewer places we have to be. But sometimes I just want to lounge around like a big pasty-skinned lizard and not spend all afternoon in the kitchen. And other times we get home famished and ready to eat one another. On those days, it's good to have a few dumb easy dinners in the back pocket, preferably ones that won't use a booty load of dishes or heat up the oven for hours. Here you go.

The fantastic, glorious thing about Mexican Rice Skillets is that you just need rice, broth, and tomatoes. After that you can kind of do what you want--add meat or beans or enchilada sauce or heat or cheese. Whatever. It's really a dump and eat kind of meal that can be adapted to whatever on earth happens to be in your fridge. If you already have rice leftover, you can even use that, though it's super flavorful to make the rice with all the seasonings simmering into it.

Mexican Rice Skillet
serves 6
adapted from Butter Yum
prep time: 10 minutes
Cook time: 20 minutes
Cost: $7.50 ( $1.25/per serving)
bacon: .50, onion: .15, pepper: .75, beef: 3.00, rice: .15, canned tomatoes: .65, beef stock (from bullion cube): .15, other stuff: .15

a few strips bacon (optional)
1 bell pepper, chopped; I used red (also kind of optional, but veggies for heaven's sake)
1 medium onion, chopped (or finely grated if you have onion-texture haters among you)
1 clove garlic
1 pound ground beef (or cut this to 1/2 pound or use beans instead; seriously, this is that kind of whatever recipe)
1 C uncooked white rice
6 tomatoes, chopped (or a can of diced tomatoes with juices)
1 Tbsp tomato paste
1 1/4 C beef stock (if you used the can of tomatoes, reduce this to 1 Cup)
1 tsp dried basil
1/4 tsp black pepper.

Saute bacon if using. Add ground beef and cook (the original recipe just had the beef going raw into the rice and cooking, but I was afraid, so I cooked it first; you could potentially skip this step and you should know the beef doesn't have to be completely cooked through as it will cook longer).Add onions and peppers. Continue to saute until vegetables start to soften.  Add garlic and cook one more minute.

Add rice and cook for a minute. Then add the remaining ingredients.

Bring mixture to a boil, then cover and reduce heat to low or medium low. Cook until all the juices are absorbed and the rice is tender. If you taste it and the rice is still a little too tough, add a bit more water (maybe 1/4 C) and cook until it's absorbed.

That's it, and there's dinner. We served it with some grated cheese and sour cream. Also, avocado would have been amazing.

PRINTABLE RECIPE

Monday, May 16, 2016

Roasted Brussels Sprouts with Garlic Aioli


So I almost posted another cake recipe on here today. You deserve it, of course. But I thought that I really should get back to writing about real food (you know, sometimes). So then I was going to post Chicken Lazone, which is kind of like the dessert of the meat world because it contains no less than two cups of heavy cream (you deserve that too). And then I thought that maybe I should get control of my food porn problem and seek help or something. But then I didn't. So, even though you're getting a Brussels sprouts recipe today, you should know that it is every bit as fantastic as all those other recipes. It's a little more wholesome, but I did make a garlic aioli sauce to keep it from becoming too virtuous.

Cole vegetables are in season right now. Cole vegetables are the broccoli, brussels sprouts, cabbage, kale family. They have an undeservedly bad reputation. Maybe because these veggies have often been used at times of war, famine or distress to keep starving people alive. No one loves a vegetable they had to eat every day for two years when the only other option was eating tulip bulbs. And they are vegetables that don't take well to canning (or boiling for that matter), so some traditional means of cooking and preserving them make them gross. Which hasn't helped their reputation at all. But in non-starving America where you can roast your delicious cool season vegetables and serve it up with a side of dipping sauce (not because it is necessary; these are delicious even without it), you should definitely add some of these lovelies to your meal rotation. They're easy. They're healthy. They're on sale.


Roasted Brussels Sprouts with Garlic Aioli
adapted from Cakescottage
Prep time: 5 minutes
Cook time: 20-30 minutes
Cost: $1.85
Brussels sprouts: 1.50, mayo: .20, other stuff: .15

1 pound Brussels sprouts, cut in halves or quarters if they're large
olive oil
salt

For Aioli sauce:
6 Tbsp mayo
1/4 tsp chopped garlic
1 tsp lemon juice
1 Tbsp chopped parsley

Set oven to 400 degrees. Toss Brussels sprouts in olive oil and salt (the dip has no salt, so we're relying on a little salt here). Roast for 20-30 minutes (depending on how big the halves/quarters are). Ever 10 minutes or so, you'll give them a little toss, so they get color on all sides.

While it's cooking, prepare the Aioli sauce. To do so, just mix all those ingredients together (rocket science, here I come).

Serve the Brussels sprouts warm with the dip. You can serve it as a side or a light lunch.

Note: You'll have leftover sauce (at least I always do. It's great with meat, especially chicken, especially chicken or pork sandwiches).

PRINTABLE RECIPE

Sunday, May 8, 2016

Lemon Curd


This month for Secret Recipe Club, I got Culinary Adventures with Camilla.  Camilla is actually the fearless leader of our SRC group and I was excited to stroll around her blog. I realized that even though I visit her blog every month for SRC, those are other people's recipes she's cooking, and I haven't really looked through her own stuff. It was sooo fun. She had tons of interesting recipes using interesting foods as well as some posts on those foods themselves, which I thought was fascinating and helpful. She's an adventurous eater and that was absolutely and beautifully reflected in the pages of her blog. While looking on Pinterest at some of her recipes, I found a recipe for blood orange and lemon curd. It sounded amazing, but what I really wanted was just lemon curd. She had that too.


I've been wanting to make lemon curd forever and just haven't gotten around to it. I was worried it would be hard. It wasn't. And Camilla's recipe is delicious.

It's like a cross between pudding and jam. I believe you can eat it either way. Spoon it into your mouth if you wish (I certainly did). Or put it on toast or yogurt or cheesecake. 

It is going to be the perfect match for my lemony birthday cake.

Lemon Curd
from Culinary Adventures with Camilla
Makes about 2 cups
Prep and cook time: 10-15 minutes
Cost: $1.80
lemons: 1.24, sugar: .15, eggs: .60, butter: .80

1 C fresh lemon juice (about 4-5 large lemons--I get mine from the Asian store where they're cheaper)
4 tsp lemon zest
1 C sugar
6 large eggs
12 T butter, cut into cubes

Combine lemon juice, zest, sugar, and eggs in a large saucepan. Mix and warm slightly. Add the butter and mix as it melts. Whisk very frequently over medium or medium low heat until the curd is thick enough to hold the marks of the whisk and maybe the first bubble breaks the surface. Don't let it boil though.

Allow to cool.

Eat with a spoon from the jar if you want:). Or on toast, with plain yogurt, ricotta, cheesecake, or whatever.

Note: If you happen to have some of your egg turn into blechy white bits in the curd, just strain it through a fairly fine mesh strainer and all will be well.


PRINTABLE RECIPE


Tuesday, May 3, 2016

Lemon Bundt Cake


My birthday is coming up this week. I love my birthday--love it like a child. This is what I do every year. On the day of my birthday, I spend the morning going to various stores/restaurants that give you free stuff for your birthday. For a few good resources about where you can go to get free stuff on your birthday, look here. Then Kip and I go out for dinner (often for Indian food, which I love, but Kip doesn't). And then I have adult friends over for cake and ice cream. Because I think we all know that it's perfectly adult to eat cake and ice cream together. I love it. Love love love it. 

But it's only good if you've got good cake. 

I also loooove making my own cake on my birthday. Not everybody does, but I do. Truthfully, I usually make it the night before, but it must be made by me me me. Because I make amazing cake. And I like making cake. And I like eating amazing cake. The end. 

Here is what I'll be making this year. It's a lemon bundt cake. I first made it for a church potluck. I wasn't sure how it would turn out (and, in fact, only snapped a few quick shots of it with my camera). I didn't quite trust the recipe. It had no baking soda. I was worried it'd be flat or weird. Nope. It was incredible. If I had known how amazing it would be, I might have skipped the potluck and just sat in a corner of my kitchen eating it by the fistful. So it's probably fortunate that I didn't know how fantastic it would be. The glaze for this is perfect, but if you wanted to do orange or lime or raspberry, I wouldn't stop you. 


We did it for my birthday with the lemon glaze and then a strawberry glaze over that. Delicious. 

Lemon Bundt Cake
Makes one bundt cake
Prep time: 15 minutes
Cook time: 70-80 minutes
Cost: $3.35
flour: .40, butter: 1.00, sugar: .30, powdered sugar: .20, buttermilk: .30, sour cream.25, lemons: .75, other stuff: .15

Note: When I made this the first time I used a cheater buttermilk (1/2 C milk and 1/2 Tbsp vinegar). The second time I made it with real buttermilk. The truth is that I think it's better with the cheater version--moister.

Cake: 

3 C flour
1 tsp baking powder
1/4 tsp salt
1 C butter, softened
2 C sugar
3 eggs
1/2 C buttermilk (can use 1/2 C milk and 1/2 Tbsp vinegar if don't have buttermilk)
1/2 C sour cream
4 Tbsp lemon juice
zest of two lemons (about 2 Tbsp)
1 tsp vanilla

Lemon Glaze: 

1/4 C butter, softened
1 1/2 C powdered sugar
3 Tbsp lemon juice

For the cake:

Preheat oven to 300 degrees and spray bundt pan well. 

Sift flour, baking powder, and salt. Set aside. 

In a large bowl, cream butter and sugar until light and fluffy. Beat in eggs, one by one. Mix in the sour cream, lemon juice, vanilla, and lemon zest.  

Mix half the flour mixture in. Then add the buttermilk. Then mix in the other half of the flour mixture. Mix just until incorporated. Pour batter into bundt pan. 

Bake for 60-70 minutes (this was the original instruction; mine took longer--probably close to 80 minutes, so don't freak out if it's not quite done at 70 minutes). A toothpick or knife or some other pricking implement should come out clean or with moist crumbs (not wet blobs) when inserted into the thickest part. 

Allow the cake to cool for 5-10 minutes, then turn it out on a cake platter. Spread half the lemon glaze over the warm cake. Do this! It will soak into the cake and contribute to its sheer amazingness. 

Let cake cook completely and add the rest of the glaze (Note: The picture you see up top is just with the first layer of glaze. I had to wait for it to cool and by then we were at the potluck and I was dumping it on there, so I didn't get any shots of it truly complete. The glaze on the cooler cake will be more of a frosting and less of a glaze that sinks in.)

For the glaze: 

Cream butter. Add sugar and lemon juice. Beat well until it's smooth and creamy. 

Optional Strawberry Glaze:

1/2 C strawberry jam
2 Tbsp cream
1-2 Tbsp milk
1 C powdered sugar

Blend in a small blender or whisk. 


LinkWithin

Related Posts Plugin for WordPress, Blogger...