Tuesday, February 24, 2015

Brownie Bites


Ironically, I have a bajillion (or at least four) delicious recipes waiting to be shared with you, but I have just not had the time to get them up. Tonight I was sorely tempted to skip this post as well and haul my little bum to bed. But no, the world deserves brownie bites. Especially when they are so easy and satisfying as this.

Sometimes, friends, I get a little bored by breakfast. We end up eating the same things over and over again. So one morning, even though these are supposed to be a sort of healthy dessert option (much like a Larabar), I whipped them up for breakfast. I didn't look back. They would also be a great healthy dessert (and are surprisingly satisfying as such). Or a perfect pre/post workout snack. I should, however, issue a warning here and say that they are not low-cal. If you're passing on the real brownies in favor of your waistline, then I would encourage you not to pop four or five of these into your mouth. Sure they contain fruit and nuts and cocoa and awesomeness. Sure, they could be considered good for you. But, well, let's just say they have more calories than air. Because they really really do.

These are raw and grain-free, potentially dairy free, and have a mere five ingredients. Enjoy.

Brownie Bites
from Paleo Grubs
Prep time: 5 minutes
Cost: $4.00
walnuts: 2.00-3.00, dates: 1.00, cocoa: .40, chocolate chips: .25

Note: Dates can often be found cheap at Asian markets/stores.

1 1/2 C walnuts
pinch salt
1 C pitted dates (get all those pits and stems OUT)
1 tsp vanilla
1/3 C cocoa powder
1/4-1/3 C dark chocolate chips (optional, but you know I added them)

Put walnuts in food processor and process until finely ground. You don't want them to become walnut butter and you don't want the oils to start separating, so go for a nice crumbly-looking finely ground. Add dates, vanilla, salt, and cocoa powder. Process until well combined--you shouldn't have big chunks of anything (unless you want them of course). You may need to add a few drops of water to get them to come together, but I didn't. You also may need to occasionally stop the processor and spread your stuff out again since sometimes it forms a huge ball or brownie bite that makes it hard to process evenly.

When it's just about ready, add your chocolate chips and pulse just a bit more to chop them a bit, but leave them so you get chocolate chips in there with your bites.

Roll them into balls. (Or press into a wax-paper lined pan, refrigerate, and cut.)

Store in an airtight container (and I refrigerated them).

PRINTABLE RECIPE

Saturday, February 21, 2015

Lentil Chickpea Soup


Today it iced. Then it rained. Then it snowed.

I'm thinking soup. Hearty, warm-the-bones soup. I've tried several (SEVERAL) lentil soups that have never made it to this blog because while I liked them fine, I knew I didn't like them well enough to make them again. This one, however, is a winner. Lovely balance of bean, spice, and creaminess. To winter.

Lentil Chickpea Soup
from Mel's Kitchen
Serves 8
Prep time: 5 minutes
Cook time: 30 minutes
Cost: $4.00 ($.50/serving and this is filling)
onion: .10, carrots: .20, curry: .30, broth: .50, lentils: .40, chickpeas: 1.00, sausage: .50-1.00, cream: .50

1 Tbsp oil
1/2 C chopped onion
1-2 large carrots
2 cloves garlic, minced
1 Tbsp curry powder (or paste)
1/2 tsp salt
1/4 tsp pepper
6 C low-sodium chicken broth (if you don't have low sodium, then use part water--I used 6 C water and 4 tsp bullion and that worked)
1 C dry lentils (I just used boring old green)
1 can chickpeas, drained
1/2 lb pre-cooked sausage (something like polska kielbasa, or, well, whatever--also I used less than this)
1/3-1/2 C cream (I'd say NOT optional; I felt like this helped this soup go from decent to ooh-la-la for me)
almonds for garnish (optional)
cilantro for garnish (optional)

In a pot, heat oil. Add onion and carrots. Cook for about 5 minutes. Add garlic, curry, salt and pepper. Cook another minute or two (until nice and fragrant).

Add broth and lentils. Simmer for 20-30 minutes, stirring occasionally until lentils are tender but not mushy.

Stir in sausage and chickpeas until they're heated through. Then add that cream. Taste and add salt and pepper if necessary.

You can garnish with crunchy almonds or sassy cilantro or both.

PRINTABLE RECIPE

Tuesday, February 17, 2015

My Favorite Lemon Bars


I really like lemon bars. Every time I'm pregnant (note: I am NOT currently pregnant just because I am writing about lemon bars), I crave lemon and lemony things like a lunatic and occasionally make a pan of bars that I eat half of that night, like even more of a lunatic (normally I'm a small treat kind of a girl). Nevertheless, you'll notice there's not a recipe on here for one yet. That's because even though I think most bars are decent, I have been looking for one to fall in love with for a very long time. Some of them get this kind of crusty thing going on up top. Some are too lemony (sometimes to the point where they almost burn my mouth) and some are just not very interesting. Then again, some are a little too interesting--I found a recipe a couple years ago where you just threw a lemon (seeds, rind, and all) into the food processor and processed it with all the other stuff. I loved that concept--the simple efficiency of it, and it actually tasted pretty good, but the bars came out with little chewy lumps of pith in them, and I didn't love that.

But as fate would have it, this Christmas, one of my sweet sweet piano students brought me a plate of lemon bars that she herself had made. And they were perfect--lemony and acidic, but nothing that'd burn your mouth off.  A perfect custardy filling with a lovely shortbread crust. I also liked the crust to custard ratio. They were it--the one--the lemon bar I'd been looking for.

I admit that I was almost scared to try to reproduce them. What if it had just been a fluke? What if they didn't work out for me? What if I messed them up?

But then, another friend, in another simple act of friendship gave me a whole bagful of lemons that her mother had grown. They were the most fragrant, beautiful juicy lemons I've ever seen. You could just squeeze them by hand and get nearly 1/2 cup of juice from them.

And then I knew that the time had come to make the lemon bars. And so I did. And they were just as perfect as they'd been when my piano student brought them.

I hope you like them as much as I do.


My Favorite Lemon Bars
Makes 9x13 inch pan
Prep time: 10 minutes
Cook time: 50 minutes, (20 for crust; 30 for filling)
Chill time: a couple hours--you'll chill the crust before baking and then you'll want to give yourself time for these to cool since warm lemon bars just seem weird (and too gooey).
Cost: $2.40 (that's about $.10/bar)
flour: .20, cornstarch: .05, sugar: .40, butter: 1.00, eggs: .40, lemon juice: .35

Note: This recipe is for a 9x13 inch pan. I didn't trust myself not to eat all of those, so I halved the recipe. If you make a smaller batch like I did, know that your cook times will be a little shorter. You'll probably cook your crust a wee bit less and your filling for about 20 minutes whereas mine was closer to 30 minutes.

Crust:
1 3/4 C flour (all-purpose)
1/4 C cornstarch
1/2 C granulated sugar (NOT powdered sugar)
1/4 tsp salt
1 C cold butter

Filling:
4 large eggs
2/3 C lemon juice (can be fresh-squeezed of from a bottle, but must be 100% lemon juice)
1 1/2 C granulated sugar
1/4 C flour
1/8 tsp salt

I made the crust in the food processor and recommend this. You just throw everything in and give it a few whizzes. It will end up looking crumbly, but it can be pressed together (kind of like a graham cracker crust actually).


However, if you don't have a food processor, just add all the dry ingredients and then use your fingers to rub the butter in until it forms fine crumbs. [Note: You could possibly melt your butter and stir it in for simplicity. I did NOT do this, since I followed my student's recipe perfectly. It might affect the texture of your crust and make it a bit denser, but then it might save you 10-15 minutes and that might be worth it--just an idea if you don't have a food processor].

Press this into a 9x13 inch pan. (I used parchment paper in my pan so that I could cut and remove the bars easily. Also, this makes it easier to freeze some of the bars so you don't eat them all immediately--this is always a good thing. Unless you are a pregnant lunatic, in which case you should just grab a spoon and have at it.)

Chill the crust for 30 minutes. [Note: Again, you could possibly skip this step. I didn't--I wanted the bars as I'd had them, so I followed the directions. But next time I will skip this step and see if it makes a big difference or not.]

When you're ready to go, heat the oven to 350 and bake the crust for 20 minutes. Then--without opening the oven door--turn the heat down to 300 and bake for another 2-5 minutes.

While it's baking, make your filling.

Whisk the eggs and then add the rest of the ingredients. Whisk it good.

Take your crust out when it's done (you don't want it super cooked--it's going back in with the filling and I just hate a burned crust; don't you?). Let it cool for 2 minutes and then pour the well-whisked filling over your crust (you want the crust still hot when you pour the filling in).

Bake for 25-30 minutes at 300 degrees until filling is set. When you take it out it should not be liquid, although a very soft jiggle is okay.

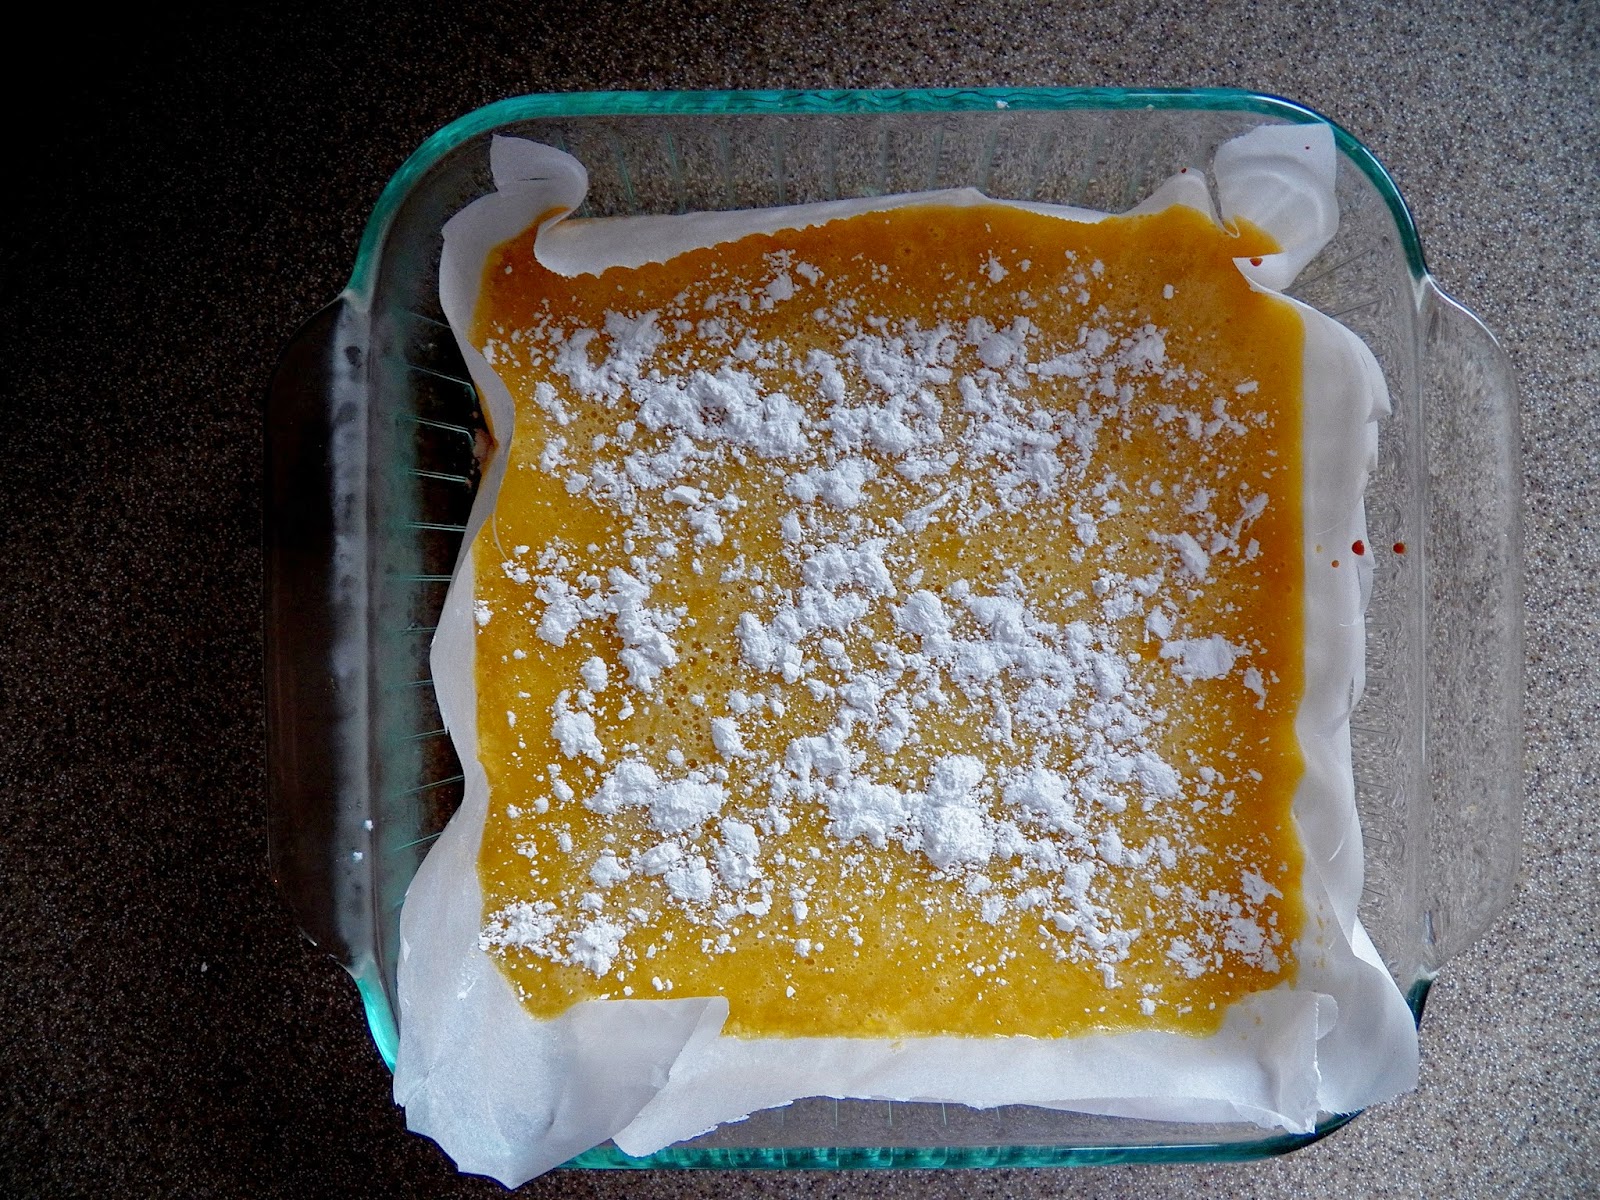
Cool it completely. When it is COMPLETELY cool, sift powdered sugar onto the top, and cut those babies up.

These keep well for several days and freeze extremely well. I just leave them on their parchment paper (cut into pieces) and put them in a large Ziploc bag in order to freeze.

PRINTABLE RECIPE

Thursday, February 12, 2015

Cookies and Cream (An Icebox Cake)--Photo Redo


Today is my mother's birthday. So I made her favorite food. Because that is the type of selfless memorial we're all about around here. Love you, Mom.

And look what I did.


I made it all pretty.


I can't say I did that for Mom. No. I did that for you Pinterest. And for the rest of you, social media.

But the truth--the honest truth--is that you needn't make it like this. And the honest honest truth is that to make it on a cake stand like this is a terrible idea. Unless you have a cover for your cake stand and a very very empty fridge to store it in. Because this cake needs to sit in the fridge for 24 hours before you can eat it.

If you want to skip the cake stand and still make it pretty, just put it onto a little Tupperware pie or cake container.


See, still pretty, but much more practical.

And then, you can cover it up with more whipped cream because--personally--that's how I like it best. And look--still pretty. albeit not quite as showy.


You could even sprinkle some crumbs from the cookies on top for visual effect, but I didn't think of that until I was typing this up.

Then cover it, pop it in your fridge. 24 hours later you're good to go.


Now if you really really want it on that cake stand--say, for a certain loving, but potentially over-hyped holiday, you can prepare it on waxed paper on your nice practical Tupperware container, cover it, let it sit, and then just before eating, use that wax paper to slip it onto a fancy cake stand before serving. If that's your style. (Trim that waxed paper and you're good to go.)

(See.)


But except for the occasional burst of energy with this blog, that kind of fancy isn't usually my style. If you click to the original post, you'll  see what my style is (note: lazy; also not particularly visual). I put it all into a glass bowl with a lid and then flop it out with a spoon. It works, but Better Homes and Gardens won't be calling you (by which I mean, of course, me) any time soon. Here are some pic's from that original post for your viewing enjoyment.


And for the skinny on this recipe (by which I don't mean anything skinny at all), have a look at the post. It will give you all you ever wanted to know about this simple recipe, and lots of stuff you never needed to know. Below you'll find the basic recipe, but--you know--not the self-gratifying blabbing I usually do (because there was nothing self-gratifying in this post at all; nothing).

Cookies and Cream (An Icebox Cake)
Serves: Um, my family of 6 (but it should serve more; it really should; we have issues)
Prep time: 15 minutes
Fridge time: 24 hours
Cost: $5.12 (Okay, I know I've been highlighting some sort of pricey desserts lately, but May is my holiday month, okay. Besides, this is way cheaper than you'd get even one teeny from-a-box-of-some-sort dessert at a chain restaurant.)
(cookies: $3, cream: $2, sugar: .12)

1 box Nabisco Chocolate Wafers
1 pint cream
3/4 C sugar
2 tsp vanilla

Beginning by whipping your cream. Pour it in a bowl and blend it until soft peaks form. When they do, add the sugar and vanilla. Whip or beat until firmer peaks form.

Put a blob of it on the bottom of a salad bowl and spread that around. Make one layer of cookies, breaking some if you need to so they don't overlap. Add more whipped cream and spread. Add another layer of cookies. Repeat until you top it off with a thin layer of whipped cream.

Cover and refrigerate for 24 hours or until the cookies are perfectly soft.

Sunday, February 8, 2015

Sloppy Joe Pie--Secret Recipe Club


This month for Secret Recipe Club, I had a fun little blog called Cheese Curd in Paradise. There was a bunch of stuff that looked good, and I pinned a few, but truthfully I knew what I wanted to make all along. As soon as I read the idea of a Sloppy Joe in pie form, I was on it. And I did not look back. It was delicious. And it can be made in, like, 10 minutes (plus bake time). Or you can pull out your crazy hat (just a little crazy, but you're adding some time to your recipe) and make it from scratch if you'd like (both methods will be covered below). Honestly, I would be glad to have found this blog just for this recipe. Because, I mean, the one problem with sloppy joes is that they're just so...sloppy. You put them on the bun and sure they're good, but they drip all out and you end up having to eat it with a fork anyway, and maybe you wish you'd just cut your burger up in the first place. This pie--it brings all the comfort food and eliminates the middle step of squeezing sloppy joe filling out onto your new shirt. You just go straight from pan to fork. Loved it.

Some notes:
-Ashley made this gluten-free simply by using gluten-free Bisquick
-I made this from scratch by using this recipe for homemade Bisquick. And a riff off of this recipe for homemade sloppy joes (basically a little sugar, Worcestershire sauce, salt, tomato sauce, and tomato paste). It was super delicious, but it seriously added a good 30 minutes to my prep time. If I had to do it again, I'd do it if I already had my homemade Bisquick all made and a leisurely dinner schedule. I would NOT make it from scratch if I had to get my husband out the door at 5:25 sharp and was about to go crazy--then I'd be dumping that sloppy joe sauce in and feeling pretty good about it too.


Sloppy Joe Pie
adapted from Cheese Curd in Paradise
Serves 4-6 (one pie pan)
Prep time: 15 minutes for the easy version; 30-40 minutes for the from-scratch version
Bake time: 30-60 minutes
Cost: $4.80 )that's $1.20/serving for a filling and fairly complete meal--yeah, I'm counting that tomato sauce in the sloppy joe as a vegetable; what about it)
meat: 3.00, onion: .20, sloppy joe sauce: 1.00, cheddar cheese: .75, Bisquick (not quite sure--totally guessing here): .50, eggs: .20, milk: .15

1 lb ground beef
1 medium onion, chopped
1 can (15.5 oz) sloppy joe sauce
1 C shredded Cheddar cheese
2 eggs, slightly beaten
1 C milk
1 C Bisquick
1/2 tsp garlic powder
1/2 tsp black pepper

Heat oven to 400.

In a large skillet, cook beef and onion over medium heat, stirring, until beef is brown and broken up. Stir in sloppy joe sauce and cheese (oh my, it makes me feel all drool-y to think about again). Spoon this into an 8-inch square pan or a 9 or 10 inch pie pan (what I used).

Now, in a separate bowl, stir together the eggs, milk, Bisquick, garlic powder, and black pepper. I'd expected this to be kind of thick/lumpy like biscuit mix, but it wasn't--it was runnier--more like a thick pancake batter (and better that way, my friends, better). Pour this over the top of your beef mixture.

Bake for 30-60 minutes (why the big range? Ashley recommended 30 minutes, but ours was still super raw in the dough part at that point, so I ended up going another 20 minutes at least--again--just trying to prepare you if the husband, or anyone else, has to be out the door at a certain time). The top should be golden brown and if you stick a fork in the Bisquick part it should come out clean.

Allow to cool for a few minutes if you want and serve. If you serve it hot, it's going to be...wait for it...sloppy. You're not going to get a pretty slice like you see above. You're going to sort of scoop it onto your plate in a big glorious plop of tomato-y meat and carbohydrate (yum). That pretty slice in the picture above was from our leftovers the next day--after it had cooled and firmed up. Then it could be sliced and warmed in a tidy manner. However, sloppy first day or neater second day--it was delicious. Perfect meal, fabulous leftovers.

Thanks Ashley!

PRINTABLE RECIPE


Saturday, February 7, 2015

Homemade Bisquick--No Shortening and a little Whole Wheat


I'm not exactly Princess Biscuit. But every once in a while a recipe calls for Bisquick and it sure is nice to have a little ready-made mix on hand. I'm not going to judge you if you use the actual Bisquick from the actual store, but if you want something a little more whole-foodsy, well, here you go. It uses butter instead of shortening (which I think makes it so much more flavorful), and a big of whole wheat (though I didn't go all crazy there, but you could). 

Homemade Bisquick--No Shortening and a little Whole Wheat
Makes about 2 C
Prep time: 5 minutes
Cost: $.70
flour: .10, whole wheat flour: .10, butter: .50, 

1 C all purpose flour
1/3 C whole wheat flour
3 tsp baking powder
1/2 tsp salt
1/2 C (1 stick) butter, melted

Mix it all together--get the butter incorporated as well as possible. And you're done. 


Thursday, February 5, 2015

Sour Apple Spinach Juice


Last week one of my friends gave me a whole bag of lemons that had been lovingly grown in her mother's house. Lemons are not native to Indiana, folks--these had been grown by hands of love. And now I had a bag of them. And they smelled amazing. (Why, yes, I do have the greatest friends, ever in the world--thanks for asking). I wanted to do something special with these lemons--something amazing. The risk, of course, with getting something really nice is that sometimes we put off using it due to its preciousness. And then, like, all things in this world, if we're not careful, it returns to dust. (Or stinky citrus mold, as it were, but I'm trying to wax poetic here.)

So today when I came home after working out with my two super fit friends (ugh, don't you just hate it when people start talking about working out on their food blogs--especially when you could all be eating chocolate pie instead; don't worry; I'm not planning to start logging treadmill workouts any time soon). But anyway, after I got home, I knew the perfect use for at least one of those beautiful lemons. Because I'd had my eye on this spinach juice that called for spinach, blueberries, an apple, and a lemon--peel and all. In my sweaty nasty clothes, that sounded like just the thing.


And I know that sometimes sometimes it might seem like I just sit around all day snarking chocolate caramel pie and washing it down with bon bons. Sometimes I even play that angle a bit because I don't think a woman should ever feel guilty for a bit of indulgence in chocolate pie. If you're going to eat chocolate pie, you should definitely have fun with that. However, in truth, I usually try to keep it pretty healthy around here. The truth is that I like to exercise and I like to eat healthy food (most of the time, people, most of the time), and I start feeling kind of bleh when I don't. This juice had everything going for it--berries, greens, the apple a day, and lemon with the healthy, but often over-looked rind included. Now all I had to do was commit to cleaning my juicer afterwards (blah).

It was worth it. I should tell you that if you're only used to fruit juices, this juice will be a bit of a shock. But a good sort of shock--the kind of shock that's a gateway into other less usual juices. In fact, if you've been kind of sort of toying with the idea of juicing more veggies and less fruit, but weren't quite sure how to make the transition, this--my friends--is an excellent transition juice. It's not a sweet fruit juice, but it's not the pepper, broccoli, and spinach juice either.

And it's sour, but not pucker-up-spit-it-out sour, no. Rather, it's that combo of sweet and sour we go for in a lot of the foods we love (notice that title I gave this juice--that's what it kind of embodies (not imitates, but embodies) for me--sour apple flavor, only with a serious health makeover). And the lemon--oh, the lemon--it was good. You could smell it. You could taste it, but it didn't overpower or kick you in the face.

One warning though--this juice is uggo. Here's a pic of it premixed when it's still kind of interesting. But after you mix it, it's kind of greenish brown--it's not scoring any beauty points.


Sour Apple Spinach Juice
from Clementine Bean
Prep time: 10-15 minutes
Serves: 1
Cost: $1.70 (I know that that doesn't sound cheap for a cup of juice, but if you bought fresh-squeezed juice from any juicing bar/place, you're going to pay a whole lot more--probably about quadruple that)
spinach: .40, blueberries: .50, lemon (free!)--but probably about .30 normally, apple: .50

 2 C spinach
1- 1 1/2 C blueberries (these must be fresh or THAWED; frozen will NOT work)
1 lemon, rind included (though I cut off top and bottom)
1 apple, cored (any will work; I used a sweet variety since I dropped it on the floor while getting my apples out, but something tart will work too--just know that you're increasing the bang in this juice if you do that)

Juice those babies. It helps when juicing to follow the spinach (and even the apple) with juicier things--this will help you get the juices from the harder-to-juice things flowing. I put in apple, then a quarter of the lemon, then the spinach, then the blueberries, then the rest of the apple, then the lemon.

PRINTABLE RECIPE

Monday, February 2, 2015

Chocolate Caramel Pie: A Book Club Dessert for Unbroken


I'm part of the best, most fun, most fabulous book club ever. We read books. We make food. Usually we make food that goes with the books.

This month we read Unbroken. You might think that this is because we are hopeless trend-followers, but the truth is I'm not sure my friend realized they'd made a movie out of it until she picked it and all the library copies were checked out. That's the way we roll. But, whatever, follow the trend if you must because Unbroken is a truly beautiful book and everyone should read it.

While you're reading it, thinking about all those men having rice balls thrown at them and contracting beriberi, and starving to death, you should eat a chocolate pie with a layer of caramel underneath and a crust made from Oreo cookies and butter. It's the American way. And then you should top it with little Hershey's bars. If you were floating along on a raft with sharks circling you, this is surely one of the recipes you would daydream about and recreate in your mind.

Also--Hershey's bars = thematically appropriate for Unbroken. Because when the POWs were rescued, well, I will just say that Hershey's bars were dropped from planes into the camp. And if that's not heaven to starving 20-year-old boys, I'm not sure what is. This pie--also kind of like being in heaven. If only it could be dropped successfully from a plane. (Note: Do not try that at home; just eat it.)

Also--chocolate pie = thematically appropriate for Valentine's Day. You might want to forgo the Hershey's bars and go for some sea salt to make it sexier.

Chocolate Caramel Pie: A Book Club (or movie club if that's your thing) Dessert for Unbroken
adapted from Kevin and Amanda
Makes 1 pie
Prep time: 5-10 minutes per layer (about 30 total, plus several hours of chill time in between)
Cook time: 5
Cost: $7.70 (no, it's not cheap; I'm sorry)
Oreos: 2.00 (for generic), butter: 1.00, cream: 1.25, brown sugar: .20, chocolate chips: 2.00, Hershey's bar: 1.25

Note: I'm going to confess something here. This caramel was billed as fool-proof. I did not consider it thus. I made it twice and both times it came out slightly (although not excessively) grainy. I almost went for a third, but didn't have it in me. That was okay because next to the cookie crust I did not notice even a tiny bit of graininess as I actually ate. Still, well, it was just kind of annoying. I wanted perfectly-creamy-yet-thick-enough-to-stay-as-a-layer-in-the-pie caramel. Perhaps one day I will work to fix this so that it is perfectly perfect in every way (I have a great caramel recipe, but need something thicker), but for now let me say that it was wonderfully tasty and no graininess was noticed as you ate it--that's good enough.

Another note: You'll note I didn't get a picture of the inside of the pie (which is a pity because it's quite pretty. Yeah--we ate most of it, and the rest that came home with me got smashed--sorry. I will rectify the lack of center pictures next time I make this.)

For Crust:
about 36 Oreos (generic is fine)
8 Tbsp butter. melted

For Caramel layer:
8 Tbsp butter
2/3 C brown sugar
1/4 C whipping cream

For Ganache layer:
12 oz chocolate chips or nice chocolate
1 C whipping cream

To make your crust, put cookies and melted butter into a food processor and process until you've got fine crumbs. Alternately, you can put them in a big Ziploc bag and smash them with a rolling pin via child labor.

Put this crust into a tart, springform, or pie pan. I used a 10-inch, but I think you could get away with a 9-inch. Using a pan with an outside that springs off is nice for presentation, but my pie pan worked just fine too.

Throw this in the freezer or fridge to set up.

In the meantime, make the caramel layer. To do this, add your cube of butter and the brown sugar. On medium or medium low heat, melt the butter as you whisk in the brown sugar. DO NOT melt the butter first, then add the brown sugar, or your finished product will be super grainy. Whisk it gently the entire time it's heating. When it starts to boil, cook it for one minute (whisking) and take it off the heat. Immediately drizzle in the cream, whisking constantly.

Allow it to cool for about 10 minutes.

Then add it to the pie crust and put it in the freezer for 30 minutes (or fridge for a bit longer)--until it sets up.

When it's set, make the chocolate ganache. Do this by putting the chocolate chips and whipping cream in a microwave proof container and nuke it for a minute. Then whisk. If it needs another 30 seconds to whisk smooth, give it that. It should whisk into a smooth creamy chocolate deliciousness.

Pour this onto the caramel layer. Freeze for 30 minutes or refrigerate until set. DO NOT put it in the freezer and forget all about it. This isn't meant to be a frozen pie. You just want it to set up.

When it's set, you can add Hershey's bars if you want (they are perfect thematically for Unbroken, but they do take an already rich dessert over-the-top so be warned). Alternately, you can sprinkle this with sea salt.

Chill for 2-4 hours in the refrigerator and eat.

PRINTABLE RECIPE

LinkWithin

Related Posts Plugin for WordPress, Blogger...