Saturday, November 30, 2013

Abundant Earth Works--a post about jewelry, not food


And here we have another post that is not about food.

Soon this is going to be one of those blogs where people just post about boots and hairstyles and stuff. Okay, probably not.

But I did get something really amazingly beautiful for my anniversary in November. I was so happy with it that I wanted to give a little call-out to the shop Abundant Earth Works and the designer Dawn on Etsy. She's not a personal friend or anything. I didn't know her at all until I asked her to do this necklace for me (uh, which was from Kip for our anniversary). I just was so so happy with the necklace she made me. And since it's Black Thursday weekend now seemed like a good time.

I should tell you all that I have a small jewelry addiction. Not the fancy stuff from those corner jewelry stores in the mall. No. I find them a little boring and a lot overpriced. In fact, I noticed last year when I went from store to store looking for an original-looking mother's ring that all the rings from every jewelry store in town looked exactly the same. In fact, everything sort of looked the same. I've always liked jewelry that looked a little different from everybody else's. It doesn't hurt when it has a $20 price tag instead of a $200/2000 price tag either.

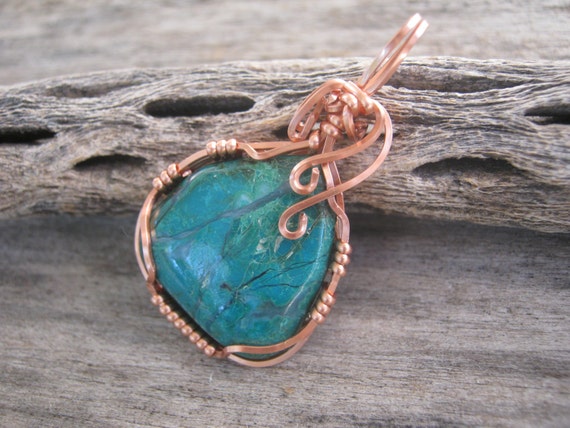
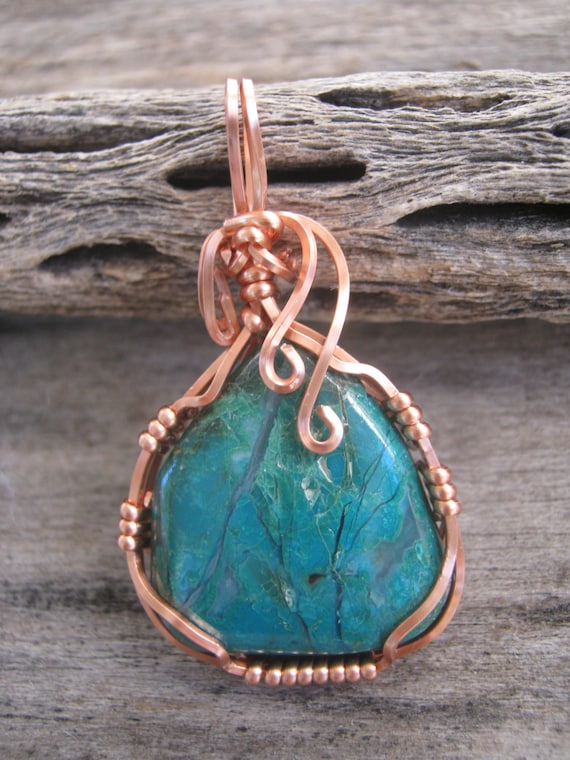
In particular I tend to love stones. No, I don't mean diamonds. I'm talking about, you know, rocks. I love them. Nerdy style. Like me and my kids will go to these "shows" put on by the lapidary club and just spend hours looking at rocks. Last year, at one such event, I got a piece of polished chrysocolla for free with another purchase. It was so so beautiful, but I didn't really know what to do with it. It sat on my shelf for quite some time and then I thought maybe I'd try to find someone to wrap it for me. I checked many many shops on Etsy. They would mostly do it for between $30 and usually closer to $50 or $60. That was a little high for me. But Dawn at Abundant Earth Works did it for less than $20. Which is remarkable in and of itself, but she also did a bang up job. I linked to several examples of wrappings that I liked, sent her my stone, and then crossed my fingers and left her to do what she thought best. (I've done this with other Etsy jewelry people before and found that we often just don't see eye to eye, no matter how anal my descriptions are of what I want). What I got was better than anything I could have imagined. I mean, it was just gorgeous. The picture looked better than what I'd pictured and then the actual necklace was even prettier than that. I've never been so happy with a jewelry purchase before--especially one I had asked someone to design (meaning I didn't really know what it would look like at the end).

You don't have to have a random stone hanging around your house either (though if you do, we could totally be friends). She's got plenty of stones on her shop to choose from.

So if you're in the market for something pretty, unique, and not bank-breaking this holiday season, give Dawn a try. She's having a Black Friday sale through Dec. 3rd where she gives at least 15% off (and up to 25% depending on how much you spend). Do it.


Tuesday, November 26, 2013

Green Beans with Pine Nuts and Lemon

(nighttime picture; arg)


I know everybody's all crazy about the green beans with cream of something something something and also cheese. But there are things I like better. Especially on a day when I'm already eating turkey with gravy, potatoes with butter and gravy (and maybe some sour cream mixed in), stuffing with about 12 cups of butter melted therein, that sweet potato casserole that we all know is not a casserole, and PIE. Yes, hopefully lots of pie. As one of my friends said (and a true doctrine of my life as well): If I'm going to have to choose between the beans with cream of something something something and cheese and another piece of pie, well, I'm taking the pie.

But wait, now you don't have to. Because you can now have amazing green beans and eat your pie too. Or maybe eat your pie two. (Ha ha. How clever am I, right? Yeah, don't answer that.)

I got this recipe this summer from Kalyn's Kitchen and it was amazing. Wonderful flavors and even a few indulgent ingredients, but just enough for flavor and texture--nothing that goes overboard and bumps out the pecan pie. Because we wouldn't want that.

Green Beans with Pine Nuts and Lemon
adapted from Kalyn's Kitchen
Makes 4-6 servings
Prep time: 5 minutes
Cook time: 10 minutes
Cost: $2.40
beans: 1.50, Parmesan: .10, pine nuts: .50, other stuff: .30

Note: It's harder to find perfect green beans in the winter than it is in the summer. Do your best not to get tough, seedy, nasty ones.

1 lb fresh green beans
1 Tbsp olive oil
1 clove garlic. minced or a light sprinkle of garlic powder
1 Tbsp lemon juice
1 tsp lemon zest
1 Tbsp Parmesan (I use a bit more than this)
2-4 Tbsp pine nuts

Prepare beans by washing, drying, and chopping off the ends.

Heat oil in a skillet. Add green beans and cook at medium heat. You want them to cook through, but also to get some good color. So after they've cooked through, you might want to turn up the heat.

When they are cooked to the tenderness you enjoy (for me this is not crazy crispy, but definitely not soggy), up the heat a bit, then throw in the garlic powder (or clove, but take care not to let it burn) and stir it in some oil, then mix with the beans. Add the pine nuts and stir fry for a few more minutes.

When it's done, throw the lemon juice and zest into the pan and give a stir. I ALSO ADD SOME SALT.

Remove from heat and sprinkle with Parmesan cheese. Serve immediately (this is the toughest part of doing this on Thanksgiving Day). It's still very good if left to sit for a couple minutes, but not as pretty.

PRINTABLE RECIPE


Tuesday, November 19, 2013

Cranberry Pomegranate Sweet Relish


So apparently Thanksgiving is coming. It's one of my favorite holidays. Partly because of the food (of course). Partly because it's a time to get together with family and/or friends. Partly because we certainly need a holiday to celebrate thanks. And partly--perhaps largely--because in its way it's a simpler sort of holiday. Since it's just a month away from Christmas businesses and advertisers tend to leave it alone and place their focus on the big Yuletide moneymaker. And although we do have to reserve a little fear those crazed Pinterest posters who would have you gluing together acorns in order to make a basket in order to put your centerpiece of pears and squashes (preferably dipped in crystalized sugars of course). But even those ideas often get bumped out by the next big craft for a homemade Christmas stocking. So, while Christmas commandeering Thanksgiving is one of the frustrating things about this season, it can ironically be one of of the blessings as well. On Thanksgiving you don't have to give a gift; gifts will come next month. On Thanksgiving you can go simple with your decorations--we can go all crazy soon enough. On Thanksgiving you can sleep in and then later when it's time to eat pie, you won't have already maxed out on chocolate Santas (just turkey and stuffing).

Still--in our modern and apparently somewhat luxurious American lives--we sometimes find it hard to resist going big. Each year has to be better (by which I mean more fabulous and intense) than the last. Each child has to (by which we sometimes mean 'deserves to') have this holiday permanently imprinted on his or her tiny brain as yet another epic event of childhood holiday lore.

Maybe I'm just getting old, but the last couple of years, I've felt a little over it. That's not always a good thing for a food blog, but it might be a good thing for our lives. I want to make delicious food, but I want to keep it simple. On the years I host Thanksgiving you won't find any oxtail soups on our table (or any soups at all; there's enough food already don't you think). You won't find cake and pie and pudding. And you certainly won't find nuts glued together into a basket. What I hope you'll find is some of the most basic, traditional recipes done very very well.

Today's recipe is one for cranberries. It allows you to keep it simple. There's no cooking. You can prep it in about ten minutes total. Also, you can totally make this way ahead (like--you could make it today and it would still be good on Thanksgiving--if you can keep from eating it, that is). It has several healthy players in its ingredient list.

Yet in its way, it allows you to go big too. It's beautiful--the fruits slightly indulgent, exotic, and glittering like little Thanksgiving gemstones on your table (who needs a nut basket right?). It's delicious--so so so delicious--I could eat it for every meal. It combines tart and sweet beautifully (with sweet ultimately winning out).  It is a side dish that will seem wonderfully luxuriant.

Also, although cranberries play a big role, it doesn't taste cranberry-y (totally a word, right?). My husband hates cranberries; he's not a big fan of pomegranates either, but he--much to his surprise--liked this. So it's a good recipe for pleasing cranberry lovers and those who don't--all in the same dish.

Note: Though called a relish, I eat it like a fruit salad--just spooned into a bowl. However, with some cream cheese and crackers on the side, it could easily be served as an hors d'oeuvres and serve a more sweet relish-y role.

I need to thank my friend Vanessa for introducing it to me and letting me inhale it at her house. And then giving me the recipe--a family recipe from her husband's side (thank you Stanfills). You know you've married well when you can inherit recipes like this.

So make it. Enjoy the indulgence. And the simplicity.

Cranberry Pomegranate Sweet Relish
a Stanfill family recipe
Makes a big bowl full
Prep time: 10 minutes
Cost: $6.40 (This is only about $.50/serving, but if you wish to cheapen it, cut out the raspberries--I almost forgot them and when I tasted this I still loved it without them)
(holiday sale prices) pomegranate: 1.00, cranberries: 1.00, apples: 1.00, oranges: .25, raspberries: 3.00, sugar: .15

Tip: This video is the best way I've found for removing pomegranates. (Parent warning: He uses the 'h' word once.) You cut along the equator, hold the half pomegranate seed-side down in your hand over a bowl. Then you whack it with a wooden spoon like it's getting the spanking of its life. The seeds will fall into your hand and the bowl and it will take you only about 1 minute. I thought the first time I tried it that I would surely whack my hand, but I've done it a bunch of times now and still haven't. It's completely awesome. Try it.

Note on sugar: This is a very sweet relish. I bet you can reduce the sugar if you wish. I bet you could take it down to 1/2 cup, although you'd be getting a much tarter finished product. I intend to try this next time. That way I really can justify eating this for every meal, right?

Note on fruits: You can leave out the oranges or the raspberries (but not both). Everything else I consider a must.

2 tart apples, fairly large (I recommend Granny Smith)--cored
1 10-oz bag cranberries
1 pomegranate (see tip)--seeds
1-2 oranges--peeled (I used one; they do add some juice to this so be aware of that)
1 10-oz bag raspberries--thawed and drained
1 C sugar
1 tsp lemon juice

Put apples in food processor and pulse for a couple seconds to break them up into big pieces. Add cranberries to food processor. Pulse until you've got smallish, relish-looking chunks. Add the orange and pulse a couple times.

Put in bowl. Add pomegranate seeds, raspberries, sugar, and lemon juice. Mix to combine.

Let sit for several hours (or preferably overnight).

Eat. I just eat this out of a bowl, but I bet it would be incredible with plain Greek yogurt.

PRINTABLE RECIPE


Saturday, November 16, 2013

Sunday Supper


Different people have different Sunday dinner traditions. There's the classic roast and potatoes with Grandma and company. Or the milder fancy dinner without all the crazy extended family (note: my extended family is not crazy--well, not too much, but they all live far away). And then there are the people who try to keep it simple, so they have a soup night or a breakfast-for-dinner. Kip and I land in a strange and wonderful place in the middle. When we get home from church (at the odd hour of 2:00 pm) we feed our kids a quick lunch and then tuck them away into quiet time while Kip and I eat a nice meal together. People, it's the BEST THING EVER. We started doing this when Mark and Elizabeth were young and picky (now they're older and picky) because I just wanted a meal where I didn't have to listen to people whine about how they didn't like this and didn't like that. But at this point it has evolved into a peaceful, grown-up, even (gasp) slightly romantic thing to do. Kip and I talk. We eat at a clean table. Usually no one spills milk on the floor. (If they do, they clean it up themselves and don't burst into a puddle of tears and whining.)

Then later that night when people get hungry, I usually make popcorn (a tradition I stole from a friend) and smoothies. Sunday dinner (alone and quiet) and then popcorn and smoothies (easy and fun) is one of the few things I enjoy just about every single week. The only slight problem with it is that occasionally by the time I've made a nice meal for me and Kip I'm a little pooped. Oh, I still enjoy it, but it's nice when I have recipes that are easy and awesome. 

So here you go. 

My friend (the same one, incidentally, who has the popcorn tradition) introduced me to this meal. Her friend introduced it to her. He made it every Sunday. And never got bored. Why? Because you can make it with different ingredients and spices every single time and it's still awesome. When I first had it (the pepper, onion, sausage version scooped out with corn chips--oh, man), I had already eaten, but just couldn't stop--it was so good.

Here's what you do:
-You take vegetables and sometimes meat or beans. You cook that up in a skillet and then you throw in a block of cream cheese and a small can of diced tomatoes with juices. You can eat it alone or with chips or rice or probably even on pasta or wrapped into a tortilla. I just can't stress enough how versatile and delicious it is. 

So far I've made three versions: 
1. Chicken, corn, and spinach (plus cream cheese and tomatoes)

2. Onion, red pepper, and sausage (plus cream cheese and tomatoes)

3. Mushroom and spinach (plus cream cheese and tomatoes)


All were incredible. Just incredible (although I did wish for a little meat in my meatless version). The first time I made it I also sauteed some peppers and asparagus for myself (Kip doesn't like those things) and placed them on top of my dish. I'll be darned if I didn't feel like I wasn't sitting down at a fancy restaurant. 

It makes for a perfect leftover meal to use things up you've got. But from scratch it's just as easy. It's a whole food meal that takes 20 minutes. You could mix meats. You could add fresh herbs. You could throw in a handful of beans. You could use Rotel instead of tomatoes to add some heat. It's just really the perfect anything recipe. And if you double it it can feed a crowd.

Here's the template with examples of the real life things I used for my two favorite versions:

Sunday Supper
serves 4
Cook and prep time: 20-30 minutes
Cost: $5.00
cream cheese: 1.00, tomatoes: 1.00, meat: 1.50-2.00, vegetables: 1.00-2.00)

Cheapskate tip: Cream cheese freezes pretty well (if you're going to cook it after you thaw it; it's a little wonky after you thaw it if serving it raw--then you'd probably want to beat it to get the consistency back to normal). I buy a bunch when it's .99 and freeze it. 

olive oil--just a bit
2 C vegetables (1 pepper, 1 onion OR 1 cup corn, 1 C spinach--chopped)
1 C meat (1/4-1/2 pound of sausage OR 1 large chicken breast--diced or shredded)
8 oz cream cheese
1 15-oz can diced tomatoes with juice (I like it especially with Italian seasoned tomatoes)
seasonings as needed or wanted

Heat oil. Add meat if it's raw. Cook. (Take meat out and set aside.) Add vegetables to pan. Cook until they've softened. If using a green like spinach, wait until everything is almost cooked and then throw it in. 

Add meat back to veggies. Add a block of cream cheese (it helps if you chop this into cubes). When it's melted, add the can of tomatoes (juice and all). This will loosen up the cream cheese to make it saucier. Heat.

Taste. Add salt and pepper if needed (it'll depend a little on your meat--sausage is saltier for example).

Then serve. I really like it over rice. I also really like it with some good tortilla chips. But seriously, any type of grain will likely work with it.  


Sunday, November 10, 2013

Spicy Sweet Potato Soup


This month is Secret Recipe Club. I got Cafe Lynnylu. It was lovely--sophisticated (but not excessively difficult) recipes and gorgeous pictures.

I could not decide whether I wanted to make the sweet potato soup or the Lemon Rice Cake. Finally I chose the soup. I'd like to say that it was my nice, healthy attitude that won out, but it was really that I'd neglected to pick up almonds at the store and just couldn't bear to make the lemon cake without them.

I've been looking for a sweet potato soup for a while that wasn't sweet, but savory. This also has a bit of a kick, which I love.

Spicy Sweet Potato Soup
adapted from Cafe Lynnylu
prep and cook time: 45 minutes
Cost: $2.00
onion: .10, sweet potatoes: .65, chicken broth: 1.00 (made from granules), other stuff: .25

Note: I halved this. Also, I used chili sauce instead of chipotle chilies en adobo because I accidentally bought the wrong thing due to a shopping list malfunction. I added a bit of chili powder because the sauce I bought wasn't very spicy. If you've got it, try this with one chipotle chili en adobo instead of the chili sauce.

2 Tbsp olive oil
1 onion, chopped
salt and pepper
1 1/2 tsp cumin
2 cloves garlic
2 pounds sweet potatoes (about 4 medium)
2 Tbsp chili sauce
1/8-1/4 tsp chili powder
7 C chicken broth
sour cream for garnish (optional)

Heat large pot. Add oil. Add onion, salt, and pepper and cook (5-8 minutes). Add cumin and garlic. Cook for about 1 minute or until fragrant. Add sweet potatoes, pepper sauce, and chicken broth. Bring to a boil. Reduce heat and simmer for 20-25 minutes or until sweet potatoes are soft.

Blend with immersion blender or in batches in a regular blender (be careful--this stuff is hot. If using regular blender, place dish towel over top and don't overfill it). Serve with sour cream. Also, I think this would be wicked good with corn bread.

PRINTABLE RECIPE


Friday, November 8, 2013

Photo Re-do: Pumpkin Cookies


Once, when this blog was very very young, I posted some recipes for pumpkin cookies--one was a regular cookie; one was a breakfast cookie. They were both delicious. I recently referred a friend to one of the recipes and when I did, I realized that it contained the most repulsive pictures in the universe (well, maybe not quite, but still). Today we'll rectify that a bit. Let us have a pumpkin cookie that looks like something you'd want to eat (because it is).

Here's the link (they're awesome):


And here are some re-do's of the pumpkin breakfast cookies

Without chocolate chips:


And with:


Tuesday, November 5, 2013

How to Send Apples in Your Kids' Lunches: A Tip


For many years I've sent apple sauce in my kids' lunches. I haven't even done it easy style (those little containers of applesauce from the store). No. I've done it cheapskate style. I've taken a generic jar of applesauce and I pour some into Tupperware containers for my kids' lunches. It's kind of annoying and not a whole food, but it saved time and gave them something healthier than a fruit roll up to nosh on.

So, why, you're asking, don't I just send an apple for Pete's sake. Well, because for a long time my kids would not eat the peels off of anything, so if I sent an apple, a nice, untouched apple would come home. These days my kids will sometimes eat an apple like an apple was meant to be eaten (although they still like it peeled by me if they can fanangle that). But at school they have all of 15 minutes (maybe on a good day) to eat their school lunches. Biting their way around an apple is just too slow.

And don't ask me why, but eating a sliced apple seems much much faster. I'm not even kidding here (though I realize I sound ridiculous). But it's true: eating a sliced apple takes my kids half the time. Also, they don't have to eat the peels if they don't want to.

Yet I could never slice my kids' apples because, yuck, what kid would eat an apple slice that's been sitting in a lunch box oxidizing for the past 3 hours. Not mine, I assure you.

Some moms slice apples with a bit of lemon juice or another type of acid, but my kids always noticed the taste and disapproved (you remember they're the pickiest kids ever, right).

And then, finally, one day Pinterest came to the rescue. If you cut your apple with an apple cutter and then rubber band it, It doesn't oxidize--well, barely at all. Genius. Pure genius. I've been doing it all fall and haven't gotten a complaint yet. (Note: I do put the rubber-banded apples in a baggie, so they don't get the lunch box all a mess.) So I thought I'd pass it along.

See how that front one is cut. You're going to rubberband it up like the back ones.


This is one I left on the counter from 7 am to 2 pm. This is how it looked when I un-banded it. Not bad.


Saturday, November 2, 2013

Vegan Pumpkin Pie That Non-Vegans Will Love


So vegans, yeah....whenever you post a vegan recipe, there's that little vegan-y minority of the population that does a little vegan dance (not the funky chicken--that's against the rules). And then there's the rest of the population that snorts milk out of their noses and rolls their eyes and just wishes I would post yet another chocolate chip cookie recipe so that they could eat it while watching dancing with the stars. (Nope--no stereotyping here, people.)

I am, in case you haven't noticed from this blog, NOT  a vegan. I do, in all honesty, like vegetables quite a lot, but I like butter too. And chocolate. 

This recipe caught my eye not for its vegan-y-ness, but because of the 4-ingredient list. Seriously. Four ingredients for one of my favorite desserts. And because of these four ingredients (raw cashews, pumpkin, pumpkin pie spice, and maple syrup) only one of them was naughty (maple syrup). This meant I could eat this for breakfast, right? Well...I haven't yet, though I wouldn't feel too horribly guilty if I did (though there really is quite a bit of maple syrup in there, although it's probably better than the sugar levels in Yoplait yogurt). 

I've had this recipe pinned for over a year now. I just didn't get to it last year before I got pumpkined out. And the thing is--it's kind of weird sounding. I mean, you take these raw cashews and then you soak them overnight. And then you puree everything in the blender and then you bake it. Weird, right? I just kept thinking to myself--how could that possibly taste like pumpkin pie--you know, real pumpkin pie--the kind that we non-vegans know. 

But this year on Halloween I finally got to it. Why? Because (confession) I don't really love candy and I wanted something sweet to eat on Halloween night (okay, now I'm even starting to talk like a vegan--a weird one). 

I soaked my cashews and blended it up. I was worried it'd taste weird. I was worried it'd taste all maple-syrup-y (I like maple syrup, but I don't like it when sweets that aren't supposed to taste maple-y taste maple-y--whew, now I'm sounding like a non-vegan again). In fact, I halved the recipe and made it in ramekins because I was worried I'd hate it. 

And then I tasted it nice and raw. (One great thing about vegan recipes is that you can do that without worrying about salmonella.) And--oh man--I could have just eaten it straight out of that blender. It was delicious. Absolutely delicious. If I'd wanted to (and I might...) I could have added some milk and made myself a killer pumpkin smoothie. But I didn't. I faithfully cooked it--the batter was much thicker than a normal batter and didn't bake like a custardy pumpkin pie would have. The vegan pie just kind of got darker and firmer. Also, my instant read thermometer broke (the horror) so I had to figure out when to take the dern things out. I let it cool. And tasted it. And I'll be darned if the whole thing didn't taste like pumpkin pie. It didn't even taste like healthy pie. I couldn't taste nut. I couldn't taste maple. I could just taste pumpkin pie. Now, it was a little different than my staple pie, but no more different than when you go to somebody else's house and try their recipe for pumpkin pie. It was delicious. And kind of sort of, comparatively nutritious. 

Vegan Pumpkin Pie that Non-Vegans Will Love
adapted from Healthy Happy Life
prep time: 7 minute (plus, um, 8-18 hours of cashew soaking)
cook time: 1 hour (plus, um, 3 hours cooling time)
Cost: $6.00 ($1/slice--not bad baby)
pumpkin: 1.00, maple syrup: 2.00, cashews: (I bought mine forever ago and froze them and can't remember--I'm going to guess 3.00 and will check next time I go to the natural foods store)

1 C RAW cashews (which should be about 1 1/4 C after it's soaked)
16 oz (or 1 small can--it's okay if it's 15 oz) pumpkin puree
1 C maple syrup (told you it was a lot: I actually used about 3/4 C and mine was still good)
2 tsp pumpkin pie spice
salt to taste, optional

Note on maple syrup: This isn't the corn syrup stuff you buy for a buck. It's got to be the real stuff. I'm sorry, but this is so. To cheapen this pie, you could try subbing sugar for the syrup, but I'm not sure what would happen. Let me know if you give it a go. 

Note: I made mine crust-less. I just wanted a little pumpkin-y treat, not a full on pie. If you want full-on pie, make a vegan or regular crust and par-bake it for 15 minutes before adding the pumpkin filling. 

Soak your cashews. This was new to me. In fact, raw cashews were new to me period and I tasted them and realized they're one of the best things I've ever eaten, but I resisted the urge to just eat them all and I soaked them. You'll soak 1 C cashews in enough water to cover with a bit of salt. Do this for 8-18 hours--just leave it on the counter. When you're ready to make your pie, DRAIN THE CASHEWS. They should be tender. 

Put cashews, pumpkin, maple syrup, and pumpkin pie spice in blender or food processor and blend away. This is going to take a few minutes. You want your mixture nice and creamy, not lumpy bumpy nutty. If you have a really nice blender you'll probably get yours to a velvety smooth stage. I confess that I got mine fairly smooth, but never perfectly smooth, and I worried about that, but all was still right with my pie. When it's smooth taste it and add a bit of salt if you wish. I added 1/4 tsp.

Put this mixture in a greased pie pan (with or without a par-baked crust--see note) and bake at 400 degrees for 15 minutes. Then reduce the temperature to 350 and continue baking for another 30-40 minutes or until the pie has darkened and firmed up. A toothpick inserted will come out a bit wet, but the batter should have darkened up and the edges should be firm. It will continue to firm and set as it cools. 

Let it cool for at least 3 hours. It's just better. 


LinkWithin

Related Posts Plugin for WordPress, Blogger...