Showing posts with label Breakfast. Show all posts

Monday, August 20, 2018

Raisin Peanut Butter Breakfast Cookies (cheapskate Larabars)

BEST OF THE TASTY CHEAPSKATE


I love these so much that posting about them on a hungry stomach is just a terrible idea. I'm going to have to rush through this, then hurry into my kitchen and make some more. They are just fantastically good. They make for a quick grab-and-go breakfast if your kids sleep in (like one of mine did this morning). They make for a great post workout snack. They make for a great healthy dessert that doesn't really taste like a healthy dessert.

They are like Larabars in that they combine fruit and nuts (and chocolate) to make something divine. But they combine the cheapest dried fruit and the cheapest nut. The cost of the entire batch is about not more than $2.00. The last time I bought a box of Larabars on sale, it was $5.00.

And the truth is that they taste 500 times better than those expensive Larabras. So make them.

(P.S. Freeze them if you want to keep them around longer than 40 seconds. My kids descend upon them like locusts of Biblical fame--consuming all.)

You can find the recipe below and the original post HERE.

Want more Larabar knock-offs. Try THESE. Or THESE BROWNIE BITES.

Raisin Peanut Butter Breakfast Cookies (aka Cheapskate Larabars)
adapted from Chocolate-Covered Katie
Makes about 12 (um, a little foggy here on the amount; I must have been snitching too much dough)
Prep time: 5 minutes
Cost: $1.70
peanut butter: .70, raisins: .70, peanuts: .30


Note: These are oily when you form them into balls--at least mine were. I just set them on a paper towel and all was well.

Another note: If you'd like, you can add any variety of dried fruits or nut butters. I did a batch with raisins, coconut, peanut butter, and almonds. It was also delicious, although this original recipe was still may favorite. Nevertheless, feel free to play around with the recipe a bit.

1 1/4-1 1/2 C raisins
3/4 C peanut butter
6 Tbsp peanuts (I used raw, but plain roasted will work too)
3/4 tsp vanilla
dash of salt if that's your thing (it's mine)
chocolate chips, optional (I added them sometimes and didn't other times--both were awesome)

Combine raisins, peanut butter, and peanuts in a food processor. (Note: In an attempt to save on dishes I tried this in my cheap blender. It didn't work; the raisins were just too sticky.) Process until smooth (you'll have a few bits of peanuts, but not big chunks) and coming together like a dough. Add vanilla and salt (if using) and process. (If using chocolate chips, you can add these at the very end and give them a whirl or two, but I like mine chunky so I didn't pulverize them.)

Take out, form into balls. Place balls on waxed paper or paper towels and press into cookie shapes using a fork or spoon.

Tuesday, June 26, 2018

Blender Waffles

BEST OF THE TASTY CHEAPSKATE


If I was a better advertiser, I'd market these as high-protein diet foods. "Eat them with peanut butter!" I would say (and I would be giving truly great advice). But really this is just lazy-mom food. You'll thank me.

Below is the original post with recipe.

I know plenty of people consider waffles a breakfast food. I won't argue with that. I will simply say that in this family waffles are eaten for dinner. Because someone is too lazy to stand by the waffle iron for 20 minutes in the morning. And yet waffles are the perfect lazy woman dinner because they only take 20 minutes. That's right--that's how things are run 'round here. 

These waffles are not typical. They contain cottage cheese and a booty load of eggs. Because of this they are quite high in protein,which is nice. They also taste almost like crepes in waffle form. And in my opinion that is a good thing, a very good thing. And like crepes, they are very good with any of a number of toppings: syrups, fruit sauces, whipped cream and bananas, jam, Nutella (oh mama), or whatever you have on hand.

The other life-changing thing about these waffles is that they are made in the blender. That means they take all of 2 minutes to prepare (that's right; no egg white whipping necessary). Perhaps more even that their crepe like deliciousness, this quality has endeared them to me forever. I love you cottage cheese blender waffles. And since I'm saying that I need to give a special thank you to my friend, Pilar, from whom these come. Thanks Pilar! 

I have not yet tried them with whole wheat flour. I love them so much as is that I've been afraid to. If you do, please let me know how they turn out.

Blender Waffles
Serves: Our family of 6
Prep time: 2 minutes
Cook time: 20 minutes (depending on how large your waffle iron is; mine is unfortunately small, so it takes longer)
Cost: $1.15
(cottage cheese: .50, flour: .05, milk: .05, eggs: .50, oil: .05)

Note: These can be kept warm on a cookie sheet in the oven (set at 200 degrees) if you want to serve your whole family at once instead of flipping them onto plates as they're ready, diner style. 

1 C cottage cheese
2/3 C flour
1/4 tsp salt
1/3 C milk
6 large eggs
1/3 C oil
1/2 tsp vanilla

Throw it all in a blender and blend until combined and smooth. 

Cook in lightly greased waffle iron.

If desired keep warm in oven as noted above.

Monday, April 2, 2018

Best Ever Crepes


So it's easy to lump crepes into the class of evil foods (right along with chocolate cake and their ilk). This is mostly because I (and every other normal American human) think it's not really a crepe unless it's slathered in Nutella and dipped in whipped cream. This, of course, is a perfectly acceptable way to eat a crepe. However, there are (gasp) other ways. And they, too, are delicious. And sometimes even (double gasp) nutritious.

For this crepe, I used a good dollop of ricotta and a bit of peach butter, and--not to brag or anything--but it was perfectly divine. The ricotta gave it a creamy feeling while contributing protein and calcium instead of just fat and sugar (sorry whipped cream; you know I love yo anyway). The peach butter was lightly sweet. And the crepe itself is higher in protein than a normal pancake or muffin. And we use just a smidgen of whole grains in ours to help it along the path of virtue.

It makes for an inexpensive breakfast and a downright tightwad dinner. The crepes themselves run about $.10/crepe and I cannot eat more than two if they're filled (if not, all bets are off). And the fillings don't have to be expensive. A few tablespoons of ricotta add another $.25 and the peach butter is probably just $.10 (plus a lot of love to make that stuff). That's a solid meal for $.50 (though it is missing vegetables...)


(Psst. Want homemade recipes for either of these. Look HERE for a perfectly divine (and utterly cheap) ricotta. And HERE for peach butter so good you know it's made from love and sunshine (which it is).)

Have a look HERE for my original post on crepes plus a filling of brown sugar peaches. (Plus a pretty profound poem if I do say so myself; I mean, you won't want to miss it.)
Or HERE for a pumpkin whole wheat version.

Best Ever Crepes
Makes: a booty load (I'm guessing it makes between 20-30 crepes; we always have leftovers)
Prep and cook time: 30 minutes
Cost: $2.05 (that's about $.10/serving; even if you do splurge on Nutella, that's a VERY cheap meal)
(eggs: .50, milk: .60, flour: .30, other stuff: .15, butter: .50)

Note: These directions are given to you as Maren gave them to me. I always make mine this way with an extra cup of milk added at the end. Would it matter if you added it at the beginning? I don't know. I just do it as she said because hers were the best and I don't mess with that.

Whisk together:
4 eggs
3 C milk

Combine:
2 Tbsp sugar
3 C flour (I use 1/2 C whole wheat and 2 1/2 C all-purpose)
1 tsp baking powder
1/2 tsp salt

Add dry mixture to egg/milk mixture.

To this batter, add:
1 C milk
1 tsp vanilla

Whisk it all together. It might be a little lumpy at first, but whisk for a minute or two and most will go away. If you still have some lumps when you make the crepes, don't worry, the crepes will still come out just fine.

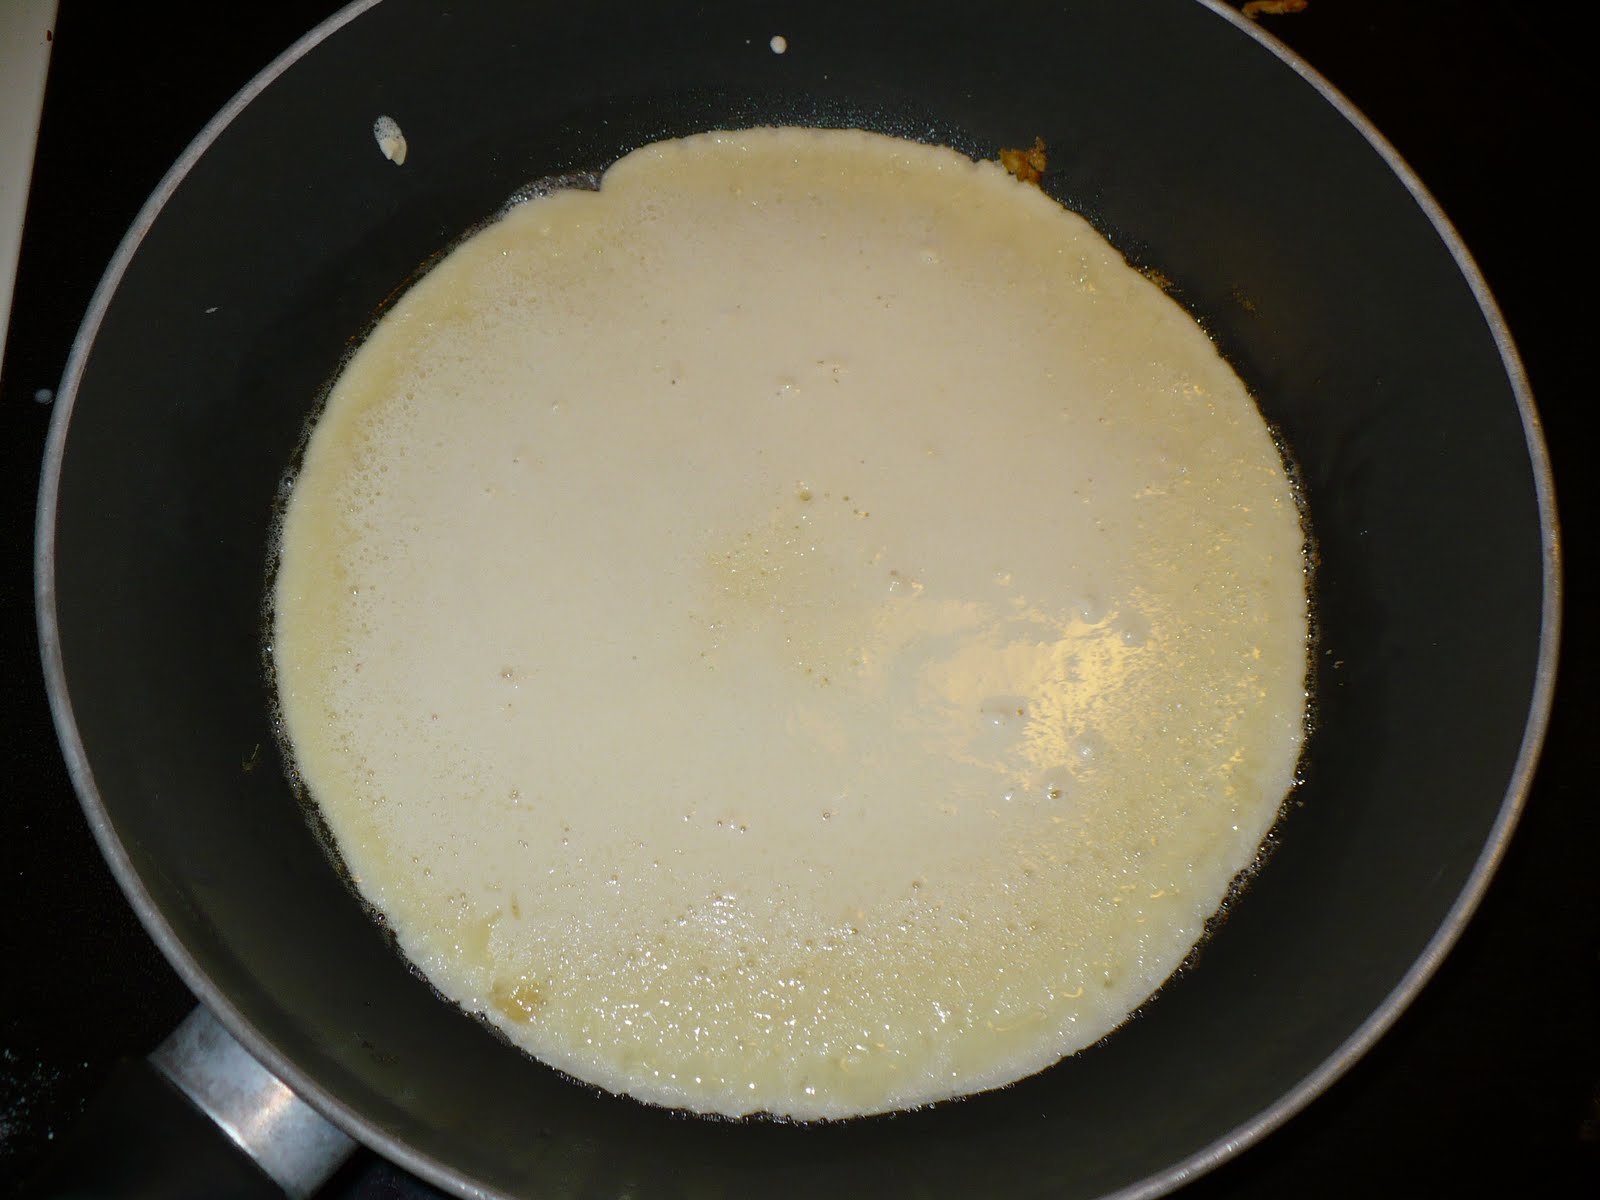
Heat skillet to medium or just below. Plop a pat of butter on the skillet. You want your skillet nice and non-sticky--whether that happens with plenty of butter or with a good non-stick pan is up to you. Pour the batter onto the skillet and tilt the skillet so that the entire face of the skillet is covered with a thin layer of batter. It won't be thick like a pancake, or even close. It'll look like this:


Now you're going to let the crepe cook until there it's kind of cooked all the way through--there won't be any (or much) raw batter-y patches left and it will be just barely golden brown on the bottom (it takes 1-2 minutes usually). If it's not done enough you'll have a really really hard time flipping this baby. At this point you'll flip it over to give the other side a chance to color just a bit. I think that authentic French crepe makers don't always even flip theirs, but I like to.

Continue this process until you're done. If you've got too much batter, you can save it as batter or you can make it all into crepes. They reheat very well.

Note: Your first crepe will probably be a disaster. I don't know why this is a law of the universe, but it is. I suspect that your pan is still warming up and stuff. Anyway, if your first crepe tears and crumples and looks a mess, do not despair. Set it aside for the baby or the dog, re-butter your pan and do it again. I promise that the next will (almost surely) be much much better. If it discourages you too much, dip some in Nutella and eat it. That should make you feel much better about the world.

Another note: If, however, your crepe is burned on the bottom, turn down the heat and wait a couple minutes before continuing.

Continue making and flipping until you have crepes coming out of you ears. 


Then eat. 

PRINTABLE RECIPE


Tuesday, March 6, 2018

One Bowl Oat Muffins

BEST OF THE TASTY CHEAPSKATE


You know how often muffins are just cupcakes without the frosting. Which is kind of depressing on all counts. Dieters don't want some bald-headed cupcake wrecking their calories and using up their points. And sweets-devotees don't want a bald cupcake because, well, it's bald.

It doesn't help when those little bald sugar bombs are just kind of meh in flavor and texture anyway.

Well, folks, it's your lucky day because today you get a muffin that contains a mere 1/4 C sugar, plus a couple whole grains. But it doesn't announce that fact by being bland and boring. It has the perfect amount of sweetness, a beautiful texture.


They can be made in larger batches and saved or frozen (assuming you don't live in a house with 6 hungry people).

Not only that, but these babies come up to $.10/muffin (take that bald cupcakes).

And they are infinitely adaptable. You can add chocolate chips and coconut (like I did, which, yes, makes them a little less righteous). But you could also add carrots or blueberries or apples or rhubarb or raspberries (making them even more righteous). You could do dark chocolate and strawberries (walking the delicate line of food virtue and vice). Or you can just eat them plain.

And if all that isn't enough, get this--you just stir these with a spoon in ONE bowl. How delightful is that. I mean, in that way they're like a really good friend who can come over and see you in your sweats and still know you're awesome. Yes, my dears, that friend is what these muffins are.

So take 20 minutes and make them.


One Bowl Oat Muffins
adapted from Simple Bites
makes 12 muffins
prep time: 15 minutes
Cook time: 10-12 minutes
Cost: $1.20 (without add ins)
milk: .15, oats: .10, brown sugar: .10, butter: .60, flour: .15, other stuff: .05

1 C milk
1 tsp white vinegar
1 C oats (rolled recommended, but quick work too and are better if you've got a child with a texture aversion)
1 egg
1/4 C brown sugar
1/2 C butter, melted (oil works too, but butter is tastier)
1 C plus 2 Tbsp flour (I use mostly white, but sub in 1/4 C of whole wheat)
1/4 tsp salt
1 tsp baking powder
1/2 tsp baking soda
1/4 tsp nutmeg
1/2 tsp cinnamon
add ins if you choose (we usually go for 1/2 C chocolate chips)

Combine Milk and vinegar (note: If you've got a cup of buttermilk, you can use that in place of the milk and vinegar.) Add oats and let sit for about 5 minutes (with quick oats, you can just give it a quick stir and you're good to go).

Mix in egg. Add brown sugar and melted butter. Mix.

Combine remaining dry ingredients and stir them in just until combined.

Add add ins if using.

Pour into 12 greased or lined muffin tins. Fill 3/4 full. 

Bake at 375 for 10-12 minutes (slightly longer if you've added fresh fruit as an add in).

Potential add ins:
raspberries
apples
nuts
dried cranberries
blueberries
rhubarb
coconut
dates
carrots

chocolate chips

If you are interested in some amazing flavor combinations (and specific measurements) instead of my lazy-bum suggestions above, check these out. They are from Simple Bites .


ONE-BOWL OATMEAL MUFFINS: FLAVOR COMBINATIONS

  • 1 cup Raspberries, fresh or frozen & ½ cup Dark Chocolate, chunked or chips
  • ¾ cup Diced Apple (Granny Smith or Russet) and ½ cup toasted Walnuts, roughly chopped
  • ¾ cup Dried Cranberries & ½ cup toasted Pecans, roughly chopped
  • ¾ cup White Chocolate, chopped or chips & 1 cup Blueberries, fresh or frozen
  • ½ cup toasted unsweetened Coconut & ¾ cup Peanut-Butter Chips
  • 1 cup diced Rhubarb, fresh or frozen & ½ teaspoon Green Cardamom, freshly ground
  • ¾ cup Dates, pitted and chopped & ½ cup Pistachios
  • ¾ cup Golden Raisins & ¾ cup grated Carrot

Monday, November 6, 2017

Almond Joy Yogurt


In honor of the Halloween candy that was, but isn't anymore... Or for those trying to wean themselves off of their Halloween candy dependence... Or for people still trying to figure out the yogurt craze.. This post is for you. 


It's pretty healthy, but it feels utterly indulgent. If I could always live my life that way, it'd be pretty much perfect. I've been eating this for breakfast almost every day. It's so so good. It feels like dessert, but with dark chocolate and healthy nuts, it's so nutritious. 

Also, simple as heck. 


(Does it look like a cloud of pure deliciousness to you? Because it is.) 

Here's what you do. 

1. Get some thick, full-fat Greek yogurt. Or make your own in the crock pot. 
2. Add dark chocolate chips, coconut (sweetened or unsweetened), and almonds (or another type of nut). If that's still too stoic for you, add a sprinkle of sugar or a bit of honey. 

Monday, June 19, 2017

Overnight Cinnamon Rolls


If you want cinnamon rolls for breakfast, you have a few options: 1) Wake up at the crack of dawn, 2) Eat breakfast at 10 in the morning after all your children have completely melted down and have been condemned to spend the rest of eternity in time out, or 3) figure out how to do the bulk of the work the night before.

Option 3 is clearly preferable, but it's also tricky. What if your rolls rise to the sun in your refrigerator and you open it to find yeasty bread bursting out of ever seam and crevice? Or what if they don't rise at all and you wind up serving tiny rocks of sweet calorie bombs to your loved ones (I won't say it's never happened before...)? What if what if what if?

On Father's Day I had the chance to experiment.

And the truth is that I don't know if there's exactly a one-size-fix-all solution. Yeasts act differently depending on how old or fresh they are, and also how the yeasting gods are feeling today. Every batch of dough has a slightly different amount of flour. Even changes in weather and humidity are going to affect your bread. So should you just give up? Um, no. We're talking about morning of cinnamon rolls here.

Below you'll find a how-to with a little bit of trouble shooting advice. May it make your mornings glorious.

How to Make Cinnamon Rolls Overnight:

1. Make your dough.
2. Roll out your rolls and add all the yummy stuff
3. Cut them and put them in a greased baking vessel
4. Cover that baking vessel with plastic wrap and possibly a lid and put it in your refrigerator.
5. Remove it the next morning and let it warm up a bit as your oven heats.
6. Cook your cinnamon rolls.
7. Enjoy bliss.

Trouble Shooting:

Scenario A: Your rolls don't rise at all. This happened to me. In this case, you'll need a few extra minutes, but only about fifteen.

Put the sad, un-risen rolls in an oven heated to a very low temperature--about 175 or 200 degrees. Leave it there for 3-5 minutes. Turn OFF the heat. Then leave it for another 10 minutes.

Take the rolls out, cover with a towel, preheat the oven, and cook. By the time the oven is heated, those rolls will have risen and you'll be good to go.

Total time: 15 minutes to get jump started, 10-15 minutes for your oven to heat, 15 minutes to cook (45, which is a lot, but way less than the 2 1/2 hours you're looking at if this is a from-scratch thing)

Scenario B: Your rolls rise to the heavens, leaving us mere earthlings behind to mourn their air-bubbled loss.

The most important way to stop this is just to get that dough cold ASAP. Put it into the refrigerator immediately. If your house is particularly warm and/or your yeast is particularly sassy (in other words, did your dough rise like a boss on its first rise?), put it in the freezer for about 20 minutes and then put it in the refrigerator (don't forget or your dough will freeze and when that happens, no amount of trouble shooting will save you).

And of course, if you want a fantastic recipe, HERE you go.

Wednesday, April 19, 2017

Peanut Butter Mug Cake for Breakfast


So you know how the whole mug cake thing came and went (or maybe it's still going; I don't know). The idea was to make a little one serving cake in a mug and then microwave it and, voila, you had a perfect single-serving of deliciousness.

Yeah, I didn't hop on that wagon at all.

Because as we all know if we ever had a mother who liked to make brownies in the microwave: Baked goods are disgusting when not, ahem, baked. 

I would have gone on happily without any mug cakes or microwaved brownies for the rest of my life were it not for an unfortunate Easter craving. You see, I'm not a huge candy lover (quality dark chocolate excepted). But it was Easter and I so wanted something sweet. And Pinterest kept telling me I wanted something sweet. And suddenly, as fate would have it, a mug cake happened to pop up in my feed. Rather, a link titled something like, "The 11 Best Mug Cakes." And, truly, the pictures all looked divine (because, um, Pinterest and stuff).

So I thought, "Hey, I'm craving baked goods, and the universe just told me to make a mug cake. And if I hate it, well, it was just a little thing." Not much to lose.


And it wasn't. But naturally, I couldn't help but mess with that darn recipe. And even though I'd been craving a sweet baked good, I got to thinking that if I added a little whole wheat, well then, that would give it a nuttier flavor, and also justify my sins. And I'll be darned if it wasn't a right decent evening snack. A wee bit dry, perhaps, but worth the lack of effort I put into it.

And then the next day, I just kept thinking about it. Like, what if I added a tablespoon of pumpkin to keep it moist? And, oops, I forgot the leavener. And added chocolate chips. It turned out a moist, dense, healthy mug cake that I may or may not have been making for myself all week.


You should make it too. We'll all be on an old band wagon that might not even be a thing anymore together. And we won't regret it.

I can't help but think that it would be the perfect thing to whip up when you're in a hurry and take to work with you, or make your kids eat in the car while you run them to school because they got up late and missed the bus. For the 18th time this week. (not that my kids are ever late)

And please note the price tag. This is a super healthy breakfast guys (well, depending on your chocolate chip addiction). And you can't beat it for cheap.

Peanut Butter Mug Cake for Breakfast
serves 1, maybe 2 if you eat light (it's quite filling; I can't always finish mine)
Prep time and cook time: 2 minutes (cool it for a few minutes though.
Cost: $.30 ($.45 with chocolate chips)
milk: .03, sugar: .03, peanut butter: .15, pumpkin: .03, whole wheat flour: .06, chocolate chips: .15

1/4 C milk
1 Tbsp brown sugar or honey
3 Tbsp peanut butter (I used creamy)
1 Tbsp pumpkin puree
1/4 C whole wheat flour (or 3 Tbsp whole wheat flour and 1 Tbsp oat flour)
1-3 Tbsp chocolate chips (optional, depending on your level of breakfast stoicism; my breakfast stoicism is quite low for the record)

Mix it all together.

Cook on high in the microwave for about one minute (Mine is usually between 1 minute and 10 second and 1 minute and 20 seconds.) Put it in for another 15 seconds if it's still not done. Note: You want it a little bit undone or raw looking in the center. It will continue to cook as it cools and that will give it just the right amount of moisture. If you cook it till it's dry-looking, it will taste dry.

Let cool for a few minutes (seriously guys, if you tear into this right of the microwave, you'll burn your tongue. Give it five minutes.)

Eat.

PRINTABLE RECIPE

Sunday, November 13, 2016

Secret Recipe Club: Sweet Potato Waffles


I mean, just, yes. These are awesome. Like perfect fall food. Seems indulgent, but actually super healthy. Perfect texture. Easy to make and work with. Makes your house smell like autumnal heaven as they cook. And cheap, totally cheap. So good in every way.

I made these for my Secret Recipe Club recipe this month. I had A Day in the Life on the Farm--a blog written by Wendy who lives on a farm in a small town. Le sigh. I was looking for something homey and farmy for Thanksgiving, but then I saw these, and one day I needed a quick meal. So I made them. And fell madly in love. Madly. I'm still swooning over their awesomeness. You have to make them and eat them and love them.

Also, if you have leftovers, you can pop them in the toaster (they're fairly sturdy) and then they come out perfect all over again. You know what this means, right? You should make a million.


Sweet Potato Waffles
adapted from A Day in the Life on the Farm
makes 12-14
Prep and cook time: 30-40 minutes
Cost: $1.65
sweet potatoes: .50, buttermilk : .20, eggs: .40, butter: .25, flour: .10, other stuff: .20

2 sweet potatoes (on the larger side)
1/2 C buttermilk (or 1/2 Tbsp vinegar and 1/2 C milk, which is what I did since I had no buttermilk)
4 eggs
6 Tbsp butter
1 tsp cinnamon
1/2 tsp cardamom
1/2 tsp nutmeg
1/2 tsp salt
1 C all-purpose flour
1 tsp baking powder
1/2 tsp baking soda

Peel, cube, and boil your sweet potatoes until they're fork tender. Drain.

Put the sweet potatoes in a food processor (or blender if you don't have a food processor). Then add butter and process. Then add the buttermilk, then eggs, then cinnamon, cardamom, and nutmeg. Blend. Then add the salt, flour, baking powder, and baking soda.

Now you just cook the waffles according to your waffle makers instructions.

Note: I served them with this caramelized pear syrup that was also beyond awesome. I haven't written down proportions yet (coming soon...) because I just throw stuff in and don't measure, but if you'd like an idea of what I do, here you go: Peel and cut the pears. Melt butter in a skillet and then add pears, cooking until soft. Sprinkle generously with brown sugar. When it's cooking and bubbling and smells like sainthood, add a glug of cream and stir. Yeah, it's amazing. But it's not really sainthood...

PRINTABLE RECIPE


Monday, August 29, 2016

Avocado Egg Toast


It's the simple things. I have been eating this too-good-to-be-true breakfast on and off all summer. Why is it too good to be true, you ask? (You always ask just the right questions.) Because it's perfectly balanced health food that tastes like the most decadent, indulgent breakfast that you would probably eat if you were a queen living on an island paradise somewhere. And it costs less than anything on the dollar menu would. And it only takes about 5 minutes to prepare (which is less time than you'll spend in the drive thru waiting to get your food).

It's just so so good. Yet it's full of vitamins, healthy fats, protein, and (maybe if you go righteous on the bread) whole grains. But beyond healthy, it's just amazing. I mean, you'd want to eat this regardless. You'd be happy if someone was like, "Hey, that's got 2% vitamin C in it like fruit snacks." You'd be like, "Morning meal justified." But you don't even have to be like all that because it really is so nutritious (vitamin K, folate, Vitamin C, potassium, Vitamin B5, Vitamin B6, Vitamin B12, Vitamin B2, Vitamin E, iron, phosphorus, selenium, I could go on). It makes you feel good in 100 ways. Eat it.

Avocado Egg Toast
Prep time: 5 minutes
Cost: $.80
bread: $.20, avocado: .50, egg: .10

Note: Don't skimp on the quality of the bread. Life will go on if you do and this will still be very good, but if you get a good loaf of bread, it will be out of this world amazing, fantastic, exclamation points!!!! kind of good. I had this with a sourdough Parmesan bread when we were on vacation and I still have sweet dreams about that. Although any good sourdough is delicious or a nice hearty whole wheat. Whatever bread you love--use it with this.

1 piece of toast
1/2 avocado
1 egg
mayonnaise
a little salt
maybe butter (you don't need it but since when do people eat butter on toast because they need it? the butter ups this to a whole new celestial level. That said, I've eaten this without it and it's still amazing)

Cook your egg so that the yolk is just the tiniest bit runny. You can poach it or do it over easy (which is what I did). If you cannot handle any runny at all, that's okay; just get it so it's barely firm. I've done this lots of times by accident and it's still delicious. Also, salt your egg as it cooks.

While your egg is cooking, toast your high quality bread. Then spread it with butter if you like to eat like monarchy.

Slice up your avocado and add that to the bread. Top with your hot egg, and some mayo (you can also put the mayo on the bread if you wish).

Eat warm. Imagine being royalty. Make your kids act like they're your servants for the day (well, we can still dream, right?)


Tuesday, July 19, 2016

Double Chocolate Scones


Ah my friends. In addition to this blog, I've spent the last few years doing a whole lot of novel writing. This month some of that work is coming to fruition and my teen/YA fantasy novel, Grey Stone, is being released. Today it just went up for pre-sale. The only thing better than celebrating with food is celebrating with food made by one of the characters in my new book.

(Isn't it lovely? Click HERE to pre-order.)

Zinnegael is a young witch with a bunch of cats, a slightly enormous vendetta against the shape-shifting king, and (naturally) a love of baking.

When she first meets one of our heroes, she brings him a tray full of goodies. Here's a sneak peek at that scene:

"Wittendon noticed the faint smell of smoke as he and the cat entered the clearing. No one else seemed to notice or care. In front of him, the table was set for tea. Two cups rested on saucers and several cookies sat on a tray as though travelers stumbled to these haunted woods every day. Sprawled behind the table lay two large white cats. They sat up when the newcomers entered, but did not bother to look in their direction.

“Good afternoon, prince,” said a voice that came from a little hut to the right of a large garden. “The scones are a bit dry today; I do hope you will forgive that. Don’t worry, I’ve spread them with chocolate to make up for any lack.”


A girl entered the garden, stepping across the stone path as though every bump had been memorized a lifetime ago, though she couldn’t have been more than fifteen. In one hand, she held a tray that was piled so high with pastries he could not see her face; in the other she carried a vase with pale purplish-blue roses."

Today we don't have to worry about the scones being dry (they're not). And we're going to do more than spread the scones with chocolate. We're going to make them with chocolate and then put chocolate bits inside. It's a tiny bit like eating brownies for breakfast. Zinnegael would totally approve.


If you'd like to pre-order the book, check it out HERE. And expect some more news about the book as well as some fantastic Zinnegael-inspired baked goods. Enjoy!

Double Chocolate Scones
adapted from Sally's Baking Addiction
makes 8 scones
Prep time: 10 minutes
Cook time: 10 minutes
Cost: $2.60
flour: .10, whole wheat flour: .10, oat flour: .05, cocoa: .20, sugar: .10, butter: .60, cream: .50, egg: .10, chocolate chips: .85

Note: To healthy this up just the slightest little bit, I couldn't help but use some whole wheat flour and oat flour (Zinnegael would never have done such a thing, but I did). They were delicious and while the oat flour makes it a tiny bit crumblier, I think it also helps it stay moist and gives it a depth of flavor that is fantastic.

1 C all-purpose flour
1/3 C whole wheat flour
1/3 C oat flour
1/3 C cocoa
1/2 C sugar
2 1/2 tsp baking powder
1/2 tsp ground cinnamon (optional)
1/2 C (1 stick) butter (frozen or cold)
1/2 C plus 1 Tbsp heavy cream
1 large egg
1 1/2 tsp vanilla
1 C semi-sweet or bittersweet chocolate chips (oh, and we were short, so we threw in some white chocolate chips too)

Glaze: 

Note: This glaze adds more sweetness, but it also sort of seals the scone so that it doesn't dry out. The original recipe recommends dipping them in this glaze, but I just drizzled it rather thoroughly over the top of the scones, and that was way easier. (Yay for laziness and stuff.)

1 C powdered sugar
1 tsp vanilla
2 oz water

Preheat oven to 400 degrees. Put baking rack in middle-low position. Line it with parchment paper (seriously--this is a good idea).

In a bowl or food processor (I use a food processor and it makes things like this so fast and easy), combine flour, whole wheat flour, oat flour, cocoa, sugar, baking powder, cinnamon, and salt.

Cut the butter into chunks with a knife and toss those in. Give the food processor several pulses (or mush them into the dry ingredients with your hands, or a pastry cutter if you must).

In a small bowl, whisk the cream, vanilla, and egg. Pour it into the food processor and process until combined. Don't overmix it. A bit crumbly here is better than being it to death.

Dump out your mixture and press it together until it forms a bit of a ball. Knead it 10-12 times. Don't knead the heck out of it. You just want it to come together and be combined. That's all. Scones are sensitive little things and if you overmix or overknead them, they will be dry. So err on the side of underdoing it. You won't regret it.

Form into a ball and roll or press it into a nice circle that is about 1/4-1/2 inch thick. Cut this into 8 triangles (like cutting a pizza).

(Sorry that this pic is a little blurry, but wanted to show you the correct thickness)


Put these on the baking sheet and bake for 10 minutes, or just until they lose their shiny look. Again, err on the side of too little. Cook too long and they dry out.

Remove and let cool slightly.

Prepare glaze by mixing all those ingredients together and drizzle thoroughly over scones (or use a pastry brush, which is easiest). You want the glaze to pretty much cover the top and sides as much as possible (you're welcome).

Eat warm or not. They're delicious.

PRINTABLE RECIPE

Monday, June 6, 2016

Whole Grain Carrot Cake Pancakes


Not every summer is a golden summer. This might be especially true if you've got a booty load of kids coming home after 10 months of being at school. There can be fighting, jealousy, sibling rivalry, mosquito bites, broken arms, broken bikes, and let's not forget lost library books, Most moms have had summers like that or even just moments in their otherwise golden summers that are like that.

But there are also those summers--where the weather is warm, but not too warm, where you kids reach a perfect balance in their ages where they play together beautifully, imagining that they are spies or princesses, where they dress up their stuffed animals and do cartwheels and paint each other's faces with face paint. There are summers where you read together on the couch still in your pajamas at ten in the morning, when you children sit for hours learning how to do origami animals while you clean your house or die of peaceful shock, when you make pancakes and no one even complains that it's not Lucky Charms. Sweet sweet summers. Or at least some sweet sweet moments in an otherwise hectic summer.

It is that golden summer that I wish to write about today. For a golden summer like this, you need a golden pancake.

I invented this lovely beauty last week when I was making a carrot cake for a friend bright and early(ish) in the morning. I accidentally grated too many carrots. What was a woman to do? Honestly, I thought about just making more cake batter and pouring that awesomeness onto a skillet. But then I repented of that evil (sort of). And realized that if I reduced the sugar and oil a bit and added whole wheat flour instead of white, I would have a right decent little pancake--a bit on the sweet side still, but loaded with whole grain and carrots.

They were delicious. You can eat them plain or with nut butter because they're already sweet, but if you happened to drizzle on a bit of syrup or (cough) some leftover cream cheese frosting, I won't tell anyone.


Whole Grain Carrot Cake Pancakes
Makes about 10 smallish pancakes
Prep time: 10 minutes
Cook time: 15 minutes for the batch
Cost: $.80 (That's breakfast for $.08/pancake. No breakfast cereal can compete with that on price or nutrition because, hello, you just ate carrots for breakfast)
sugar: .05, oil: .10, egg: .10, carrots: .20, whole wheat flour: .20, milk: .15

1/4 C sugar
1/4 C neutral oil, such as canola
1 egg
1 C grated carrots
scant 1 tsp baking soda
1 tsp cinnamon (can even do 1 1/2 tsp if you love cinnamon)
1/2 tsp salt
1 1/4 C whole wheat flour
1-1 1/2 C milk (or buttermilk)

Combine sugar and oil. Add egg. Add carrots. Mix in dry ingredients. Then whisk in milk just until combined.

Drop by 1/4 C "spoonfuls" onto a skillet (set just below medium works best for me). Cook until the underside is golden (and they've puffed up). Then flip and cook until the other side is golden.

Enjoy plain or with toppings. (P.S. I added a few white chocolate chips and milk chocolate chips, solely for experimental purposes I assure you. Experiment successful.)


PRINTABLE RECIPE

Sunday, September 13, 2015

Secret Recipe Club--Pumpkin Spice Scones


Ohmyohmyohmy-o.

This month for Secret Recipe Club I had A Spoonful of Thyme for my blog. I'd pinned several salads to try and then I saw these scones and I thought, "Who needs salad? I mean, these have a vegetable in them too, right?" Totes.

And then--I know you drizzle things on your salads, right--well, I figured I better drizzle something on my pumpkin scones as well. A Spoonful of Thyme used a beautiful and delicious-sounding cream cheese drizzle. But then I opened my cupboard and saw that my husband had opened the speculoos cookie spread. And then I realized that maybe a speculoos cookie spread glaze with pumpkin scones might, just might, be the next cure for cancer. So I didn't want to, you know, miss out on that. So then this happened.


It didn't cure cancer (well, not that I know of). But I can't say I regretted the experiment.

My kids didn't either. They wolfed these down and beg beg begged me to make more today. Thanks, Spoonful of Thyme for the perfect fall breakfast/dessert (depending on your standards for such things).

Pumpkin Spice Scones with Speculoos Glaze
adapted from A Spoonful of Thyme
makes 8 large scones
Prep time: 15 minutes
Cook time: 10 minutes
Cost: $1.85 or about $.22/scone
flour: .15, whole wheat flour: .10, sugar: .10, butter: .40, pumpkin: .35, egg: .10, half and half: .05, spices: .20, powdered sugar: .10, cookie spread: .30 (um, I don't quite remember how much this cost, so I'm sort of making this up)

A few notes:
-Spoonful of Thyme used all all-purpose flour, but I added 1/2 C whole wheat and found it perfectly delightful.
-The risk with scones is having them dry out. To avoid this: 1) DO NOT OVERMIX them. I took mine out when still kind of a crumbly blop and then pressed and formed it into a ball and that was all it needed. 2) DO NOT OVERBAKE them. I went with 10 minutes and it was perfect. This didn't make them golden, so I wouldn't recommend going for golden brown. When they're puffy and look done, take them out. Stick a fork in it if you're worried it's doughy in the middle.

For the scones:

1 1/2 C all-purpose flour
1/2 C whole wheat flour
7 Tbsp granulated sugar
1 Tbsp baking powder
1/2 tsp salt
1/2 tsp cinnamon
1/2 tsp nutmeg
1/4 tsp cloves
1/4 tsp ginger
6 Tbsp cold butter
1/2 C canned pumpkin
3 Tbsp half and half
1 large egg

For the glaze: 

1/3 C powdered sugar
2 Tbsp speculoos cookie spread (this is generally a seasonal item--likes like peanut butter; tastes like cookies in a spoon)
2 Tbsp milk

For the scones:

Combine all dry ingredients. I did this in a food processor. Then add the butter in chunks and process until the big pieces are gone.

In a separate bowl, whisk together the egg, pumpkin, and half and half.

Then add this to the food processor. Do NOT overprocess it.


Process it until it's crumbly and mostly combined-ish. then dump it out and fold it a few times (as in 4 kneads, not 75 kneads) to be sure it's uniform in flour-y-ness. Then form it into a ball. That's it. Do NOT keep messing with it. Gently roll it into a circle on a WELL-FLOURED surface (I hope you're enjoying the caps. I feel strongly about certain aspects of this recipe). Don't skimp on the flour or it will get stuck and you'll have to scrape it up and maybe re-need it and life as you know it will be ruined. Well, probably not, but your scones may be slightly tougher than you prefer.


 Okay--so roll it out into a circle that's about 1/2 inch think. Then cut it into 8 pieces.


Bake at 400 degrees for 10 minutes. Again--don't overbake this. It will be a little too dry and a little too crumbly.

Let cool.

For cookie spread glaze:

Combine all ingredients and whisk.

When your scones are cool, drizzle with the speculoos cookie spread (or Spoonful of Thyme's cream cheese frosting).

PRINTABLE RECIPE


Monday, July 27, 2015

Whole Grain Strawberry Rhubarb Crisp


This summer, I've pretty much only posted ice cream related items and desserts. And desserts that would go well with ice cream. I'm trying to feel properly ashamed. But I don't. However, to make it up to you I'm not only posting a dessert that could go well with ice cream, but one that is also wholesome-ish enough to pass for breakfast. (So now I'm officially posting desserts that go with ice cream that I'm encouraging you to eat for the first meal of your day.) But wait...I know it is a bit on the decadent side for breakfast, but let's talk about muffins and pancakes before we go giving this poor little crisp a bad rap. After all, it is full of whole grain and fruit plus some nice healthy fats. And, yes, it has sugar, but not in crazy amounts. So have it for dessert if you consider yourself too righteous for this post, but if you'd like to get your epicurean on, then come on over. You can put a dollop of Greek yogurt on it instead of ice cream. Promise.


I made this because I had rhubarb coming out of my ears from my rhubarb plant, but one of the things I like about this is that it doesn't take much rhubarb, so if you have a young plant you can make this, or if it's a little more expensive to buy, you can still make this. Also, if you have a husband who insists he doesn't like rhubarb, he will still eat this. I also used strawberries I'd frozen and then dethawed, and that worked out just fine.

Also, this is just mixed up in the pan. Yes, you do have to chop your fruits. But once that's done, this is a dump into the pan and bake recipe--no bowl, no stirring with anything more complicated than your fingers (unless you want to be civilized and break out the spoon).

Whole Grain Strawberry Rhubarb Crisp
adapted from Smitten Kitchen
Makes 1 8x8 inch pan or 16 pieces
Prep time: 15-20 minutes
Cook time: 40 minutes
Cost: $2.10 or about $.15/serving
oats: .15, flour:. 10, sugar: .20, butter: .40, rhubarb (I have honestly no idea--I have NEVER bought it; let's say .50), strawberries: .75

Note: This was really really delicious as is, but if you wanted to add some coconut flakes or chopped almonds to your crumble, I think it'd be pretty darn incredible.

1 C rolled oats (I used a combination of quick and regular--about half and half)
3/4 C plus 2 Tbsp whole wheat flour (or you can do a combo whole wheat and all purpose; I'd recommend 1/2 C whole wheat and 6 Tbsp all-purpose)
1/2 C brown sugar
1/4 tsp salt
6 Tbsp butter, melted (or 3 Tbsp coconut oil and 3 Tbsp butter, which is what I did)
1 tsp cornstarch
1 Tbsp lemon juice
1 Tbsp granulated sugar
1 C diced rhubarb (I dice mine small)--about 1 1/2 stalks
1 C diced strawberries (also dice them small)

Heat oven to 375. You can line your pan with parchment paper if you want, but once cooled, I think this would come out of a plain greased pan just fine.

Put oats, flour, brown sugar, and salt in the bottom of the baking pan and mix. Pour melted butter over it and stir until clumps form.

Set aside 1/2 C of this mixture. Press the rest of the crumb mixture into the bottom of the pan.

Mix the fruit with the cornstarch and lemon juice. Spread this over the crumb bottom. Then sprinkle on the tablespoon of sugar.

Put remaining crumb mixture on the top.

Bake for 30-40 minutes. (Note: I doubled this and the cook time was quite a bit longer--at least an hour total, possible an hour and 10 minutes, so be aware of that if you double.) The top will be browned golden and the fruit may bubble (though mine didn't).

Let cool in pan. Cut into slices. I like this best cold, but at room temperature and even warm would be delicious too (especially if you just hang the whole breakfast thing and have ice cream thereby).

PRINTABLE RECIPE


Monday, June 1, 2015

Banana Yogurt Breakfast Plate


My kids are out of school! And I've been on a little food jag. It seems wrong not to tell you about it, even if it is dumb easy (especially if it is dumb easy). But this little "recipe" sat on my shelf for a couple weeks. Yes, I'm ashamed to say, but even though it tastes just as good as a banana split and maybe even better, I just hadn't gotten it posted. And then this weekend when my son and his friend went through our neighborhood and gathered mulberries from all the trees they could find. Mulberries, should you have no idea what they are, are a berry that grows on a tree. They taste like a cross between a cherry and a blackberry to me and are purely delicious. They grow all over the place around here and the trees are actually considered a bit of a pest because they'll sprout up wherever they please and grow like mad. I'm not sure you can find them on the grocery shelf anywhere. And I'm not sure why. Maybe they're too delicate to store/ship/whatever. I didn't even know what they were until we moved to Indiana several years ago. Interestingly, we've tried to get several adult friends to eat them from the tree and they Would Not Touch Them. Well, my kids touch them and eat them until their faces and hands are purple. And so my son and his friend rode their bikes around with a large bowl somehow balanced on their ?laps? or something (my son claims to be the best no hands biker around, but still--how did they transport an enormous bowl of berries on bicycles--it's a gift, I suppose). And then they came home and told me that now I could make mulberry jam.

How could I refuse? They'd been biking around with a bowl of berries on their laps for two hours.

Now, I would love to be sharing a perfect mulberry jam recipe with you today, but after digging out my only package of somewhat expired, low-sugar pectin and making a jam with a weird fruit in it, our jam came out delicious but slightly runny.

We also had a couple bunches of very ripe bananas on our hands and that runny jam and some Greek yogurt just called to me. Over and over again my friends. Because this is delicious. And easy. And kid-friendly. And kind of pretty. And well--rounded. It's got your fruit, protein, calcium, nuts. It could be eaten for breakfast, snack, pre/post workout food, or as a side dish with dinner. Which is how we first ate it several weeks ago when we had it.

It's hard to call this quite a recipe exactly, but when you're on a delicious, wonderful food jag, who cares?

Banana Yogurt Breakfast Plate
adapted from Natural Noshing
Prep time: 2 minutes
Cost: $.70
banana: .15, yogurt: .25, jam: .10, other stuff: .20

1 ripe banana
1 dollop plain Greek yogurt (I like it best thick)
1-2 spoonfuls jam or real maple syrup or this
maybe a squirt of whipped cream if you're feeling evil
nuts or shredded coconut

Cut your banana in half. Plop on the yogurt, then jam, then optional whipped cream. Sprinkle generously with nuts. And eat.


LinkWithin

Related Posts Plugin for WordPress, Blogger...