Showing posts with label Easter. Show all posts

Thursday, March 29, 2018

Peanut Butter Cream Eggs

BEST OF THE TASTY CHEAPSKATE


Sometimes I drop the tasty cheapskate ball. When I do, it's usually about pictures.

This week my sister was here with her four kids. She brought me a gorgeous peanut butter cream egg. Do I have a picture?

No.

Then Wednesday, while I made dinner, she and several of the kids proceeded to make and then decorate approximately 10 million more peanut butter cream eggs. They were so beautiful--an army of spring calorie bombs marching along the table. Did I get a picture of that?

Nope.

So today after my sister left (and I took myself a luxurious couch nap because Bec and I had stayed up till after midnight every single night because we are masochists). Anyway, after that, I scrounged around for a single solitary egg to photograph. My youngest daughter had one that I snagged, and then another daughter came out about to eat hers and I stole it too. That's all we had.

The moral of this story: Make these. They're not hard. They make great gifts, look beautiful in Easter baskets, and are a big crowd favorite. You'll be lucky to have a couple left at the end of the day.


Peanut Butter Cream Eggs
Makes about 30 1 1/2 inch long eggs
Prep time: 30-40 minutes, but there's some wait time while things harden/set.
Cost: $3.05 and if you flavor it with coconut, peanut butter, or chocolate that will add another $.50-1.00
(sugar: .60, butter: .40, chocolate: 2.00, other: .05)

1/3 C butter, significantly softened 

1/2 C peanut butter (crunchy or creamy depending on your preference; you can also use Nutella in place of the peanut butter if you want to go with more chocolate)
1 tsp vanilla
2-3 Tbsp milk (or cream, if you're a stickler about keeping the 'cream' in your butter cream--I used milk and it was very good)

1/2 tsp salt
2-4 C powdered sugar
1 bag (12 oz) semi-sweet chocolate chips (or melting chocolate or white chocolate or whatever shivers your timbers)


Soften/Melt butter. Add peanut butter, then vanilla, then milk. Add salt and powdered sugar. Mix by hand. It will turn into a thick mixture. I like mine a little  softer (because dry PB eggs are the worst), but having it a little thicker makes it easier to work with. Just add the powdered sugar bit by bit at the end. You need to be able to roll it into a ball. 

Refrigerate the filling, and then when it's firm, roll it into egg-shaped balls. 


When it is rolled, melt your chocolate in the microwave in 30 second intervals. (Note: If using real chocolate, melt until a few chunks remain and then stir until those are melted. This will keep it from getting that white swirly-old-chocolate the next day.) 

You can use nice chocolate (my preference) or melting chocolates. Melting chocolates do not taste NEARLY as good, but they are delightfully easy to melt; they harden quickly, and they re-melt beautifully, and they don't ever get the white swirly-old-chocolate look. We opted for real chocolate on the overall egg and melting chocolate for the swirly parts. 

When the chocolate is melted, dip the eggs. You can use a slotted spoon, or you can blob and drizzle it in a completely messy, but finger lickin' good kind of way. 


Allow chocolate to harden, then decorate if you wish. If you'd like to give them away, you can put them in little muffin liners or bon bon liners (depending on size). Then put them in a small plastic gift bag. My sister did this and it looked like it had been bought from a store. Ours never quite hit that level. 

Note: I have instructions for other flavors (plain butter cream, chocolate, and coconut) on another post. Feel free to hop on over HERE if you'd like. 

Tuesday, March 31, 2015

Chocolate Potato Chip Bird's Nests


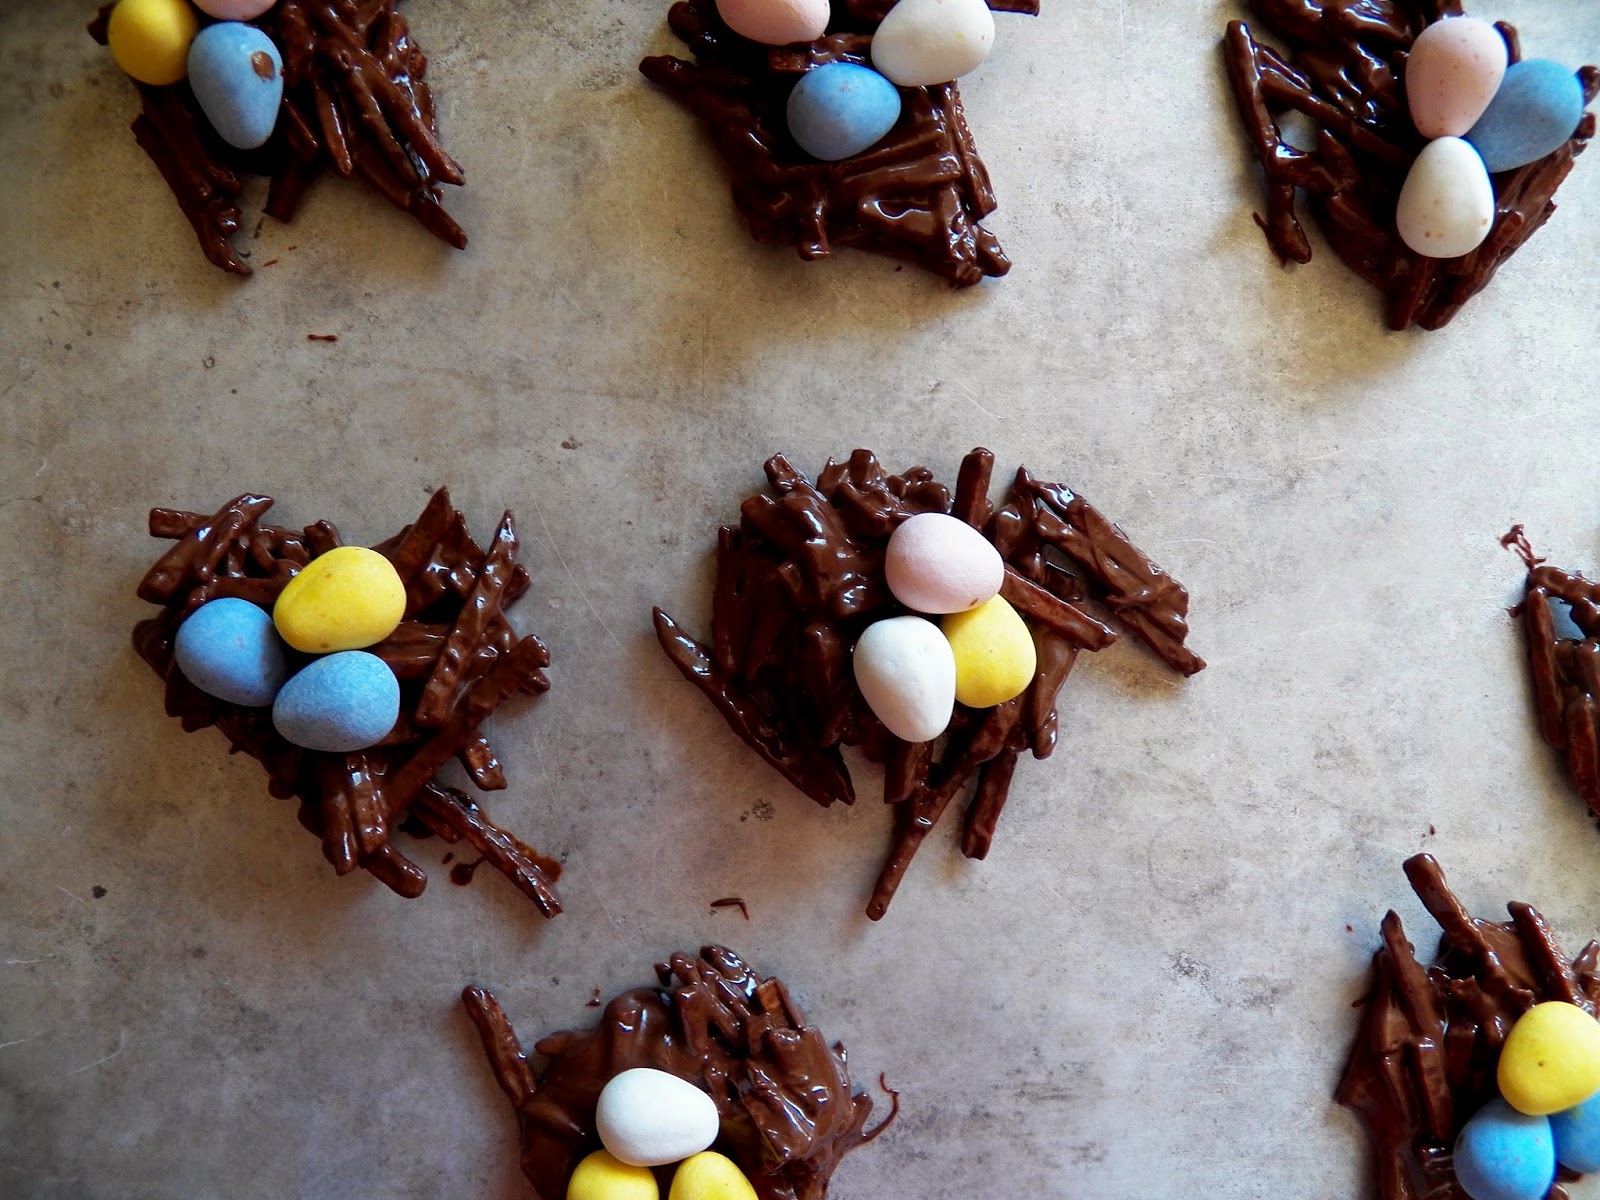
So on Monday at too-late-at-night o'clock, I was like, "What am I going to blog about this week?" I chose our family's favorite chicken enchiladas, which were an excellent choice. Except that this Sunday is EASTER and I specifically made and photographed these rocking Sweet and Salty Bird's Nests with the full intention of posting them on Monday.


Which is why you should not do things at too-late-at-night o'clock after a day that is chock full of manual labor with your husband. Indeed, at too-late-at-night o'clock, you should not write things on the internet at all--that's just a good rule to live by. If you insist on doing random things at too-late-at-night o'clock, what you should do is head out and buy yourself some potato sticks (I'd never bought them before either) and then sit at your kitchen table and make these little lovelies. Don't eat them at too-late-at-night o'clock (you're sure to regret that on several levels). But make them, and then love them. They are super super delicious. And delightfully dumb easy.


Chocolate Potato Chip Bird's Nests 
makes about 20 nests
Prep time: 10 minutes
Set time: at least an hour
Cost: $3.75
butterscotch chips: .50, chocolate chips: 1.25, potato chips: 1.00, Cadbury eggs: 1.00

1/2 C butterscotch chips
1 1/2 C semi-sweet chocolate chips
2 1/2-3 C shoestring potato chips
Cadbury milk chocolate eggs for the eggs in the nest

Melt butterscotch and chocolate chips together. I do this in a glass bowl in the microwave, stirring every 30 seconds or so until they're melted. (Note: If you do it in a large glass bowl, you can just pour the shoestring potato chips in and stir.)

Add your shoestring potato chips and stir until they're all covered.

Plop spoonfuls of this onto wax paper in a nest-like fashion, which is--fortunately--chaotic enough for most of us to manage.

Now arrange your Cadbury milk chocolate eggs on these (or Robin's eggs or Hershey's eggs or whatever).

Allow to set. This will take at least an hour, and you should really give yourself two hours, especially if it's warm in your house.

PRINTABLE RECIPE

Wednesday, April 16, 2014

Lemon Chick Cookies


Motto: If I can do it, so can you. I am probably the least artistically inclined baker in the universe. I'm not particularly visual in general and I care a lot more about how a food tastes than how it looks.

But this week in-laws came to visit and my mother-in-law brought a magazine with these cute little chick cookies. How could we resist? We both thought the kids would love them. The original recipe was a cake box recipe. If you follow this blog at all, you know that I'm not a huge fan of cake box recipes in general. Although truth be told, I might have just gone with it for cuteness sake. Except that I had a better idea. What if I made the chicks with my Lemon Doodle recipe? Why, yes, it was brilliant.

Although when I first pulled those "chicks" out of the oven, I wasn't so sure. They were, to put it sweetly, the most obese chicks I'd ever seen. They'd spread quite a bit and run into each other and I couldn't picture them ever looking like chicks. In fact, I didn't even bother taking a picture of the cookies straight out of the oven because I was so sure they wouldn't make it onto this blog.

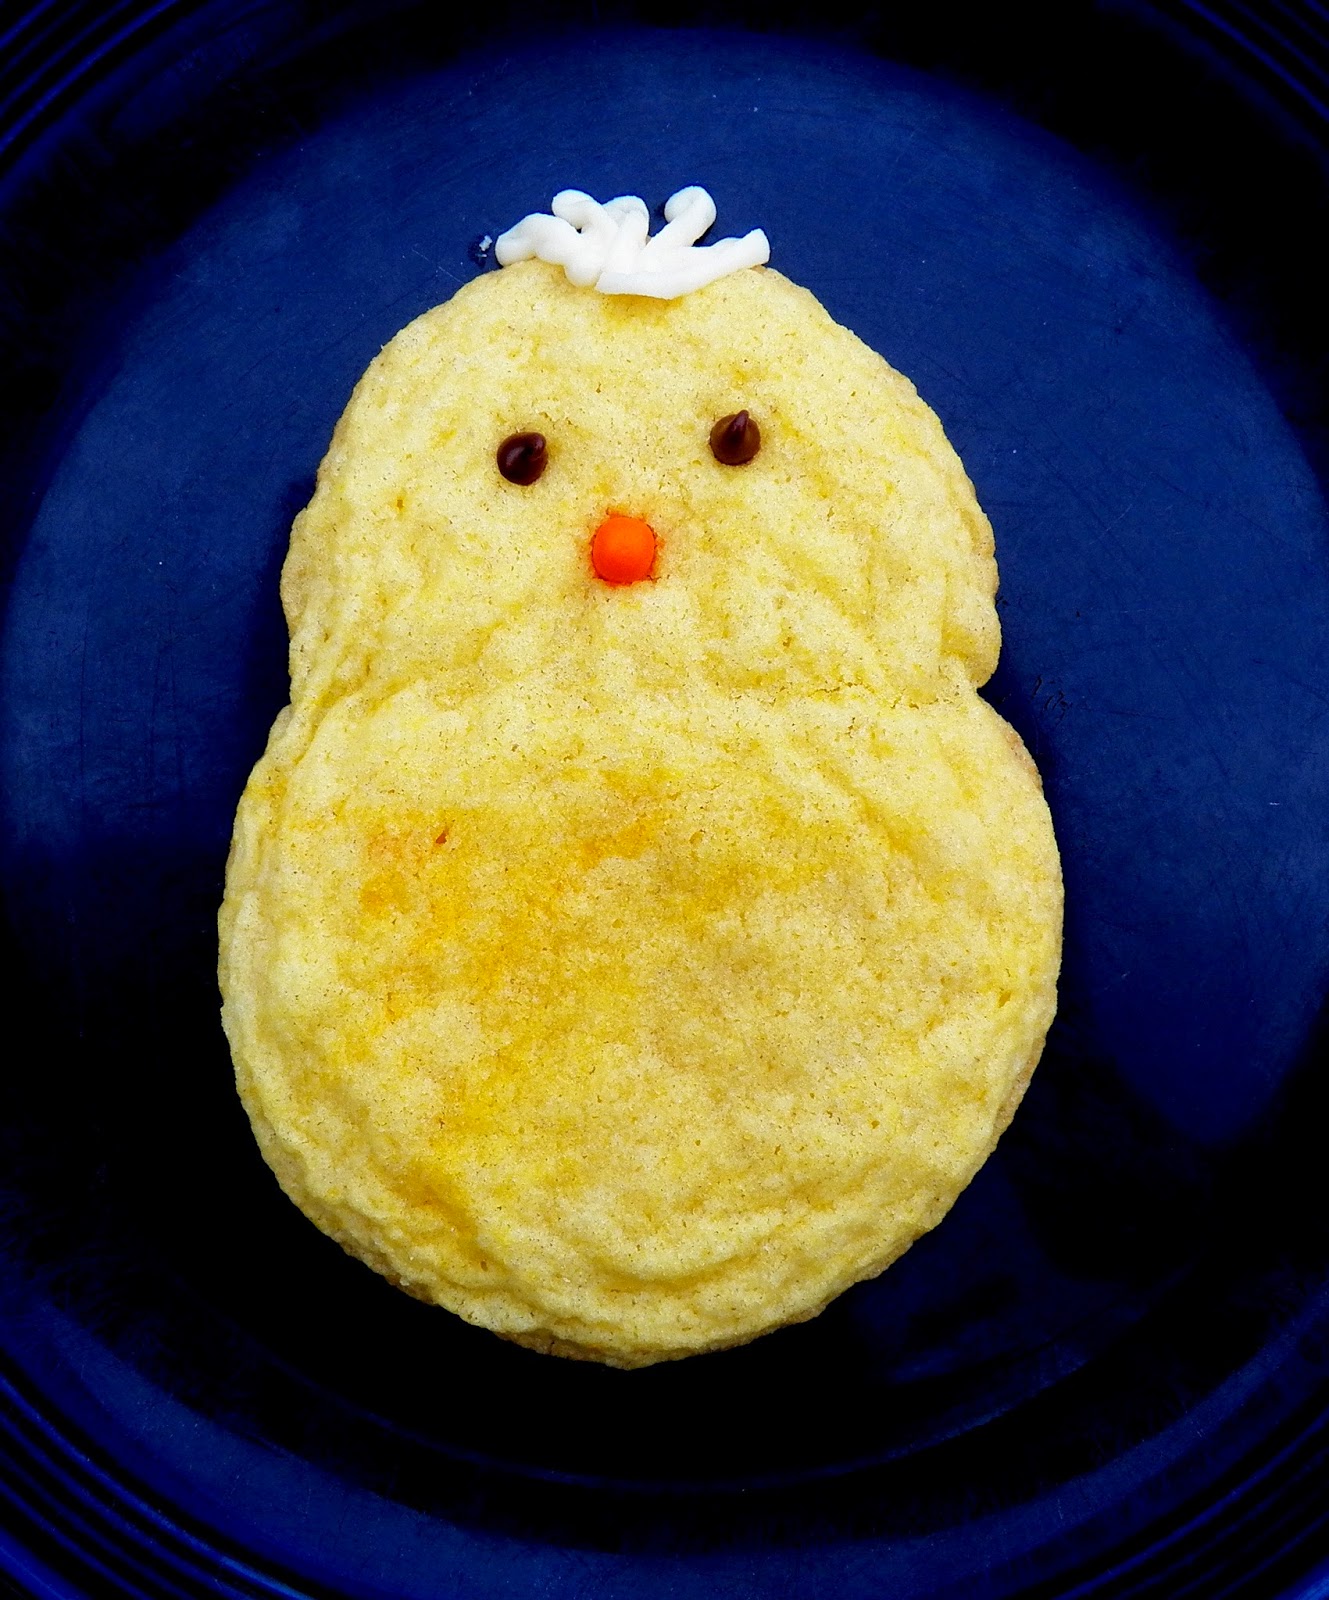
But then we added the eyes and little beaks and I'll be darned if they didn't come alive--those fat little Siamese-twinned cookies.


So then we decided just to do this thing and topped them off with little tufts of chicky, um, hair.


And of course there had to be a girl chick too (long hair and even some accidental eyelashes from those melty chocolate chip eyes because we all know--at least if we are four--that long hair and eyelashes is what makes someone a girl).


And then we ate them and they were soooo delicious. And so cute. And they would be super easy to make into snowmen in the winter. Or cats for Halloween (tail plus pointy ears).

I should also say that your chicks may actually come out not obese. We like to mess things up a little just to keep it real. We did not chill our dough as we were supposed to and my 9-year-old was measuring flour with a 1/4 C measuring cup and at one point lost count. This may have resulted in 1/4-1/2 C less flour than we were supposed to use. Can I just say that you know a recipe is a winner when you mess it up and it still comes out okay.

What You'll Need:

-Lemon Doodle dough
-Lemon sugar (optional). You could also use yellow sprinkles to very good effect if you've got them.
-mini chocolate chips (for eyes)
-Orange Tic Tacs (for nose)
-a bit of white frosting (for "hair")

What to Do:

1. Make 1 recipe of Lemon Doodle cookie dough (1/2 recipe is one sheet of cookies and actually what we did). Dye it yellow if you wish. We did and used several drops yellow food coloring.

2. Make your lemon sugar for the lemon doodles and dye it yellow as well if you wish. To do this, put the sugar and lemon zest in a Ziploc bag with a few drops of food coloring and mash it around (see here). (Note: If you don't love lemon or lemon zest, you can just use sugar).

3. Chill the dough if you want slightly less obese chicks.

4. Roll dough into small balls and big balls. Our small balls were about one inch and our big ones were about two inches. Note: I was worried the small would cook too fast and be burned, but surprisingly this was not the case. It just worked.

5. Place on cookie sheet--little ball touching big ball with plenty of space in between chicks. Bake for about 10 minutes at 400.

6. AS SOON AS cookies come out, plop on some mini chocolate chips for eyes and an orange Tic Tacs for the nose. You've got to do this while the dough is warm or it will be hard to get them to stick into the face properly.

7. Let cool. Then, if you desire, pipe a tiny bit of frosting onto the top for "hair." I had a little bit of this white chocolate frosting left in my fridge and that's what I used (though this would work too). I just scooped it into a Ziploc bag, cut a tiny bit off the corner and piped away. I should say, though, that if you skip the "hair," probably no one will hate you and they're still pretty cute...

Some of you want that cake box recipe, don't you. Fine. Though I'm gonna promise you that they won't taste nearly as good (and I'm even going to say that that Lemon Doodle recipe is not that hard to put together). This is from Woman's World.

1 pkg. lemon cake mix
2 eggs
1/3 C oil
yellow food coloring

Mix this together, then follow the directions above.

Wednesday, March 27, 2013

A Few Easter Things


My favorites (warning: they call contain sweetness):

Hot Cross Buns: Mom always made these on Good Friday. I think she stole the idea from my father's mother.

Butter Cream Eggs: Also compliments of my mom (pictured above).

Cadbury Milk Chocolate Cookies: This we can thank Kip for. He loves those Milk chocolate Cadbury eggs.

And for anyone wanting a cookie that is sweet, but definitely on the healthier side, you can try these low sugar whole wheat peanut butter cookie nests with (again) milk chocolate Cadbury eggs.

Thursday, March 21, 2013

How to Cheapen Easter


So apparently Easter is the new Christmas. I guess that's good news if you're under 18. For the rest of us (although, frankly, we've no one to blame but ourselves; or maybe that overzealous Pinterest-crazed no-good-goody-goody next door), it means more stress and more money than the holiday to celebrate the resurrection of Christ used to entail. Truly, I think my parents should have thought it was a stretch when I was a kid and Peeps and weird pink grass were seen as an essential symbol of the good Lord's rebirth. But now? Now--to walk through the aisles of Walmart--in all its pink, yellow, and green glory is to wonder if Peeps and pink grass and .99 dyed eggs mightn't be touted as full-on abuse by your kids and perhaps whispered about as pure laziness by that Pinteresty neighbor we discussed.

What's a self-respecting cheapskate to do? Especially if she doesn't want those overly-entitled children to come back and sue her when they're diagnosed with diabetes, right?

Below you'll find a few ideas that will make Easter special without making it ulcer-inducing. I must warn you, though: it requires a little bucking of trends. But you're a cheapskate, so you knew that, right?

1. Dye a bunch of eggs. This will fill up the baskets nicely while providing a non-sweet snack later on in the day/week and a bonding activity for you and your kids to do together.

2. If the above suggestion sounds like as much fun as having all your teeth pulled, dyed purple, and reset, then try this. Buy some cheap plastic eggs (no need to go for the fancy ones, though they are tempting), and put one piece of candy in each one. Full basket, not so much candy.

3. Make some of your own sweets. My mom used to make chocolates for us in molds. It's a sweet memory. And for a $2.50 bag of chocolate chips (or the even cheaper melting chocolate) you can have a several trays of molded chocolates.

4. If the above suggestion sounds like as much fun as having your child stick his new light saber up your nose and into your brain, then do this: Buy less candy. Say what? Okay, okay, hear me out. You could just do this straight up. You could just buy less candy. But some people. Some people who will remain nameless (whatever--it's totally Kip), but are members of this candy-loving family really really love Easter candy. Easter is my husband's favorite candy holiday. He loves all of that Easter candy (you know, the stuff they're now starting to market for different holidays in different colors). He loves the little milk chocolate Cadbury eggs and the big ones with the filling. He loves the Reese's eggs, which he claims taste better than normal Reese's. He loves the Robin's eggs. Everything--pretty much--except the jelly beans and Peeps. Yup. He would rather just skip out on life than miss out on those classic Eastery candies. So this year, I decided to do something radical. It won't help his health, but it should soften the blow on our budget (and, if well hidden, help the health of our children). I bought only a couple kinds of candy for Easter morning baskets instead of each and every kind that has become a "staple" for us. And I promised him I would go out on Monday and buy more of his favorites for half off. Fair enough. You can do this too.

5. Skip the toys (or skip the candy and give one toy). I mean, you didn't get toys when you were a kid, did you?

6. If the above suggestion sounds as winsome as filling your child's basket with fresh dog poo, then try this. Make sure that whatever you buy them is not junk. Yes, this is a purely radical suggestion, especially when each and every Easter aisle at your local superstore is filled to the ceiling with all sorts of Easter-themed kitsch. If you must buy them something, buy them something thoughtful or useful or both. Here's a story to illustrate: Last week, after having my daughter swear that she absolutely needed one of the little stuffed bunnies in order for her life as she knew it to be complete, I thought, "What the heck--I'll get each kid a $3 stuffed animal. They like stuffed animals." And then standing in the check-out line, I realized in that brilliant way of mine that I was now buying $12 of crap--of things I will find on my kids floor for the next several months, or--worse--things that will end up buried at the bottom of a toy box by the end of the next day. I put the toys back (except the one for this particular daughter because I am, at the end of the day, a pushover; and she swore I could give her the bunny with Easter eggs stitched to its bum to her for her August birthday). Instead, I decided to buy them each a water bottle for summer. Which is something they will actually need and which I have been meaning to buy anyway. (I also bought toothbrushes--yup, you heard me). But is still kind of fun because they're pink, purple, flowery, and cool. (Note: I'm still not sure this is the greatest ever suggestion. It does, after all, set up expectations for next year, and the idea behind being a cheapskate holiday parent is to keep the bar so exceedingly low that anything will be great. But if you want to fill the basket, and if you want to fill it with things that are not all--please oh please--candy, then this is a decent method.) As an alternative, you could do suggestion #4, only with toys--buy the Easter stuffed bunnies the day after, but I'm guessing if you get to that point, you may have already decided that you really didn't want/need them all that much anyway.

7. Keep the bar low, eh. The more you give this year, the more you'll be expected to give next year.

8. If this sounds as much fun as cleaning your shower drain with your nose, then you are clearly not a cheapskate at all (we love keeping the bar nice and low). You are probably that Pinterest-pinning neighbor and you are surely gossiping about me right now as you hot glue tiny little Easter eggs to the ornaments you plan to hang from the Easter trees in your living and dining rooms.

Saturday, April 7, 2012

A Couple Easter Ideas

Did I mention yesterday that I was a hypocrite? Oh good, I did. Because I am. Tonight I am so very very tired. I feel a little like it's Christmas Eve and I've been on my feet most of the day. Much of the reason for this involves goodies. I am going to try to rectify my evil ways and get off my feet shortly and do things that do not involve sweets and are more important than sweets. But first...

For breakfast we're having these:


Aren't they cute? See they're like little eggs in a nest. The cookie part is pretty healthy. You can find the recipe here, but you'll need to roll them into bigger (2-inch) balls and cook for 8 minutes. I used Cadbury milk chocolate eggs, but Robin's eggs would do nicely too.

I know, I know--we ought to be eating meat and vegetables for breakfast with all the candy that will be consumed throughout the day. But a big ol' quiche would go over just about as well as a bushel of broccoli so I just gave up and went with this.

And then I made these to give away.


Of course you could make these with any vanilla or lemon cupcake (or muffin) recipe you've got. I used this one (although I did make a few changes, which I'll be posting about next week because I'm really ready to get my feet up tonight). It was good, though I must warn you of two things.

1. The reviews are very conflicted. Some say it winds up flat and dense. Others had no problem. I was in the no problem camp and I will tell you why: You have to beat the 1st five ingredients for 5 minutes just like the recipe says. Capiche? Good.
2. The jelly beans bleed. This can turn out really pretty and rainbow-y and look like you intended for all those colorful swirls dripping around your muffin top. Or it can turn out sort of creepy--like a crying clown. It's a risk you might not want to take since it's Easter and all. So put the jelly beans on right before you plan to serve these. (P.S. If I bring you some of these Sunday, you have my apologies. I didn't realize the jelly beans would bleed until tonight when they did. I sincerely hope yours are of the rainbow swirl variety and not the crying clown variety.)

Also, I think they'd be really charming with a whole raspberry, strawberry, or blueberry up on top (or with a dab of syrup made from one of those fruits).

Happy Easter!!!

Thursday, April 5, 2012

Jewish Bread for our Christian Tradition: A Post on Matzah


When I was growing up, we would sometimes have a sort of "Jesus meal" on the Thursday before Easter. This was the night that Jesus and his disciples were celebrating Passover and the night Jesus broke and blessed the bread (and wine) instituting the Christian sacrament for the first time. Our simple homemade affairs involved flat bread or crackers, grape juice, maybe greens (um, bitter herbs), and some other stuff I can't remember. I think there were olives.

Anyway, that's not the point. The point is that it helped me think about what Jesus and his disciples were doing on that pivotal night before the crucifixion. It wasn't a sad day for us, though. It was kind of fun to eat different foods and learn about something in the sneaky sort of way my mom had fashioned. And the emphasis wasn't on the gloom of the crucifixion, but on the sacrament and the events that led up to the joyful resurrection. It was something that stuck with me.

So I've done it with my kids. We've had crackers, olives, nuts, fish (lamb being woefully too expensive). But this year, this year, I decided to do it right. I would make matzah or Jewish unleavened bread.

Except that then I found out what you had to do it right--sterilized everything (er, maybe some houses, but not this one), special flour that has never been exposed to moisture, spring water, and an 18 minute start to finish time to prevent any kind of possible fermentation. If they make more batches than one, they re-sterilize everything and even clean the rolling pin with sandpaper to ensure that none of the previous (and possibly fermenting dough) is stuck to it. Whoa. Next time someone tells me Mormons have a lot of rules, I'm going to tell them how to make matzah.

As a result, I may have (cough) cut a few corners. After all I wasn't really serving food for Passover. I was really serving food to remind us of a distinctly Christian tradition--the Passover where Jesus broke bread for his disciples. So I fudged a few things. Like those sterile utensils. Still, I did try to keep my bread within the 18 minute limit. I actually thought I'd be way ahead since the actual making of matzah is fairly easy (flour, water, a bit of salt), but I just barely made the time limit and the center of mine is still not crispy (is it required to be crispy?). This is because I used a pan instead of tiles, my oven only goes to 500 degrees, and I took one food blogger's suggestion and brushed on some olive oil and salt. The olive oil seemed to keep the cracker from crisping up as quickly.

Oh, and the fire alarm only went off twice. (A tip for the uninitiated: Make sure none of your parchment paper is hanging over the edge of your pan  or it will blacken and make your fire alarm go off.)

Nevertheless, I was pretty pleased with the final product. It looked interesting if nothing else (it also looked a bit like Illinois).


And while I'm pretty sure my kids will insist on putting peanut butter on their matzah (because it turns out that flour and water don't exactly make a baked good bursting with flavor), I'm guessing they'll probably eat it.

You can find plenty of recipes and videos for real matzah online, but if you're looking for a nice cheater version that's quick and easy and can provide a sort of Christian object lesson, I'll give you the skinny.

1. Sterilize everything. I wiped off my counters and that was pretty much the extent of it.

2. Make the dough by using 3 parts flour to one part water. Add a dash of salt if you want. I did 1 C white whole wheat and 1/3 C water. Stir this together, kneading it into a ball. (If you have to add a bit more water, that's okay, but don't go overboard--you don't want it sticking to your counter, and technically you're not supposed to flour your surface. This is a rule I would have broken if necessary, but I didn't need to).

3. Heat your oven as hot as it will got.

4. Roll out the dough super thin. Some tutorials rolled it into one-serving balls and then rolled those out, but I went with a method that used a long strip instead.


5. Put it on a pan lined with parchment paper. (This was a sort of cheater method. Normally, it would be cooked on hot tiles or even the bottom of the oven.)

6. Prick it with the tines of a fork (did you know you can buy a special rolling pin with pricky things on it?)

(See how that parchment paper is hanging over the side? Don't do that.)

7. I cut mine with a sharp knife so that it would be easier to break into "crackers."


8. Brush on some olive oil and give it a shake of salt. I don't know if this is usual or accepted or not, but it sounded more appetizing to me. However, as I said above, I do think it slowed the cooking.

9. Put this in your hot hot oven. Cook for 3-6 minutes or until it's cripsy and cracker-like.

10. Take it out, cool, and eat.

Saturday, April 23, 2011

Cadbury Milk Chocolate Cookies

Cheap Eat Challenge: Watch as our family of 6 tries to eat too many sweets and some other food too on $6/day.


One last sweet, then next week, it's back to business. Good thing my business is sweets. No, wait, it's being cheap and a good mom and a nice person and a millionaire who eats a lot of fine chocolate. Sorry, just a little Easter wish there at the end. But seriously, I've got pictures and recipes for bean dishes, potatoes, casserole all languishing on my desktop, awaiting their day in the sun. Well, they can join the club. They, like me, have seen not much sun this weekend. But come Monday, we'll keep our fingers crossed.

Kip is an avid lover of those milk chocolate Cadbury eggs (not to be confused with the large fake-yolk filled Cadbury eggs that I loved as a child, although he likes those too). Tonight I made these cookies to put in his Easter basket because I love him. They actually came out even more delicious than I thought they would. The shell of the Cadbury egg gives a super awesome candy crunch to your cookie and the milk chocolate gives it a sweet something different as far as chocolate flavor. And of course I added a few semi-sweet chips as well to keep it real.

As I whipped up the batter with just a wooden spoon, I was struck by how easy homemade cookies are to make. Much easier than navigating the "bakery" section at your local chain grocery store. And do I even need to say how much better.

Cadbury Milk Chocolate Cookies
Makes 36-48 cookies, Serves: Kip (fine, whatever, I may have had a few tonight too)
Prep time: 7 minutes
Cook time: 9 minutes per batch
Cost: $5.10 (good thing those Cadbury's are a gift)
(butter: 1.15, sugars: 1.00, eggs: .20, flour: .30, Cadbury's: 2.00, semi-sweet chocolate chips: .45)

1 recipe for Kip's Chocolate Chip Cookies:

1 C butter
1 C brown sugar (packed)
1 C sugar
2 tsp vanilla
2 eggs
3 C flour
1/2 tsp salt
1 tsp baking soda

And to that you'll add:

1 1/2 C Cadbury eggs, roughly chopped (I admit that I halved the recipe so there'd be Cadbury's left for baskets)
1/2 C semi-sweet chocolate chips

When I chopped the eggs, it was very rough. I wanted large pieces, so I pretty much chopped at the halfway point--sometimes I got a half and sometimes it shattered into smaller pieces.


Preheat to 375. Cream butter, sugars, and vanilla. Add and mix in eggs. Sift, then add flour, salt, and baking soda. Stir in chopped Cadbury's and chocolate chips. Bake 8-10 minutes until barely golden. DON'T OVERBAKE AND DON'T EVEN THINK ABOUT USING MARGARINE.

Amen and Happy Easter!

P.S. Don't have time to make these this weekend, even better for you. Easter candy goes on sale Monday. Grab some Cadbury's if you can find them and make these.

P.P.S. Check out Sweets for a Saturday for more Easter treat ideas.

PRINTABLE RECIPE


Friday, April 22, 2011

Hot Cross Buns

Cheap Eat Challenge: Watch as our family of 6 tries to eat on $6/day.


We had a lot of traditions growing up. My dad was raised Catholic and said that on Good Friday he and his siblings went to their rooms for 3 hours to think about Christ and his cruxifiction. Then that night they got hot cross buns. When he married my mom, they only kept one of those traditions. Perhaps this is because it was easier to think about Christ when your kids weren't whining and moaning and pitching a fit in their rooms for three hours (not that we as children ever would have done such a thing). At any rate, I love making these every year, and did so even in college (it was some of the very little cooking I did in college, and I like to think my rolls have come a long way since then). And you know, they always remind me what day it is (does anybody else find it easy to forget?), and what that day represents. So I guess my parents succeeded in helping me remember Christ on Good Friday after all. 

Hot Cross Buns
Makes 20-24
Prep time: 20 minutes (plus you've got about 2 hours of rise time to figure in)
Cook time: 15 minutes
Cost: $1.70 plus frosting which will add an extra $.15 or so, unless you've got a bunch already in your fridge like I do.
(milk: .15, yeast: .15, butter: .30, sugar: .10, eggs: .20, flour: .80)

I start with my sister's roll recipe (it's copied below).

When you've got the dough formed into balls, I cut a cross into the dough. You don't have to; you can just paint it on with frosting at the end, but I like the frosting to have a gulley to seep into, yes I do.


Bake them for about 15 minutes.


You could stop right there and they'd still be amazing, but we always add a bit of frosting in the crosses. You could pipe this frosting in if you wanted it to, like, look good, but I was in a super hurry so I just used a knife and my finger to blob it on. No one complained.


You can use whatever your favorite frosting is. I had several to choose from hanging out in the fridge and picked orange cream cheese frosting (yes, it was totally awesome). If you're at a loss for what frosting to use, have a look here. For the orange cream cheese, add 2 Tbsp orange juice and 1 tsp zest to my Best Ever Cream Cheese Frosting.

Katie's Rolls:
1 C warm water
1 C milk, warmed (not hot)
2 Tbsp yeast
1/4 C butter
2 tsp salt
1/2 C sugar
2 eggs
7-8 C flour

Add yeast to water and milk. Let it sit there if you've got five minutes. If you'll get distracted by leaving a thing for five minutes, then just throw the butter, salt, sugar, and eggs in before you forget what on earth you were doing in the first place. Mix it all together. Mix in 4 C flour. Add 2 more cups. Begin kneading with hands when it gets too tough to stir. Of course, if you're a member of the 21st century and have a Kitchenaid, you can use that too with the dough hook. I myself haven't quite made it to the 21st century and that's okay with me because (weird mental disorder alert) I kind of like kneading. It relaxes me. I like how the dough smells. I like how it feels.

So if you, like me, will be doing things manually, here is #1 best tip for rolls. The dough should be pillowy--like a mother's bosom. We don't want any tight teenage breasts, nor do we want a stretched and sagging grandma shelf. If a three-year-old would just love to lay her head on your dough, it's perfect. (Warning: If you have a real life 3-year-old available, do not invite her to lay her head upon your dough to test it out. You'll get hair in your dough. And possibly boogers. Which is what mother's bosoms also get covered in when they have three-year-olds. Not that we mind because three-year-olds are cute.) I've digressed, haven't I? Anyway, so keep adding flour in 1/4 C increments or so and knead it for about 8 minutes until it is nice and pillowy and perhaps the teeniest little bit tacky, but not sticky. Then put it in a bowl and cover it and keep it in a warm place. (Everyone always says put it in an oiled bowl. I have never, not even once in my life done this. I always just throw it back in the bowl I mixed it in. It is always always fine. Who are these people with their oiled bowls and what is the purpose of oiling the bowl?)

Tip #2: If it's cold in your house, stick the bowl with the dough in the oven. Turn the oven on for 1 minute. Then turn the oven off and leave the dough in the warmed oven. (Do not leave the room to go do something in that one minute. You will never remember your dough. It will cook right there in your bowl with a dish towel over it and perhaps your house will burn down. This is not worth what you were going to do in that one minute.)

Let it rise for one hour or until doubled. Then punch it down and shape it into rolls. Put the rolls on a greased baking sheet. Cover them and let them rise again--this time for about 20 minutes.

Bake at 375 for about 10-13 minutes. I like my rolls just a bit on the dough-y end. I always break them open to determine if they're just right and not way too doughy still. It's not the perfect technique, but it works.

You can make the rolls ahead of time and freeze them. You can make the dough ahead and refrigerate it (covered in plastic wrap) for about 24 hours. You can even make them to the rolled roll point and then freeze them and then take them out, let them dethaw and rise, then bake them. The possibilities are limitless. As it seems is my ability to write many many words even when I am so so tired and have said I will not tonight write many many words.

P.S. If you're Jewish or Muslim or someone else who is not interested in remembering Christ on Good Friday, you should make these rolls anyway. Because they are awesome. You can stretch them out (like a Playdough snake) and shape them into bunnies..


...and then use the frosting to paint a little bunny face.

(This bunny looks like she's up waaaay too late.)

(Or...while we're talking bread, have a look at these cinnamon rolls. They're no-rise and I love the visual effect of the brown sugar, cinnamon, and cocoa.)

Thursday, April 21, 2011

Butter Cream Eggs: Coconut, Peanut Butter, and Chocolate

Cheap Eat Challenge: Watch as our family of 6 tries to eat on $6/day while consuming over many Easter treats.


There are family traditions we choose keep and family traditions we choose to leave behind. And somehow there are family traditions that we sort of slip out of--one year we don't have the time or means to do it and the next year we kind of don't think about it as much and then, whoosh, it's gone.

At least until your mother sends you a package with several butter cream eggs and you give your sister a call and end up talking about butter cream eggs and then find yourself at 9:30 at night experimenting with flavors of butter cream egg fillings--the ones you remember your mother making for the church fundraiser, the ones you got big as an ostrich egg in the center of your basket every Easter. Back then my favorite was peanut butter (tell me it's a shock). As of today it's got some stiff competition.


(peanut butter, coconut, chocolate)

And here, let me take a little moment to give my mother a call out and a thank you. Thank you, Mom, for sending me those butter cream eggs with all their happy memories. Thank you for making them all those years--for us and the church fundraiser. Thank you for all the effort you gave to providing 5 kids with lots of happy holiday memories--food and otherwise. And thank you for every care package you ever sent. They have all been cherished and I hope you know that.

The butter cream eggs we got as kids were huge. You certainly couldn't eat them in a day. I remember slicing slivers off of mine each day and storing the rest carefully wrapped in the refrigerator (I was one of those kids who was just finishing off Halloween candy when Easter rolled around.) My kids will not be so lucky. The ones I made today are small. (Sorry, kids.) There are a couple of reasons for this (they're so cute, there's more chocolate coating...), but the big one is that my kids get candy all the time. I do not remember having any Easter candy (or any other candy for that matter) before Easter. Also, I walked uphill to school both ways. Also, my parents didn't go nuts with the candy. We got our butter cream egg, one Cadbury egg (it was the only one we saw all year), some peeps (yuck), and jelly beans and robin eggs. It was certainly plenty; it was more than plenty. But these days (and, yes, I know when people start saying 'these days' they are old) kids get more candy. My kids have had a frightening amount of it all week. And so they will receive a miniature version of my beloved childhood favorite. But small or not, they will be given with the same amount of love; and plenty of chocolate coating. Viva tradition.

Butter Cream Eggs
Makes about 30 1 1/2 inch long eggs
Prep time: 30-40 minutes, but there's some wait time while things harden/set.
Cost: $3.05 and if you flavor it with coconut, peanut butter, or chocolate that will add another $.50-1.00
(sugar: .60, butter: .40, chocolate: 2.00, other: .05)

2-4 C powdered sugar (original recipe calls for 1 pound--that seems like way way too much to me)
1/2 tsp salt
1/3 C butter, significantly softened (Note: The original recipe calls for this to be equal parts margarine and butter, but I didn't have margarine, and all was well with all butter. I mean, how could all not be well with all butter?)
1 tsp vanilla
2-3 Tbsp milk (or cream, if you're a stickler about keeping the 'cream' in your butter cream--I used milk and it was very good)
1 bag (12 oz) semi-sweet chocolate chips (or melting chocolate or white chocolate or whatever shivers your timbers)

Combine all ingredents except chocolate by hand. If it's too dry, add a bit more more milk.

Now you can leave it at that. Or you can add some other flavorings (I highly recommend other flavorings; I find the plain buttercream a little uninteresting). I tried coconut, peanut butter, and chocolate. (The chocolate was my favorite, but I thought they were all very good.)


For Coconut: Add 1 1/2 C shredded coconut (You can also substitue the vanilla extract for 1/2 tsp coconut extract if you wish).

For Peanut Butter: Add 1/2 C peanut butter.

For Chocolate: Add 5-6 Tbsp cocoa powder.

For Nutella: Add 1/2 C Nutella

What I haven't tried, but think would be awesome:
1) Orange or lemon--1-2 Tbsp juice and 1-2 tsp of zest ought to do it.
2) Peppermint--add 1/2 tsp peppermint extract and a couple drops of green food coloring.

Refrigerate the filling and then when it's nice and firm, shape it into egg-shaped balls.


Get a sheet of wax paper ready because you're going to coat the eggs with chocolate. Melt the chocolate chips in the microwave by microwaving in 20-30 second intervals until chocolate is mostly melted. When it's nearly melted, take it out and mix it until the last bits of chocolate melt (this method sort of tempers the chocolate--it's not an exact science; I guess I'm not an exact science kind of a girl, but it will help keep your chocolate from getting white streaks in it after it's set.)

Then you're going to coat the eggs with chocolate. Truly I have no idea how my mother used to do this. I tried dipping. That didn't work very well because the chocolate was too thick. I tried using a spoon to sort of drizzle over/cover the eggs. Also not successful. Finally, I settled on holding the egg, smearing the chocolate on the bottom and sides with my finger and then plopping it down on the wax paper and smearing it on the top, again with my finger. I can only imagine the health code violations that were committed via this method. (Of course, I didn't lick the chocolate off my fingers when I was done; what kind of establishment do you think I'm running here. I let my assistant lick them instead. Because she is cute.) Anyway, it might not be the neatest way in the world, but it worked.


And then I looked over and discovered my other assistant sitting on the tray of her high chair, licking 2 spoons. Did I mention I will not be opening a restaurant any time soon?


And then I let them (the eggs, not my assistants) set until the chocolate was firm. This took an hour or two.


Now I was ready to decorate them. Of course, this isn't essential, but Mom always did when we were little and it makes them so much prettier. Even when you have the decorating skills of an aquatic mammal as I flatter myself to have, they will turn out pretty with a few nice Easter colors. Just stick some decorating tips in some Ziploc bags...


And have at it. (I'll post my basic vanilla frosting recipe below.)


If you have assistants you can let them have at it too.


By the way, leftover frosting, no problem.


Oh--and leftover chocolate from earlier. Well, if your mother truly loved you, she probably sent you some chocolate molds from your childhood like my mother did. Otherwise, have a look here for some on Amazon.

(The chocolate was getting a little hard and weird by the time I got it in the molds, but better than washing any leftover semi-sweet down the drain, right?)

You can save these eggs for Easter or eat them for dessert tonight or send them off to your children's teachers as gifts (providing you waited to lick the chocolate and icing off your fingers until after you were done with the project).

Basic Vanilla Frosting:
Cost: .60
(sugar: .25, butter: .30, other: .05)

1 C powdered sugar
4 Tbsp butter, significantly softened
1-2 Tbsp milk
1/2 tsp vanilla

Combined butter, sugar, and vanilla and mix. Add 1 Tbsp milk and the other if the frosting needs it. Add food coloring if desired.

PRINTABLE RECIPE

LinkWithin

Related Posts Plugin for WordPress, Blogger...