Monday, July 16, 2012

Peach Butter


It's time for another recipe for the Secret Recipe Club. This month I had A Dusting of Sugar, a blog written by Rebecca, who is in college, which I mention here only because her blog seemed so surprisingly mature and lovely that I just can't get over that fact. (Rebecca, do not be offended--I have merely gotten to the point in my life when 21 seems so very very long ago). Her photography is beautiful and her recipes are fresh and interesting.

I chose peach butter because ever since I had some that a friend made last year, I've been a little obsessed. And beauty of beauty peaches are in season. It was with this cheerful serendipity on my side that I went to a grocery store here in Evansville (one that rhymes with schmucks). This store had peaches that were billed as "local," "sweet," and "fresh." (I bought 6 pounds.) And which tasted of--there's really no other way to describe it--mild dish soap. I'm not sure why. It's like they were underripe and yet starting to go off all at once and the result was a slightly soapy aftertaste. (Come on chemists--tell me why this is). As snacking food they were completely inedible. I could barely even stand the smell of the peels as I peeled them off.

I almost just chucked the lot.

But then, I figured if there was any way to redeem them, a slow simmer with a bunch of sugar would do the trick, although I admit that I went at this recipe with a little bit of fear (was I going to spend my entire afternoon and $13 of peaches creating 7 C of soapy tasting jam?)

Which is why--two sore feet and the most delicious peach butter later--I have to give a super hug to Rebecca and her recipe. It is beyond delicious. Beyond delicious when made with peaches that sort of made me gag to smell. That, my friends, is a recipe fit for cheapskates and foodies alike.

A Few Notes:
-I doubled the recipe below. I got about 7 C from it. If you're going to can to give some away, you'll want to use those cute little jars, not pints (probably not even 1/2 pints).
-Since I doubled the recipe and was a little timid about burning this, it took forever and ever to simmer down (probably 2 1/2 hours). If I could do over, I would have cooked it on a bit higher heat than I did at first (medium or just higher than that; as it was I started at medium low and it took so long) OR put it in 2 separate pots OR left out some of the water and then simmered it on low or medium low. Do watch it at the end, but at the beginning, you don't need to be afraid of a nice steady boil (not a crazy boil, mind you--just a solid husband kind of a boil).
-To remove the skins from the peaches, most people recommend cutting an X in the bottom of the peach, then putting it in boiling water for 30 seconds and then in ice water for 30 seconds. I know that this works as I've done it before. However, as I heated my water, I decided to start peeling and had almost half my peaches peeled by the time the water was boiling. At that point, I decided to just keep sitting at my table and meditatively peeling than running back and forth from hot oven to cold sink, dirtying extra dishes and making my floor sticky. As a note, I do have an excellent peeler. 
-I did a little experimenting with my jars of apple butter. I tried one with vanilla (very good), one with vanilla and cinnamon (also great), and one with vanilla and almond extract (really good). I think the almond was my favorite, but I seriously had trouble choosing. They were all good.

Peach Butter
adapted from A Dusting of Sugar
Makes 3-4 C
Prep time: 30-40 minutes
Cook time: 60 minutes (or, if you're me, 2-3hours)
Cost: $6.85 or about $2.00/cup
(peaches: 6.50, sugar: .35)

4 lb peaches
1 C water
2 C granulated sugar
1 tsp lemon juice
1 tsp vanilla extract
1/4 tsp almond extract, optional

Peel the peaches and cut them off their pits--they just need to be in chunks; nothing neat is required.

Put peaches in a pot, add water, and cook at a steady boil until they're tender. This will take 15-20 minutes. They're ready when you can mash them with a potato masher or fork.

Puree your peaches in a blender or with a submersion blender. Return them to pot. Add lemon juice and sugar. Mix. Return to your steady, solid-but-not-too-aggressive-just-like-a-good-man-should-be boil. Stir them occasionally. By which I mean every 4-5 minutes or so. At first I was stirring every 30 seconds and I was really slowing the cooking process down.

After the peach butter has reduced a bit and is beginning to thicken, you should stir it more frequently and keep your eye on it because you don't want your lovely substance burning on the bottom of your pot. Really, you don't. You've been standing there for a while and burning it will really tick you off.

Note: While you're standing there, you can prepare your jars if you're going to can. Sterilize them in the dishwasher or by putting them in a pot of boiling water. If you're not canning, clean your kitchen or read your child a story or stare vacantly at your pile of peach peels  meditate. Whatever works for you.

As it boils and you occasionally stir, the bubbles will start to seem thick. They'll sort of hold a bit of their shape after they pop, like this bad picture, taken with my sticky hands.


At that point, you're almost done. When you can drizzle a bit over the top and that ribbon of peach butter holds its shape before dissolving into the pot, it's ready. Another good back up test: If you put it on a spoon and it holds its shape for a minute or two, it's ready. You'll see.

When it's ready...

If canning: Pour hot liquid into hot jars. Wipe off the tops and put new sealy lids on and screw the rings on. Then put them in a big pot of water (enough water to cover the jars plus 2 inches) and process (boil) for 10 minutes. Take them out, let them cool, and listen to that satisfying pop as the lids seal. It's sheer retro bliss, that sound.

If not canning, let cool just a bit and pour into containers. This is said to keep for 3 weeks in the refrigerator. I'm betting you can also freeze it like you would freezer jam.

PRINTABLE RECIPE


Thursday, July 12, 2012

No Cook Chocolate Mousse Pie

PHOTO REDO. You're welcome because this pie really needed and deserved a facelift. 


(And here's the original photo if you need it for reference. Yikes.)

Okay, so this picture was taken in haste.

Once you have licked off the beaters for this completely awesome creation, you will understand why I didn't want to wait more than 30 seconds to get to my dang pie. In fact I've now made this twice and neither time did I stop very long to really go for that perfect picture. That perfect picture was too eager to be in my mouth.

Besides being intensely good chocolate pie and intensely good chocolate mousse, this recipe requires no baking. And no cooking on the stove top either. None whatsoever. Take that 100 degree days. (If you don't take it, I sure will.)

It also takes, oh, a whopping 10 minutes to whip up the mousse. And maybe another 5 to blend up the crust. And, if you're an over-achiever, another 5 to whip some cream.

There is but one caveat. This recipe requires raw eggs. And I doubt it's possible to adapt it so as to cook the eggs and come out with the same recipe. I bummed some "farm" (backyard) fresh ones off of my friend because they were eggs that, as Tamar Adler would put it, I could trust. However, now that I've eaten this, I might wind up throwing caution to the wind and just using any old eggs I have on hand any old time I happen to need a fix. Because I'm a sick woman. (You can be too. It's easy. It's fun. It's chocolate. It's really good chocolate.)

You can make this with or without a crust. I liked it both ways (um, obviously). You can also make it extra decadent by using an Oreo cookie crust. Or you could play around with the flavors by using different types of cookies in your crust (gingersnap, Nilla Wafers, whatever).

No Bake Chocolate Mousse Pie
adapted from My Judy the Foodie
Prep time: 20 minutes
Cook time: Zip
Cost: $2.40
(crust: .85, butter: .50, sugar: .15, chocolate: .80, eggs: .10)

1 graham cracker crust
1/2 C (1 stick) unsalted butter
3/4 C sugar
2 oz. unsweetened chocolate squares
1 tsp vanilla (I think 1/4 tsp almond extract would kick butt too, but haven't tried it yet)
2 eggs

Note: Instead of vanilla, you can use 1/4 tsp almond extract, or orange extract or any other crazy flavors you want to try.

Chop chocolate into tiny bits. Melt it with 2 Tbsp butter. I did this in the microwave, stirring ever 20-30 seconds, until it was melted. Allow it to cool a bit as you prepare butter/sugar blend.

Cream remaining butter. Add sugar and blend very well.

Mix in melted chocolate (it's okay if it's warm, but it shouldn't be crazy hot). Mix in vanilla. (Your mixture may still look grainy. That's okay.)

Add eggs 1 at a time, beating 5 minutes each. (Note: This is what the original recipe instructed. I beat mine for considerably less time--probably 2-3 minutes. What's going to happen is that at a certain point your chocolate will lighten up and the mixture will become a bit thicker and stiffer. It will also become smoother and silkier. If you stop too early, you'll have an overly grainy tenxture for your mousse. I'm sorry I didn't take a picture; I was probably too busy sticking my fingers in and licking them off.) When the color of the mixture gets lighter and the texture gets firmer (and when you have a taste and it's not super sugar-grainy), you can stop beating.

Spoon it into crust and smooth it out. (P.S. You can also make this in ramekins as I did above. It's a little more hassle, but it kept me from eating the entire pie.)

Chill until it's set, about 1 hour.

Dollop with whipped cream if you wish (although it's plenty good without it).

PRINTABLE RECIPE

Tuesday, July 10, 2012

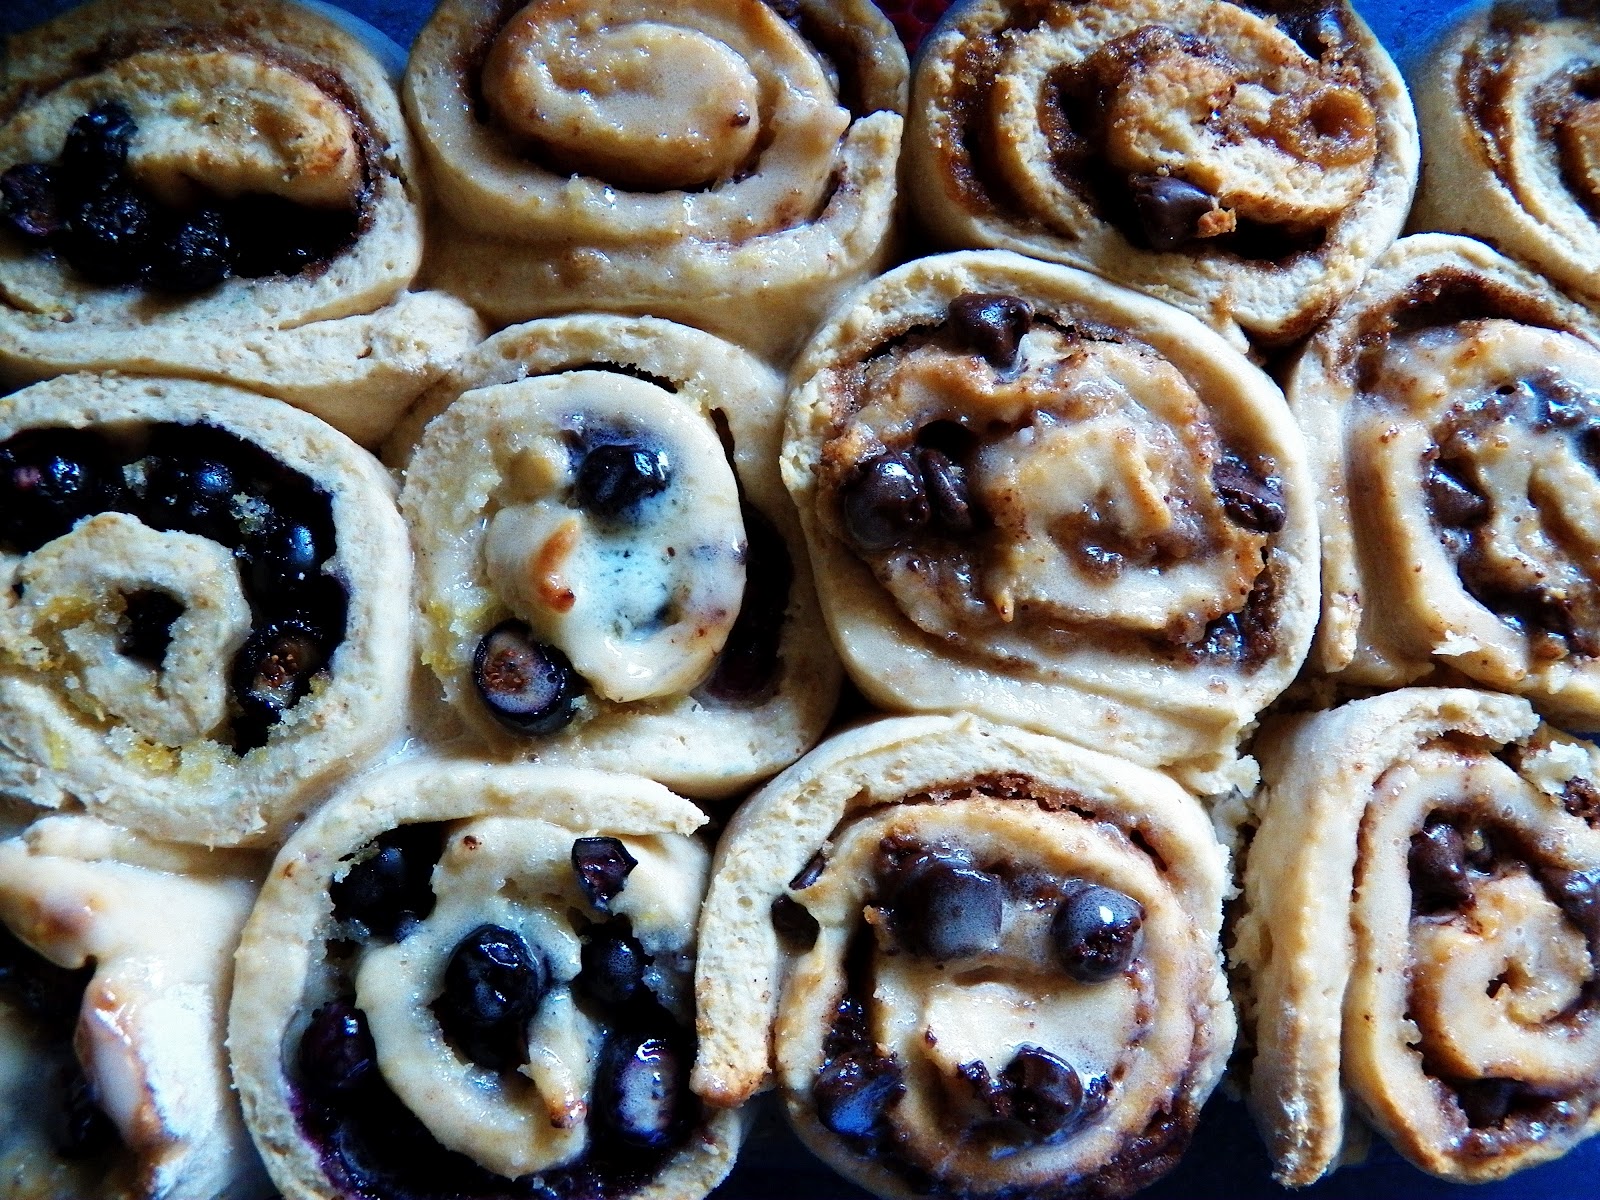
No Rise Cinnamon Rolls with Blueberry Filling


We have breakfast for dinner about once a week. Evenso, I felt a little guilty making a cinnamon roll. We usually eat the yeasty,sugary, traditional amazing kind only twice a year and it is a BIG treat. But then I found this recipe for no rise cinnamon rolls. And then I had these local blueberries. And then I justified my way into a perfectly delightful breakfast for dinner. I admit that it's a little on the sweeter end, but no worse (and probably a good deal better) than pancakes or waffles would have been (in my family, the syrup really gets slathered on). I also admit that I was incredibly skeptical about the whole no-rise thing. I assumed from the recipe that it would come out a little biscuit-like and I have yet to find my biscuit soul mate, and my kids haven't even really found their biscuit friend, so that gave me pause. But not for too long.

In the end, they came out much more like a wonderful English scone with even more wonderful fillings all wrapped up inside. My kids devoured them (though they preferred the ones without the blueberries) and I bought more ricotta just to make them again for breakfast sometime. I must tell you though, that these are not exactly like a yeasty cinnamon roll. Just don't expect them to be identical, okay.

I made some with blueberries and lemon sugar. I made some with cinnamon (and a few chocolate chips thrown in; yes, we have issues). I glazed some and not others. I loved them all.

No Rise Cinnamon Rolls with Blueberry Filling
adapted from Fashioned 4 You
Prep time: 15 minutes
Cook time: 15 minutes
Cost: $4.50 (without glaze)
ricotta: 1.00, milk: .05, sugar: .10, butter: .30, flour: .15, whole wheat flour: .10, blueberries: 2.50, lemon: .30

Dough:
3/4 C ricotta cheese
1/3 C buttermilk (or a scant 1/3 C milk with 1 tsp vinegar mixed in)
1/4 C sugar
4 Tbsp butter, melted
1 tsp vanilla
1 1/2 C all-purpose flour
1/2 C whole wheat flour (I used white whole wheat)
1 Tbsp baking powder
1/2 tsp salt (if using salted butter, reduce to 1/8 or omit)
1/4 tsp baking soda

Cinnamon Filling:
2 Tbsp butter, melted
2/3 C brown sugar (I used less)
1 1/2 tsp cinnamon

Blueberry Filling:
2 Tbsp butter, melted
2-3 C blueberries (fresh or thawed and drained)
1/4-1/2 C sugar
lemon zest

Glaze:
2 oz mascarpone cheese (you can sub cream cheese, but mascarpone is a dream and I believe a little higher in calcium)
2 Tbsp powdered sugar (the original recipe called for 1/2 C, but seriously that 2 Tbsp really did all I needed it to, especially when using mascarpone (which is creamy) instead of cream cheese (which is slightly more tangy)
1 Tbsp milk
1 tsp vanilla extract

Heat oven to 400 degrees. Grease pan. I used a 6x9 or something weird like that and had a few extra that I put in a bread pan.

For the dough:
Combine ricotta, buttermilk, sugar, melted butter, and vanilla. Process in food processor until smooth. Add flours, baking powder, salt, and baking soda and pulse until dough clumps (don't over-process it, or your dough will be tough). The dough will be soft and moist.

Dump dough onto a floured surface and knead it with floured hands 4 or 5 times. Then (adding more flour to your work surface if necessary) roll it into a 12x15 inch rectangle.

Brush the dough with the melted butter. Then add either a cinnamon or blueberry filling.

Fillings:

To make the cinnamon, just mix everything together, and then sprinkle it over the butter.

To make the blueberry, rub the zest into the sugar until it smells lemony and you think you'll faint with the loveliness of it (we used the lower amount of sugar, and that was good for me, but if you like things sweeter or have tart blueberries you might want to opt for a bit more sugar; remember the dough is slightly sweet also). Put the lemon sugar on the melted butter, then add your blueberries.

Roll your rolls up long-ways.

Cut with a sharp knife. (Original recipe says she got 8, but I got a good deal more; I assume mine were thinner.) I cut them 3/4-1 inch wide.

Put them in the pan. Let them touch a bit, but don't jam them in (remember they won't be rising, so you don't need to leave space for them to get a lot bigger, though they do grow a bit in the oven).

Bake until golden on top and firm when you touch them. Mine took about 15 minutes. If they're fatter, they'll take longer.

Make glaze if using:
Mix mascarpone, sugar, milk, and vanilla. Spread over rolls while still warm (oh, yes, do; it's so amazing).

Serve warm or cool (naturally, we went for warm as we couldn't hold back).

PRINTABLE RECIPE

LinkWithin

Related Posts Plugin for WordPress, Blogger...